How to Install Joomla : Tutorial for Beginners
Joomla is one of the most popular Content Management System available today. It is an open-source CMS based on PHP and MySQL. Let’s learn how to install Joomla.
How to install Joomla
You can download the latest package of Joomla to begin the process. I am using 3.9.1. version of Joomla.
Create a Database
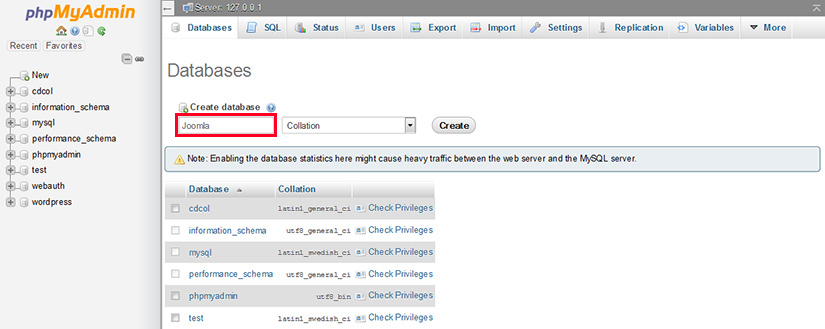
On browsing this URL- http://localhost/phpmyadmin, on localhost or visiting MHPmyAdminyou on your Joomla hosting panel will see the phpMyAdmin interface, where you can create a new database. For instance, I am using a database with the name Joomla.
Unzip Joomla zip package
First and foremost, create a new folder and name it Joomla in htdocs (though you may create the folder by any name). Extract Joomla.zip package content to this folder.
Once the extraction from the package is done, install Joomla.
For initializing the Joomla installation, browse this URL- http://localhost/joomla or yoursite.com/joomla and here you will see the Installation Page.
Main Installation Page
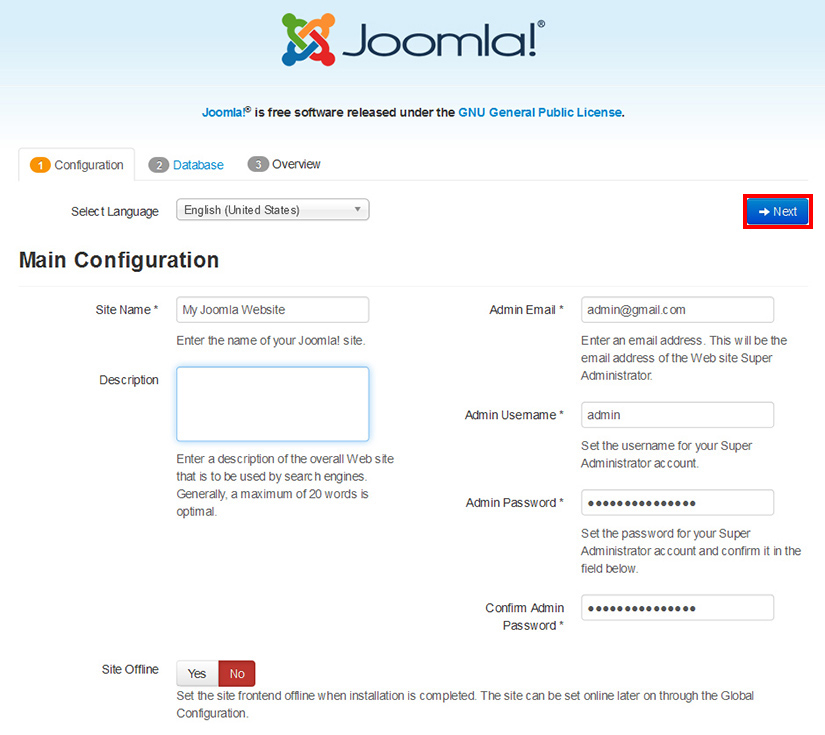
This page contains general information such as site title, site description, email address, username, and password.
Database Configuration
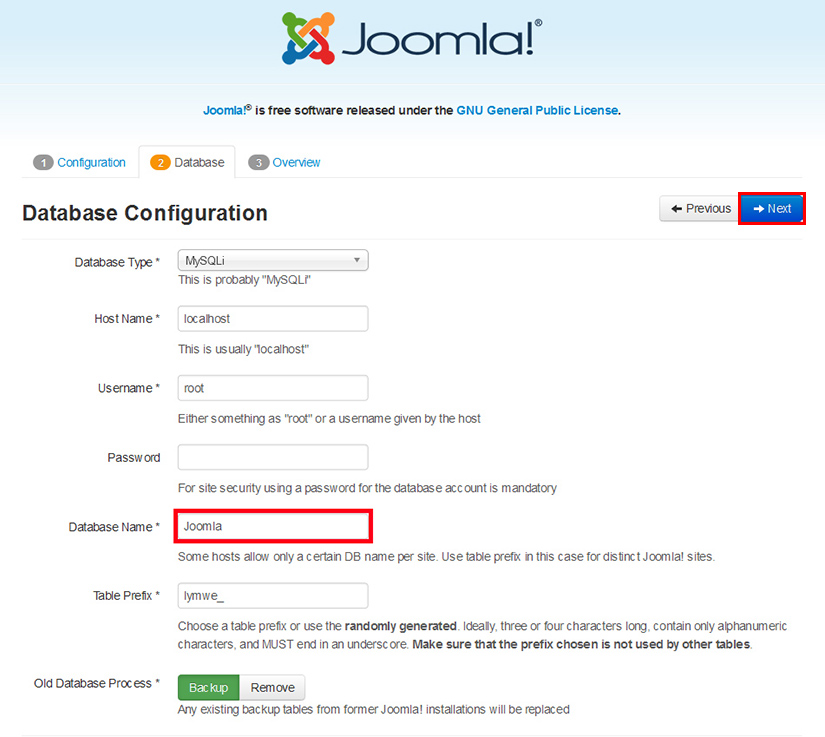
After quickly proceeding from the main configuration page, the next thing is “Database Configuration” page. The very first thing here is to select the Database type. There are three options for this-
- MySQLi
- MySQL (PDO)
- MySQL
In fact, these are the different APIs to connect to the MySQL server. And it is suggested that you should select MySQL – the default database. Moving ahead while filling the required fields. Your host is localhost. Type “root” in the username field and leave the password field blank.
Recall the name of the database that you’ve created through phpMyAdmin earlier and put that name in the required Database Name field. I have added a database with the name Joomla. And finally, in the last field, specify the table prefix or let it auto-generated. Press “Next” to move further.
Sample Data
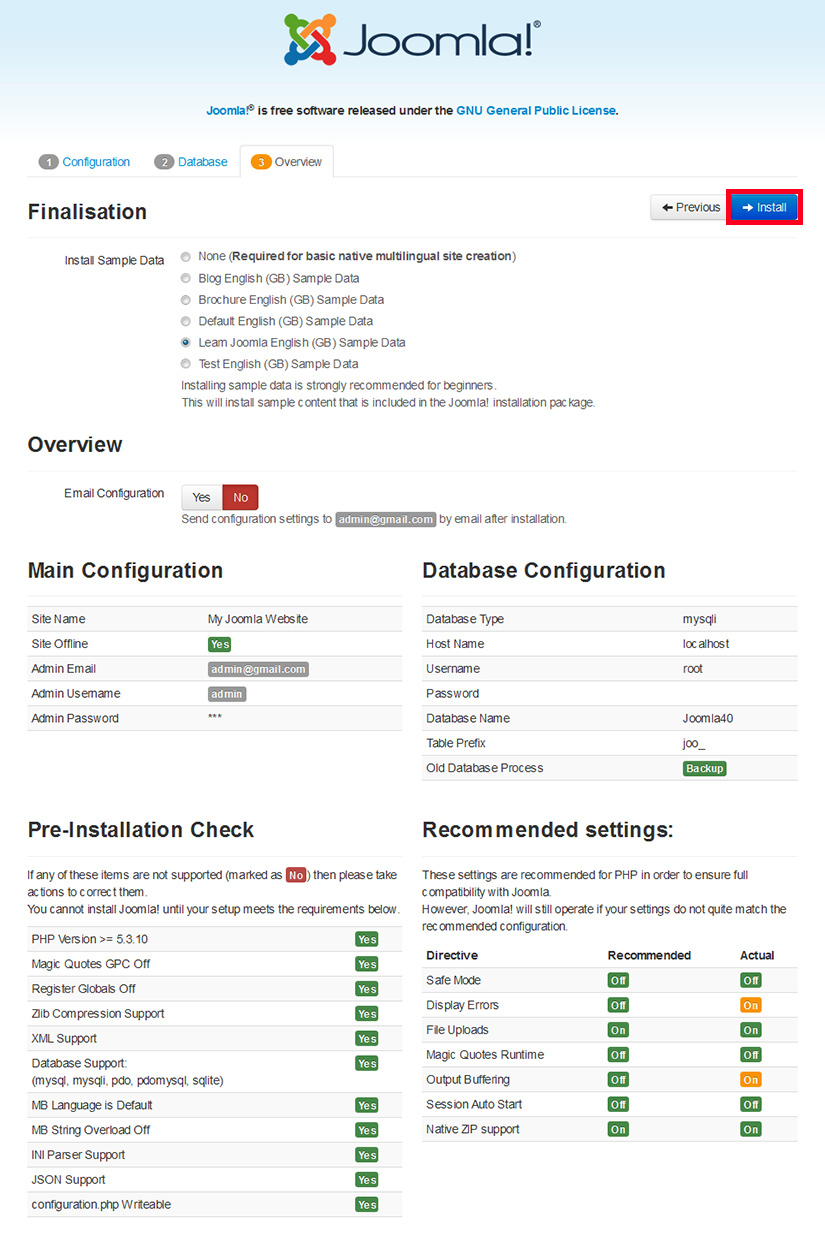
We have reached the last step of the process how to install Joomla.
On this page, choose any sample data, which will be seen on the site after you install Joomla completely. It is highly recommended to choose the default sample data as it would help you learn about basic site structure with examples.
After choosing the sample data to check if everything is correct or not. Once the overview page is completely checked click “Install” on the top right corner.
Installation Completed
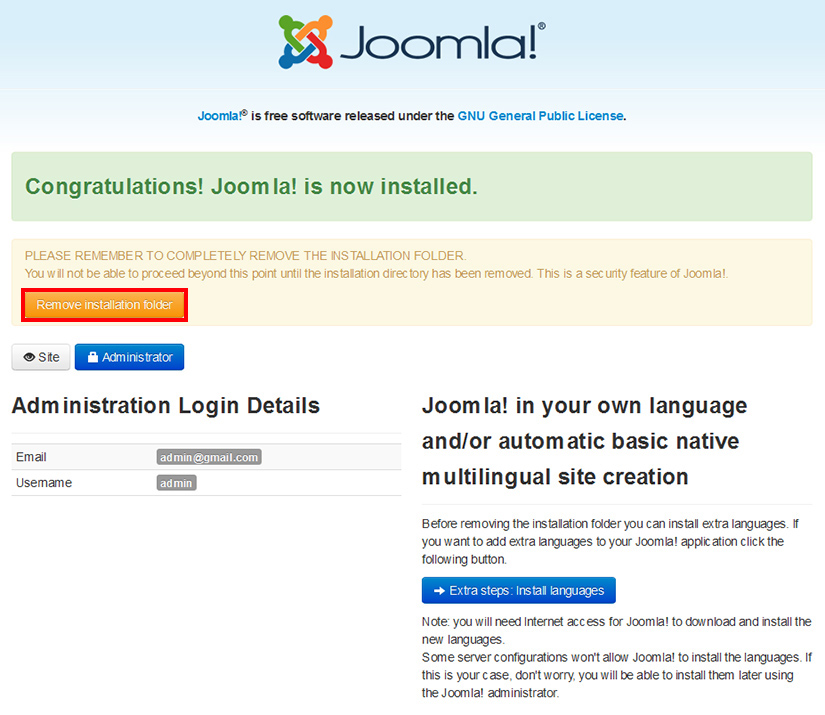
After the successful installation of Joomla, a congratulation message displays along with the reminder to delete the installation folder. Unless you press the Remove installation folder, you will not be able to browse your site.
Due to the security reasons, it is mandatory to remove the folder. Since the folder contains the crucial information so, it is required to be deleted in order to save it from any external attack. If anyone gets the access to this folder, he may overwrite the files and ruin your website.
After removing the folder, you can move to the dashboard by clicking the “Administrator” button.
How to view your website in the browser?
To browse the website, use this URL- http://localhost/Joomla/ or yoursite.com/joomla. Where I have extracted the Joomla.zip package into a Joomla folder. However, if you have given a different name to the folder, then use that folder’s name instead of Joomla.
My website looks like the following one:
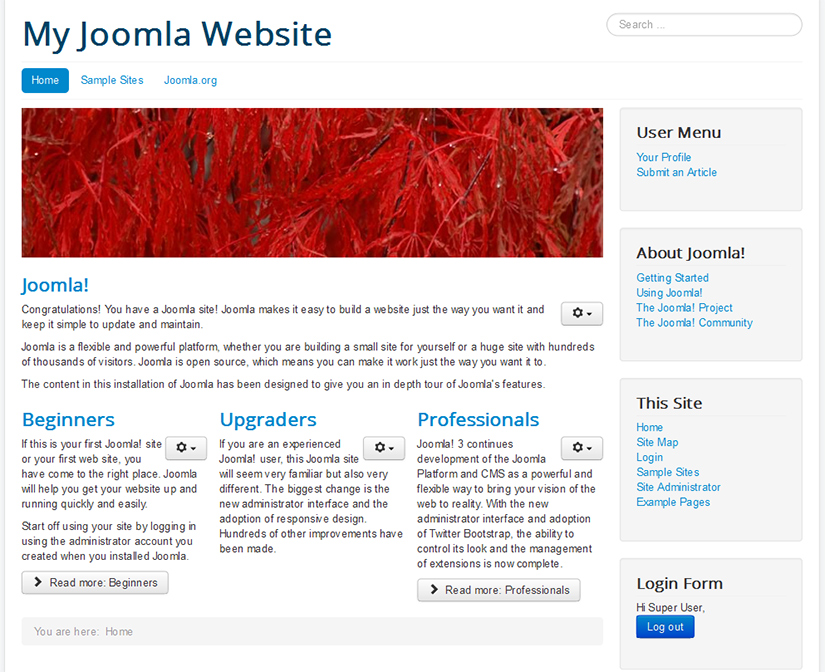
This is default Joomla template, looking very basic. You may want to use a visually appealing template for your website. You can download a stunning and matching Joomla templates from our free Joomla Templates section or you can create a professional Joomla template yourself with the help of Joomla website Creator.
How to Install Joomla Locally
XAMPP is a free local server application which is required for installing Joomla on our personal computer system. It is a collection of basic software (components) needed for running a web server. It is a good practice to install Joomla and XAMPP on your local machine first in order to learn the basics of Joomla.
And in this tutorial, I’ll guide you how to install Joomla on XAMPP and by the end of the post you’ll be able to work with Joomla even if you are an absolute beginner.
If you want to install Joomla on your Local PC you need to install XAMPP first. Here We will learn how to install XAMPP.
How to Install XAMPP
Download XAMPP for windows from apachefriends.org. Now, run the installer and initiate the setup.
Select the Components
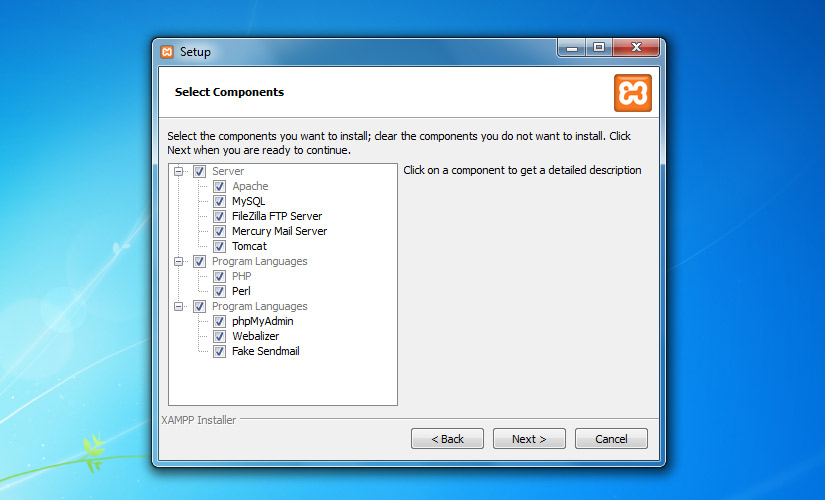
In the component wizard, all the listed components are selected by default. You can uncheck the ones that you might never use.
Let’s quickly go through the given components for better understanding.
Apache– It is the HTTP web server, essential to run the software.
MySQL– It is the database server.
FileZilla FTP server– Used for setting up an FTP server.
Mercury Mail Server– Used for setting up a mail transport system.
Tomcat– It is an application server that runs Java-based web applications.
PHP– It is a server-side scripting language used for making dynamic web pages.
Perl– This language is widely used by the programmers for writing CGI scripts.
PhpMyAdmin– It is a necessary component to handle the administration of MySQL.
Webalizer– is a web log file analyzer, which generates statistical reports about how many people visit a website and what do they look for in the website.
Fake Sendmail– Fake Sendmail is used for testing email transfer on localhost. If you are about to work on a project that involves sending emails, then this component can be a great help to you.
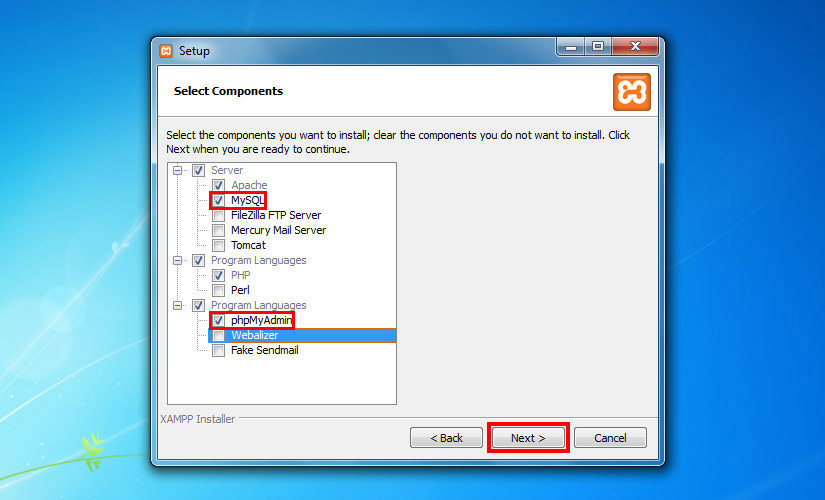
I have chosen the Apache, MySQL, PHP, and phpMyAdmin since these are fundamental requirements for installing Joomla. And I don’t need any other element therefore, I’ve unchecked them all.
Install
After selecting the elements, it is required to specify a location where you want to install XAMPP. And on the specified location, the setup can be installed.
Start Apache and MySQL
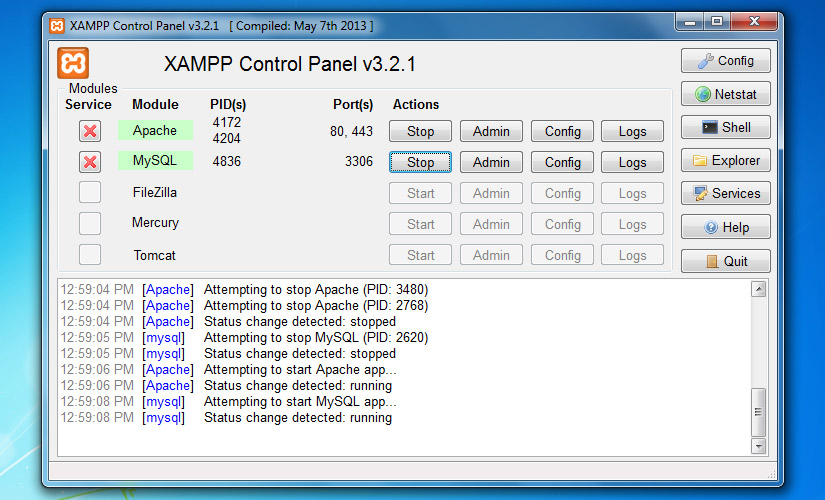
Once the installation process is completed, open XAMPP control panel. Go to the XAMPP-control.exe and launch it. The default location of XAMPP folder is C:\xampp
Having to open the control panel, start the Apache and MySQL components. Once it gets started, their Admin links will become clickable. Now, select MySQL Admin for moving ahead to phpMyAdmin. It can be opened via http: //localhost/phpmyadmin as well. You will find free Joomla templates at Templatetoaster website maker .
Let me know through the comments if you like the tutorial.
Build a Stunning Website in Minutes with TemplateToaster Website Builder
Create Your Own Website Now
Template Toaster is a very nice step by step guide. I love it.
Thank you very much.