How to Add Edit Custom CSS to Your WordPress Website
In today’s visually competitive digital space, standing out with a uniquely designed website is key. WordPress offers great themes and page builders, but often you need more control over design. That’s where custom CSS comes in. Whether you want to change button styles, hide page elements, or fine-tune font sizes, learning how to add custom CSS to your WordPress website can give you the creative freedom you need.
If you’re building your site using a WordPress Theme Creator, you’ll likely want to tweak styles beyond what the visual editor allows. Whether you Create a WordPress Theme from scratch or download one of many Free WordPress Themes, knowing how to add custom CSS is a vital skill.
In this guide, I’ll walk you through the easiest and most effective ways to add custom CSS to your WordPress site—whether you’re using classic themes or the new Full Site Editing (FSE) feature.
Table of Contents
- Introduction
- Method 1: Add Custom CSS Using the WordPress Customizer
- Method 2: Add Custom CSS Using a Plugin
- Method 3: Add Custom CSS via the Theme’s
style.cssFile - Method 4: Add Custom CSS Using a Child Theme
- Method 5: Add Custom CSS via Full Site Editing (Global Styles)
- Method 6: Add Custom CSS via Full Site Editing (Per Block Type)
- What is Custom CSS in WordPress?
- Why Add Custom CSS to Your WordPress Site?
- Best Practices for Using Custom CSS in WordPress
- Troubleshooting Custom CSS Issues
- FAQs – How to add Custom CSS on your WordPress Website
- Conslusion
Ways to Add Custom CSS in WordPress
Let’s explore the most common and efficient ways to add custom CSS to your WordPress website. Each method has its own benefits and is suited for different skill levels and project requirements.
1. Using the WordPress Customizer (Classic Themes)
This is the most beginner-friendly way to add CSS to your site without editing files or installing plugins. Available under Appearance > Customize, the Additional CSS section allows you to write and preview your code in real-time.
You can see your changes on the right preview pane instantly, which helps avoid guesswork. This method is particularly useful when making small visual adjustments, such as changing font colors, sizes, or padding. For example, if you want to increase the line height in your blog posts for better readability, just add:
.post-content p {
  line-height: 1.8;
}
After you’re satisfied with the look, just hit Publish, and the changes go live. The only downside is that these changes are often theme-dependent. If you switch themes, you might need to reapply your custom CSS.
2. Using a Custom CSS Plugin
If you’re not comfortable editing code directly in theme files or you want to ensure your custom CSS is theme-independent, CSS plugins are a great choice. These plugins offer a simple UI to add custom CSS that persists even when you switch themes.
Popular plugins like Simple Custom CSS and JS help you add custom CSS in a friendly way.
Using a plugin also helps organize your code better. You can segment CSS for different areas of your site, like the homepage, blog, or WooCommerce product pages—and manage everything from one central location. For teams, this also means multiple people can collaborate without interfering with the theme files.
3. Using a Child Theme
When you need to implement larger or permanent design changes, using a child theme is the most professional approach. A child theme inherits everything from the parent theme but lets you override only the elements you want to change—CSS, templates, and functions.
This method is especially useful for developers working on custom WordPress websites or agencies managing multiple client projects. All customizations go into the child theme’s style.css file, so even if the parent theme updates, your changes remain intact.
To create a child theme, you’ll need access to your hosting file manager or FTP. Once created, you can add your CSS and activate the child theme from the dashboard. While this requires a bit more setup, it’s the safest and most scalable method for serious design work.
4. Editing Theme Files Directly (Not Recommended)
Directly editing your theme’s style.css file is a tempting shortcut but comes with considerable risk. Whenever your theme gets updated, your changes are likely to be overwritten, and if something goes wrong, you could crash your site.
This method is best reserved for advanced users working on custom-built themes or when you’re certain the theme won’t receive further updates. If you must use this approach, make sure to backup your site and test the changes on a staging environment first.
Instead of editing the main style.css, consider using a child theme or CSS plugin to protect your customizations from future updates.
5. Using Page Builders (Elementor, WPBakery, etc.)
Modern page builders have revolutionized WordPress design by offering drag-and-drop interfaces and advanced customization features. Most of them also allow custom CSS at the widget, section, or global level.
For example in the Pro version of Elementor, you can add CSS directly to any widget or section by navigating to Advanced > Custom CSS. This is perfect for micro-customizations, like adjusting the padding on a particular button or changing the hover effect for a call-to-action box.
Keep in mind that this CSS is scoped to the specific widget or element, which keeps things neat and organized. However, if you want to apply site-wide changes, you’ll still need to use global CSS options available in the page builder’s theme settings or use a plugin.
6. Adding Custom CSS in WordPress Full Site Editing (FSE) or Block Themes
Full Site Editing (FSE) is the future of WordPress theme design that utilize Block themes. Introduced in WordPress 5.9, FSE allows users to design every part of their site using blocks—including headers, footers, and templates. However, adding CSS here works a bit differently.
Adding Custom CSS in WordPress Full Site Editing Method 1:
With the arrival of Full Site Editing (FSE) in WordPress, customizing your site’s appearance has become more accessible and user-friendly. FSE allows you to edit the entire layout and style of your website directly from the dashboard, including the ability to add custom CSS to individual block types. This method is especially helpful if you’re using a block-based theme and want to apply specific styling globally to certain blocks — like headings, images, or buttons — without affecting other parts of your theme.
Follow these steps to add custom CSS using Full Site Editing:
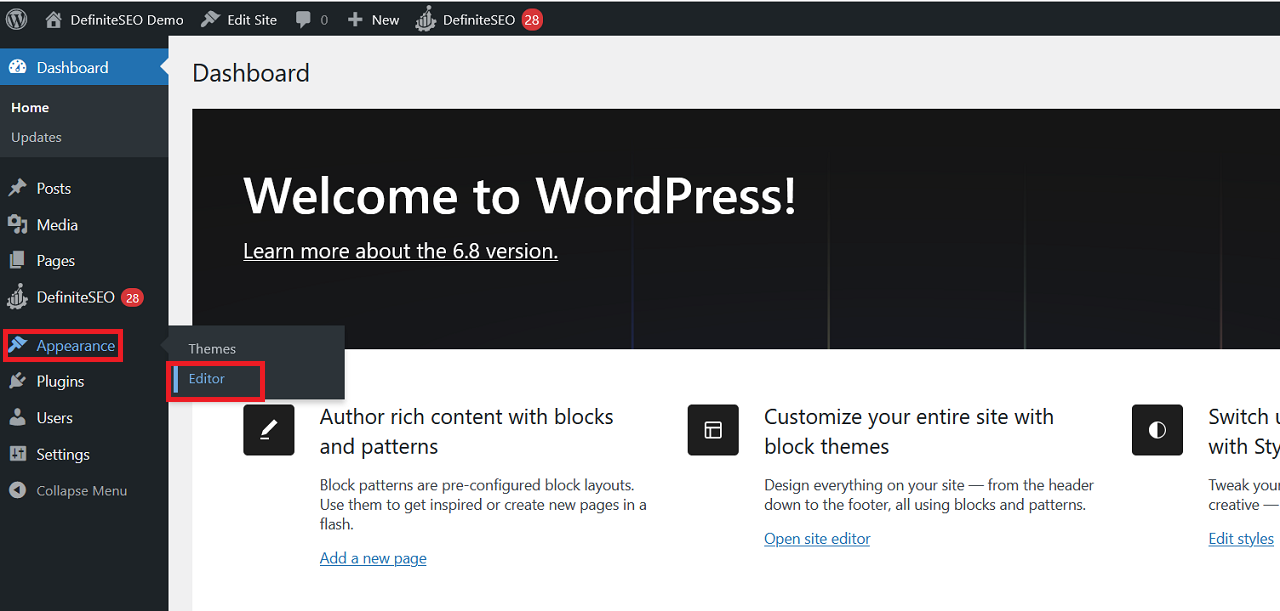
- Step 1: Log in to your WordPress dashboard.
- Step 2: Go to Appearance → Editor to launch the site editor.
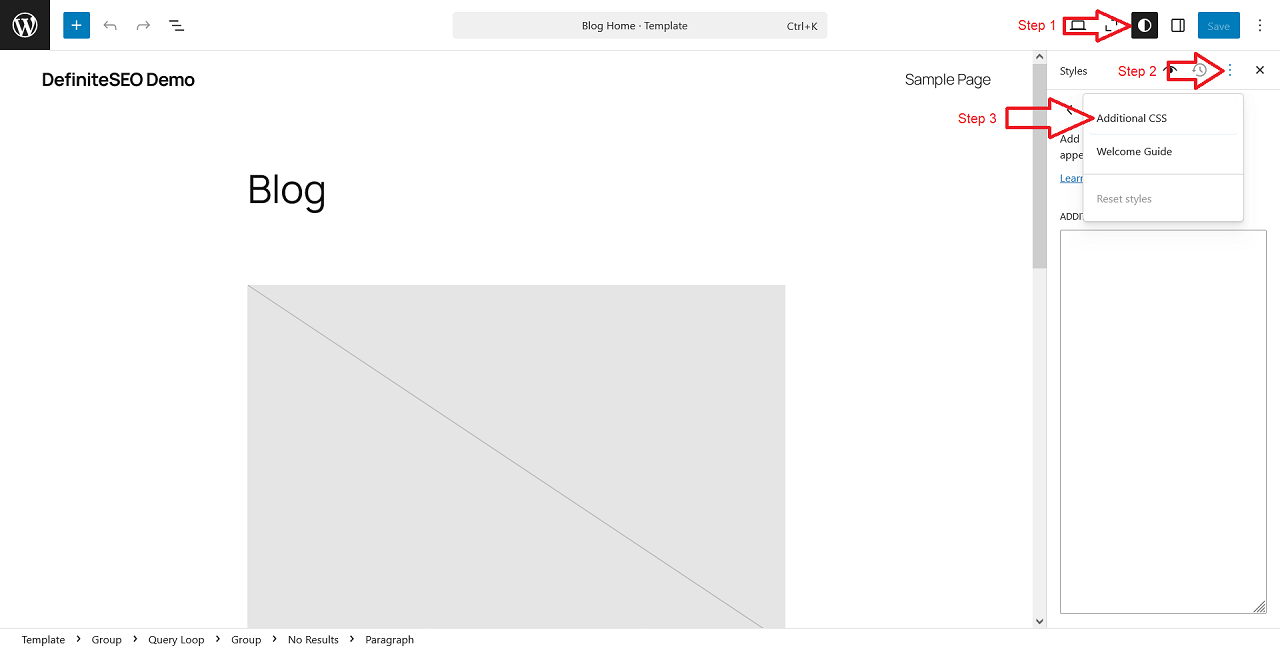
- Step 3: Click the “Styles” icon in the top-right corner of the editor.
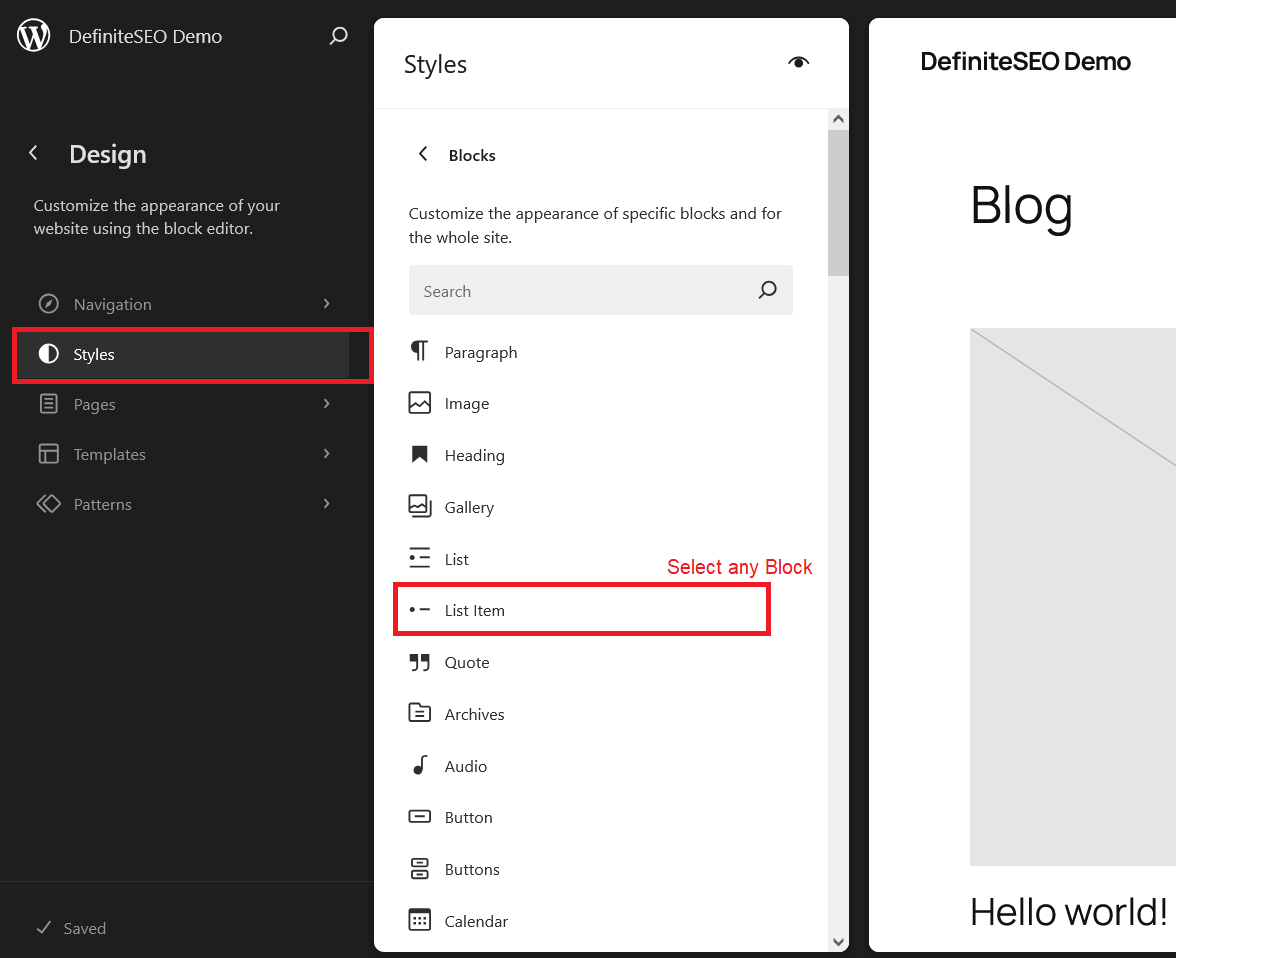
- Step 4: Select the “Blocks” section to view block-level settings.
- Step 5: Click the name of the block you wish to style globally (e.g., Paragraph, Button, etc.), or use the search bar to locate it.
- Step 6: Scroll to the bottom and click on “Advanced.”
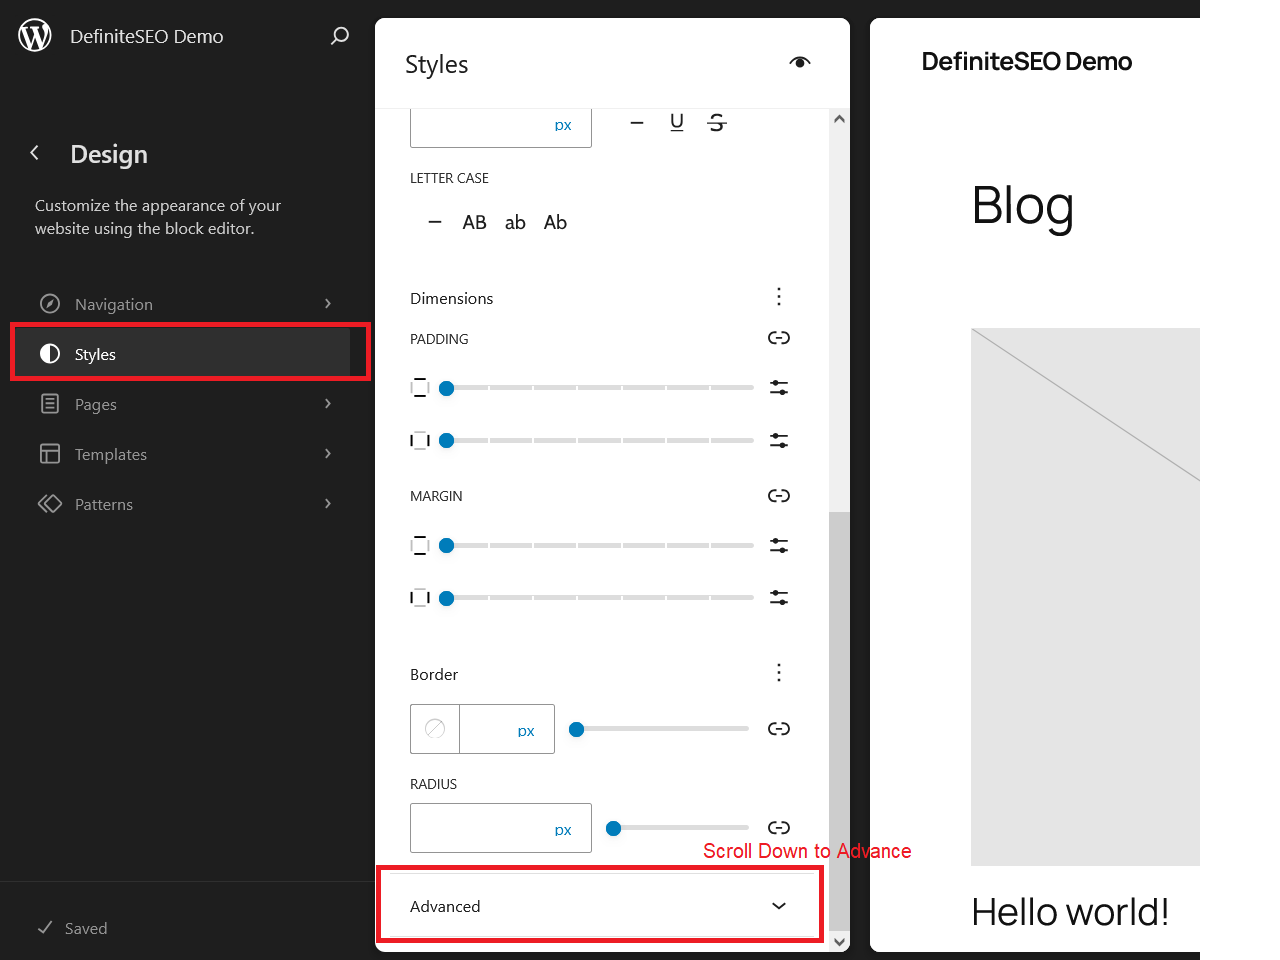
- Step 7: In the “Additional CSS” box, enter your custom CSS. You don’t need to write a selector — just input the CSS property and value (e.g.,
font-size: 18px;).
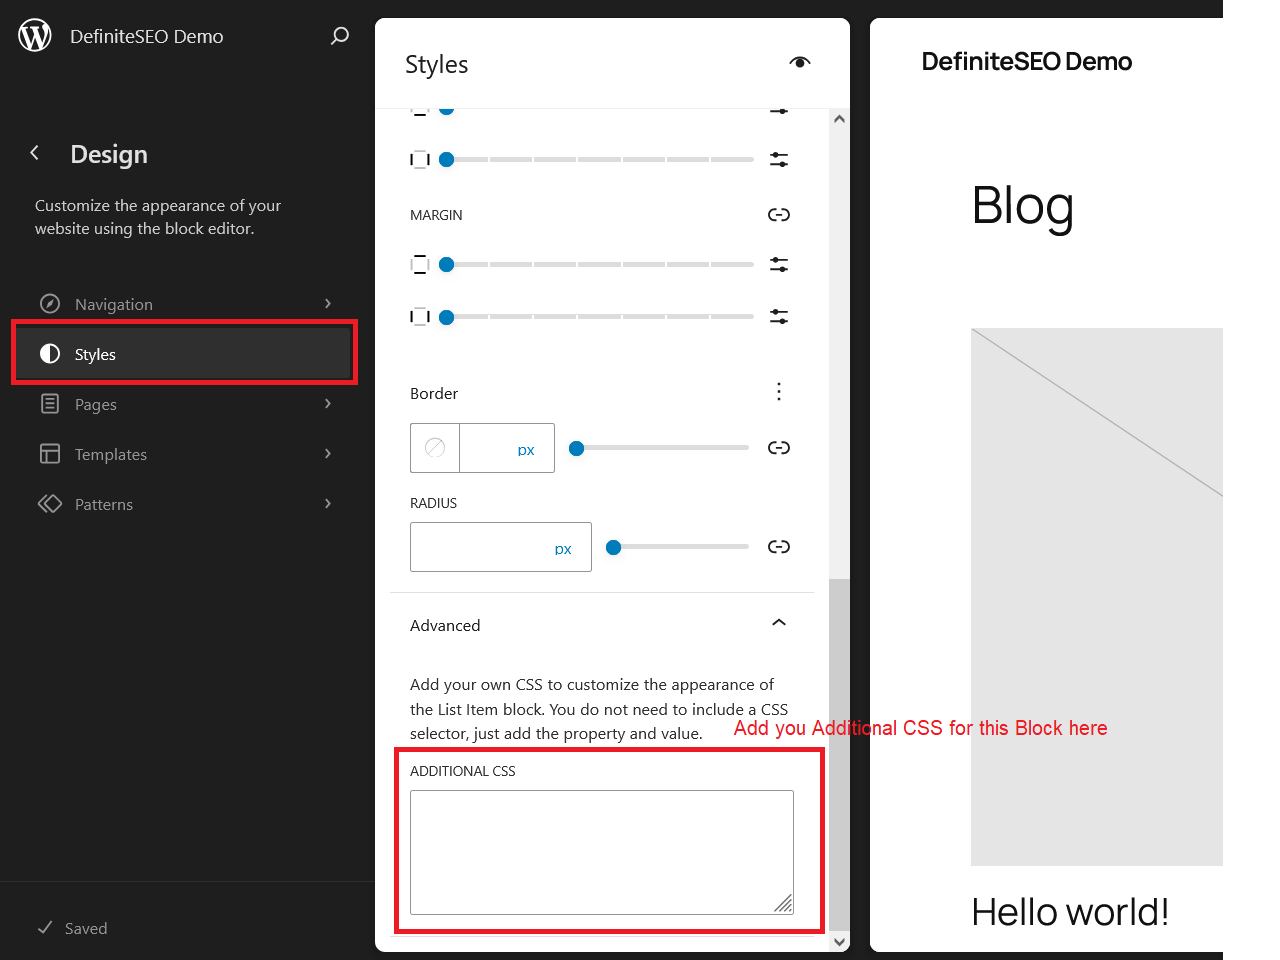
- Step 8: Click the “Save” button in the top-right corner to apply the styles across your website.
Adding Custom CSS in WordPress Full Site Editing Method 2:
To add CSS in FSE:
- Go to Appearance > Editor (only available if your theme supports FSE).
- Click the Styles icon in the top-right corner.
- Scroll down to Additional CSS.
- Paste your CSS and hit Save.
If you don’t see the Additional CSS section, your theme might not support it. In that case, revert to using a plugin or child theme. The FSE experience is still evolving, so expect differences depending on your active theme.
Custom CSS here is especially useful for overriding default block styles or tweaking patterns introduced by the theme. For instance, you could change the padding around columns or add unique hover effects to buttons without touching template files.
What is Custom CSS in WordPress?
CSS (Cascading Style Sheets) is a language used to style HTML content. In WordPress, it controls how elements like headers, buttons, menus, and sidebars appear. Custom CSS allows you to overwrite or supplement your theme’s existing styles. This means you can completely revamp how your website looks without changing the content or layout structure.
For example, if your theme displays post titles in black and you’d prefer them to appear in blue, you can easily change the color with just a few CSS styles. The beauty of custom CSS is that it gives you granular control over the design without having to depend on third-party plugins or theme updates.
With a little practice, you can modify everything from the padding around sections to the size and color of your fonts, allowing you to align your site’s appearance with your brand identity or personal preferences.
Why Add Custom CSS to Your WordPress Site?
Themes offer a base design, but they don’t always cover every design aspect you might want to tweak. Sometimes, you’ll come across a layout element that just doesn’t match your branding. That’s where custom CSS becomes your design superpower.
Let’s say you’ve installed a great WordPress theme, but the buttons are too small, or the font isn’t to your taste. Instead of searching for a new theme or installing bulky plugins, a few lines of CSS can resolve the issue instantly.
Furthermore, using custom CSS ensures your design tweaks are lightweight and don’t slow down your site. Unlike plugins, which can introduce bloat, CSS changes are lean and efficient. Plus, you avoid the risk of breaking your site when themes or plugins update. It’s an ideal method for web designers, developers, and DIY users looking for clean and quick design fixes.
Best Practices for Adding Custom CSS
Adding custom CSS is powerful, but with great power comes responsibility. Here are some best practices to ensure your code remains clean, efficient, and easy to manage:
- Use specific selectors to prevent global changes from affecting unintended elements.
- Always test responsiveness by using media queries to adapt styles across devices.
- Comment your code for clarity. This helps you or others understand the purpose of each style.
- Avoid overusing
!important, which can complicate future debugging. - Backup your site before making major CSS changes.
- Use browser developer tools (Inspect Element) to identify correct class names and test CSS live before applying.
These practices can save time, improve collaboration, and protect your site from accidental changes.
Troubleshooting Custom CSS Issues
Custom CSS not working as expected? Here are common issues and how to resolve them:
- Selectors not applying? Recheck class or ID names and make sure there are no typos.
- Caching problems? Clear your browser cache, CDN cache and any caching plugin you might be using.
- Plugin conflicts? Temporarily disable other CSS or theme-related plugins.
- Style overridden? Check if other CSS rules with higher specificity are interfering. Use the browser’s Inspect tool to find out.
- Theme limitations? Some themes restrict custom CSS or load styles late. Consider switching or using a child theme.
Persistence and patience go a long way in fine-tuning your WordPress site’s design.
FAQs on Adding Custom CSS in WordPress
Q1. Can I add custom CSS without a plugin?
Yes, use the WordPress Customizer or Full Site Editing editor (for block themes).
Q2. What happens to my custom CSS if I change my theme?
If you added CSS via the Customizer, it may be theme-specific.
Q3. Can custom CSS slow down my site?
No, unless it’s excessive or poorly written. Clean, minimal CSS won’t impact speed.
Q4. How do I remove custom CSS?
Delete the code from the section you added it (Customizer, plugin, etc.) and save changes.
Q5. Should I use a plugin or child theme for CSS?
Use plugins for quick edits; child themes for complex and permanent changes.
Conclusion
Knowing how to add custom CSS to your WordPress website unlocks endless design possibilities. Whether you’re tweaking margins or building a fully branded look, there’s a method that fits every skill level—from using the WordPress Customizer to leveraging Full Site Editing.
Start with small changes, always preview your results, and don’t be afraid to experiment. With time, you’ll gain confidence and create a uniquely styled website that stands out from the crowd.
Build a Stunning Website in Minutes with TemplateToaster Website Builder
Create Your Own Website Now
Editing CSS also changes the post?
Overall, the TemplateToaster article provides a helpful guide on how to edit CSS in WordPress. It is a good resource for anyone who wants to learn how to customize the appearance of their WordPress website.
This was so helpful. I was always afraid to touch CSS thinking I’d break something. The FSE method was new to me — super easy and clean. Thanks for such a well-explained guide.