Joomla Online Store using VirtueMart
Joomla is a very flexible content management system. It is used for websites of diverse niches. One of the popular niches for which Joomla is used is eCommerce or online stores. There are so many websites using free Joomla Templates for managing their content. The eCommerce capability of Joomla comes from extensions. The eCommerce extensions make the Joomla flexible so that users can establish their online shopping websites. In fact, it is possible to make a flexible Joomla online store by using a popular extension- VirtueMart. You can download free virtuemart templates.
Here at Templatetoaster Joomla template creator, let us together make an online shopping website using Joomla and VirtueMart.
Install Joomla
Installation of Joomla is the fundamental step of heading towards establishing a shopping website. You can install Joomla on a web host or on a localhost. A web host should be chosen when you want to develop your website online. Nowadays, almost every webhost provides “one click installation” feature, so you would do it easily.
If you want to make your website offline, then, you can use a local host. The most used localhost is XAMPP. You can install XAMPP on your PC for developing your website locally. Once you install XAMPP, you can install Joomla. You can learn installing XAMPP and Joomla locally from our previous blog post.
Install VirtueMart
VirtueMart is an open-source eCommerce solution designed for Joomla to offer an excellent Shopping cart. However, it is much more than just shopping cart. n fact, it is a complete eCommerce solution that can be used with Joomla. It is written using PHP and offers further components like galleries, forums, FAQs, and more.
After successful installation of Joomla, head towards VirtueMart installation. We are going to demonstrate you the VirtueMart installation in seven steps.
- Download VirtueMart latest version.
- Extract the downloaded package. You must get following three files after this.
- 3.0.9- this directory is the VirtueMart cart itself.
- 3.0.9_ext_aio- this directory contains the vital plugins and modules of VirtueMart.
- 0.0- this directory is useful for making PDF invoices.
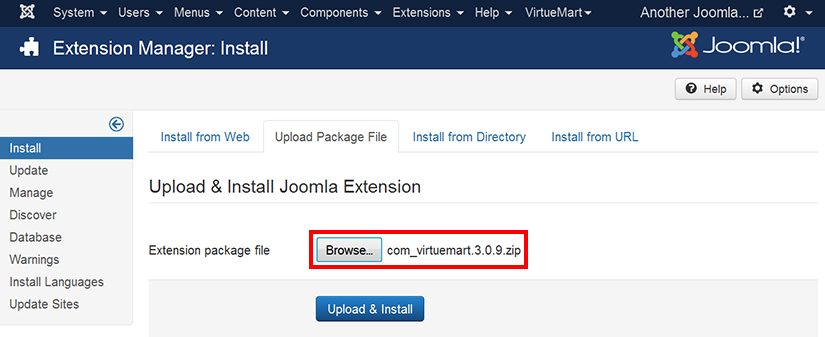
- Visit your Joomla admin dashboard for installing this extension. Go to Extensions–>Extension Manager–>Upload Package File–> locate com_virtuemart3.0.9.zip–> click Upload & Install. If you do it right then, you will see the success message in a split of second. Yet, VirtueMart is not fully installed. There is one more step to install it completely.
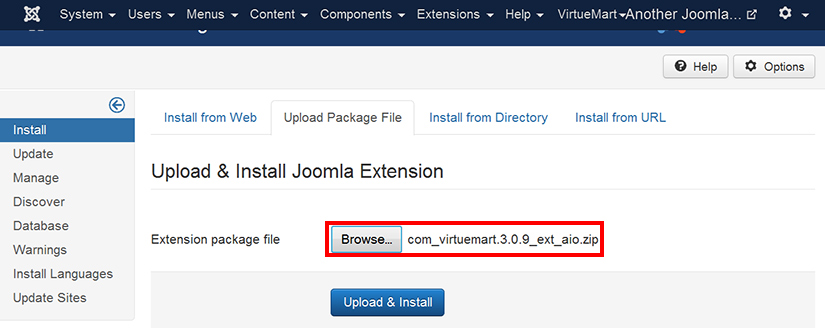
- Again, go to Extension–>Extension Manager–> Upload Package File–>locate com_virtuemart.3.0.9_ext_aio–> click Upload & Install.
- If you do it right, then again, you will see a success message. You will also be prompted to install the sample data. Installing sample data is always advised as it helps understanding better the working of software.
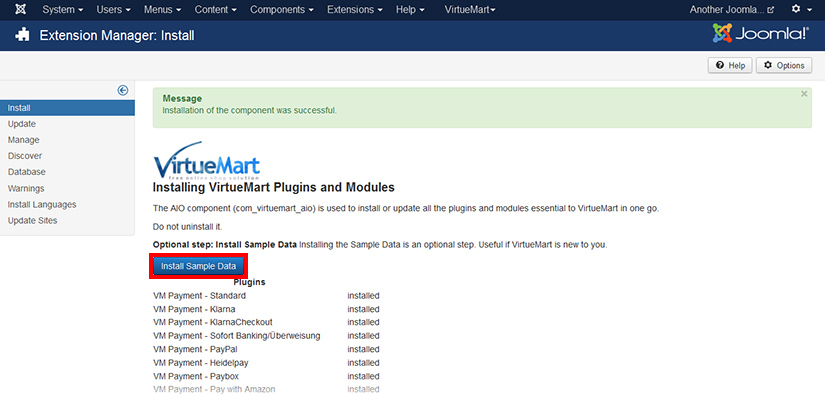
- Congratulations! VirtueMart has been installed. You can see a new item with the name “VirtueMart” added in the admin menu across the top.
- Yet one more step to take is to install the com_tcpdf_1.0.0 file. Install it in the way the other files are done.
Steps to Create the Storefront
- Creating a Menu Item for displaying the shopfront on the site.
- Modifying information of shopfront.
- Making a product category.
- Adding products to the product category.
- Configuring a payment method
- Knowing advanced configuration options for shopfront.
Create a Menu Item
Go to Menus–> New Menu–>Add New Menu Item. Give a title to the menu and select the menu item type.
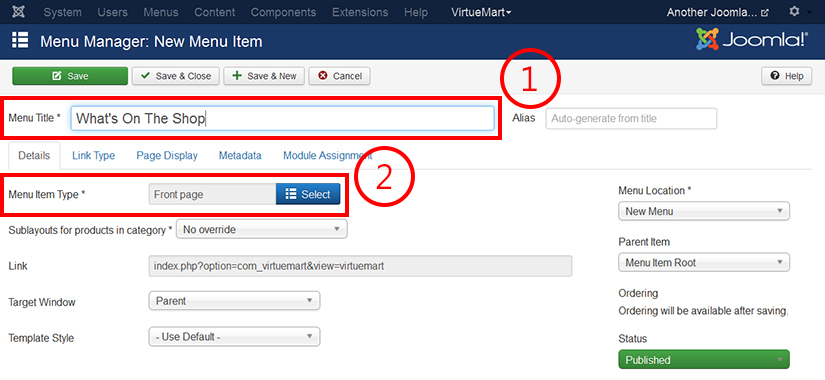
When you’ll click to select the menu item type, a pop up containing several types will be shown to you. From the VirtueMart category, select any item you want to display in the menu of your website. Save and close after selecting the menu item type.
For your demonstration, we choose “Front page”.
Modify Your Store’s Information
Go to VirtueMart–>Shop. Herein, you can add vendor (your own) information, choose the currencies, set the shop logo, change the content of the front page, define terms of service, describe legal information, and describe the Meta information such as custom page title, meta keywords, meta description, etc.
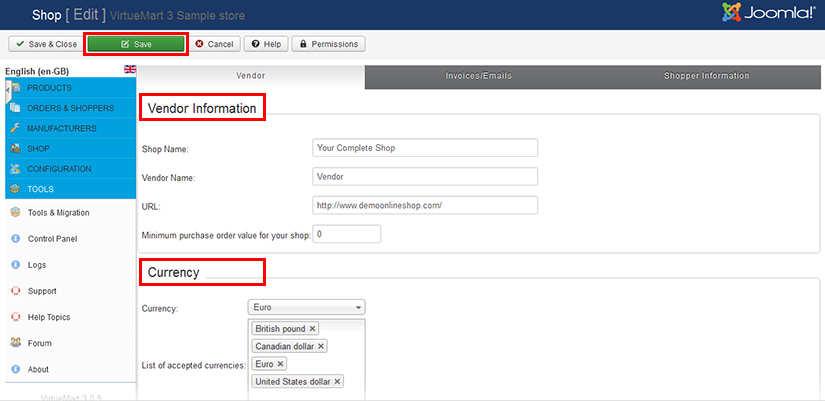
On the same page, you can switch to Invoices/Emails section for setting up invoices. You can customize the geometry and appearance of the invoice; and add custom words in the invoice header and footer. Then, the next section is available for describing shopper information, shipping addresses, and bill-to information.
Make a Product Category
For adding a new product category, go to VirtueMart–> Product Categories–>New. As a result, you will see a form. Put the information pertaining to the new category you are creating. Aside from general information, you can also add Meta information of category. For your illustration, we are making a new category of sunglasses.
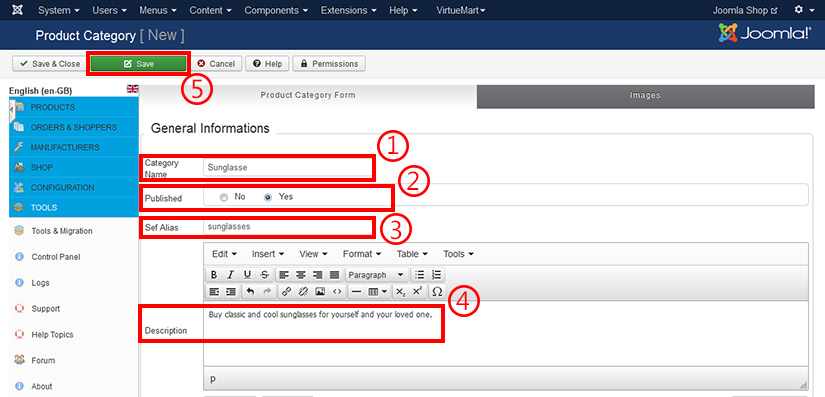
We put the category name at first. Then, change the published status to Yes. Give the Sef (search engine friendly) alias and write the description. In the end, “Save” the category.
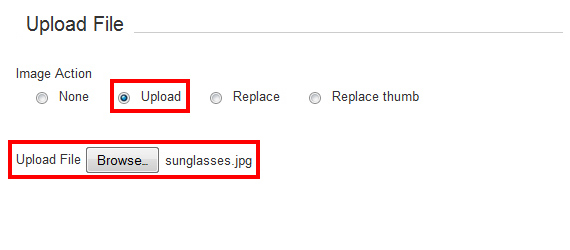
Now to apply an image for the category, switch to the adjacent tab that is “Images”. Go to the “Upload file section”. Select “Upload” image action and browse the image, and save the settings.
Add Products to the Category
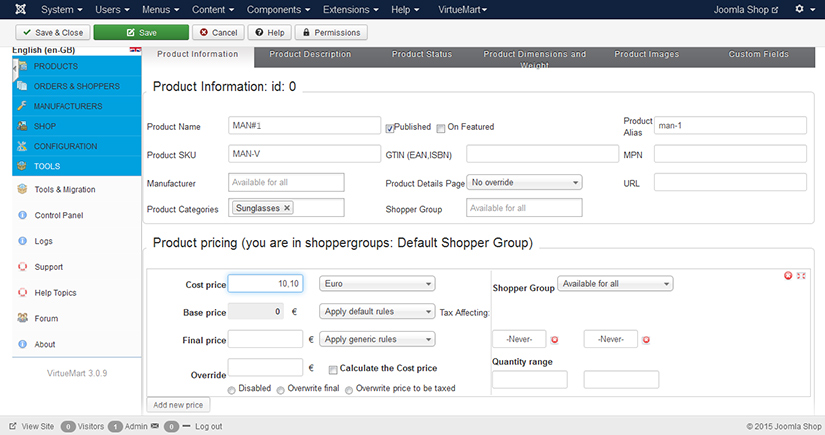
For adding the products into the category, go to VirtueMart–>Products–>New.
Enter product name, select the product category (an interesting thing is that you can select more than one categories for a single product), and enter the price. “Save” the information.
Switch to the “Product Images” tab for adding an image of the product. Upload the product image and click “save”. This process is same as we told you in case of adding an image for the product category.
Repeat this process until you upload all the products: click new->add products information->click save->switch to “product images” tab->upload image->Save.
Configure Payment Method
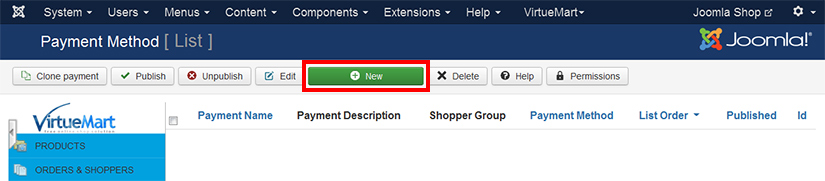
Go to VirtueMart–> Payment Methods.
Going this way will lead you to the payment gateway configuration options. Therein, you’ll see no default payment method configured your site. To configure it yourself, click “New”.
As you click New for adding a payment method, you see a new wizard wherein you need to put the information as to payment method and choose the method.
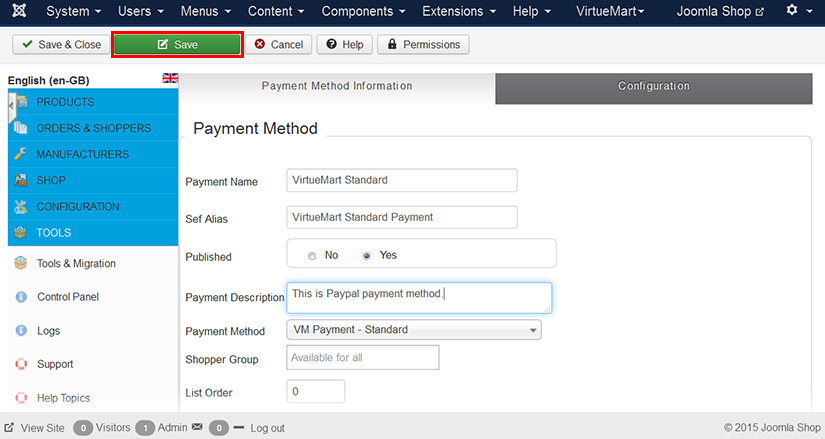
Give a name to the payment method, let us say “VirtueMart Standard” as we are demonstrating you to setting up the standard payment gateway. Then, give Sef Alias, which generates search engine friendly URL. Change the published status from No to Yes. You may describe the payment method in the next text field. Select the payment method; you may leave the next fields default.
Do remember to save these settings in the last, and switch to “Configuration” tab.
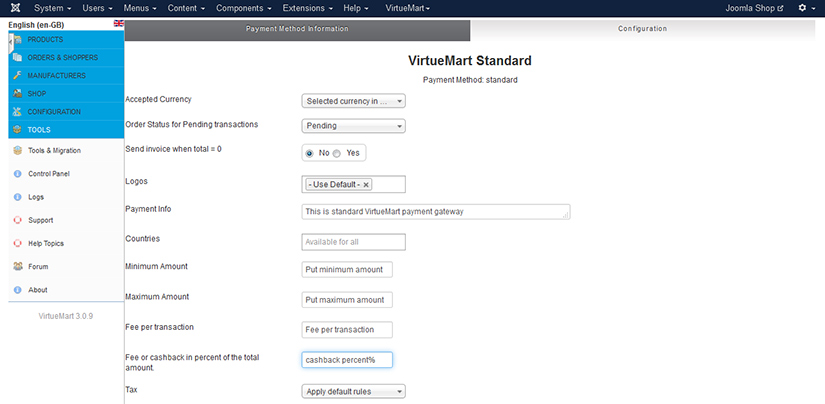
From this tab, you can configure the payment gateway. Select the accepted currency from the drop-down. The drop-down shows you those currencies that you choose while modifying your store’s information. You may select “selected currency in the currency module” so as to accept the currency chosen by the buyer. The rest of the options are to set the logo, select the countries in which you want the payment method available, set the minimum and maximum amount for using the payment method, set the fee to be charged on each transaction, and apply the tax rules.
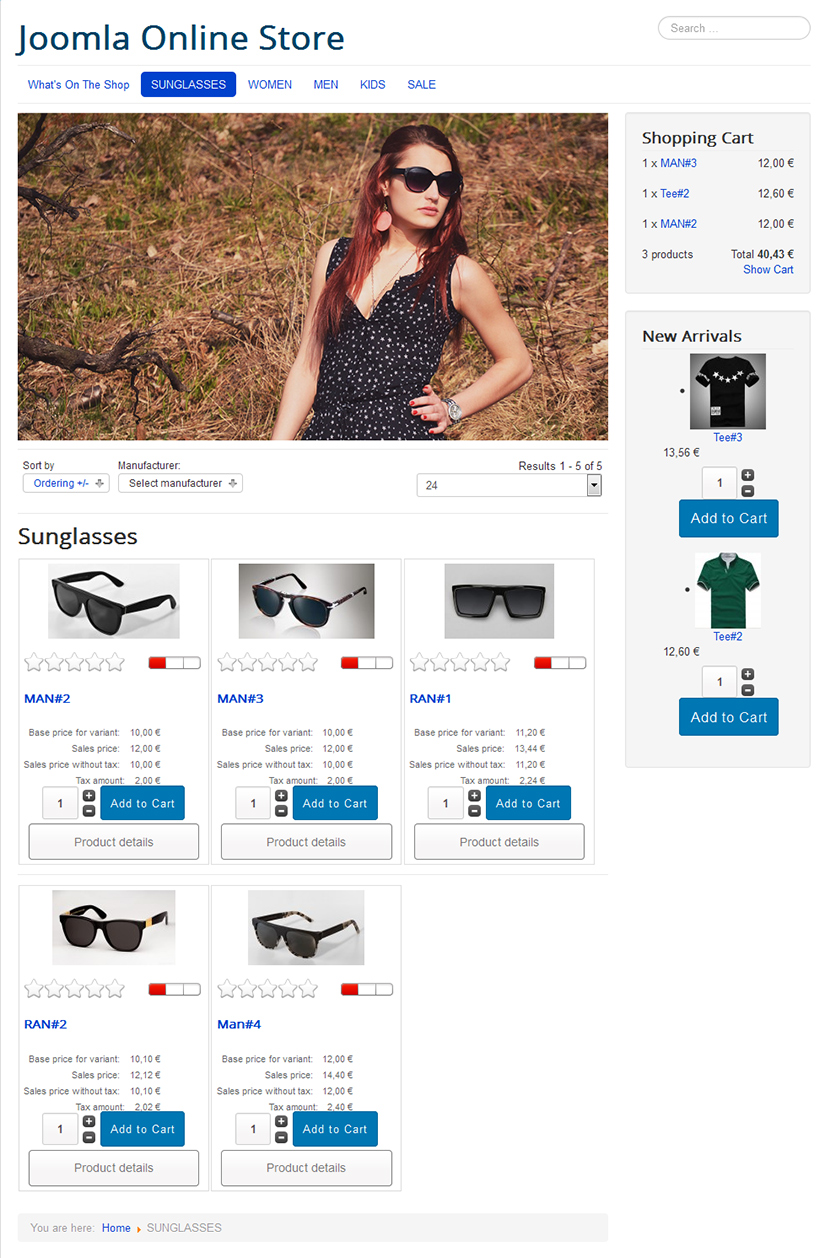
Here’s our shopfront display after doing all of the above settings.
Advanced Configuration of Store
You can do more settings for the store. Go to VirtueMart–> Configuration.
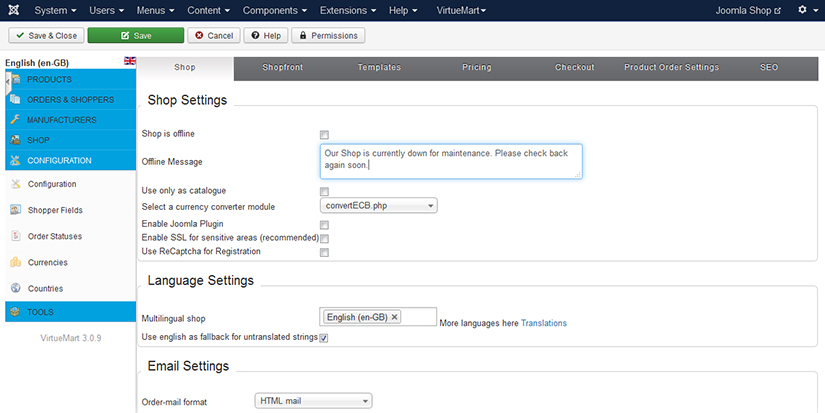
Exhaustive settings are given by the VirtueMart therein, which are categorized in seven tabs, “Shop”, “Shopfront”, “Templates”, and “Pricing”, “Checkout”, “Product Order Settings” and “SEO”. If you find the settings overwhelming, you may leave the default settings as it is.
For language settings and order-email settings, go to “Shop” tab.
For selecting what action to take if a product is out of stock; and modifying shopper review and rating system, go to “Shopfront” tab.
To modify the storefront layout, go to “Templates” tab.
For pricing configuration, go to “Pricing” tab.
To modify the checkout page settings, go to “Checkout” tab.
For the sorting settings of products, go to “Product Order Settings” tab.
This is it for this tutorial. We would welcome your recommendation, suggestion and queries dropped in the comment area. Check out best Joomla hosting providers.
Would you like the default design for your own storefront? Most probably, you would prefer a custom design over default design for your store. Download TemplateToaster by now and start making a Joomla template of your imagination for your online store. Templatetoaster offline website builder software is the finest template generator that will let you make a website without coding.
Build a Stunning Website in Minutes with TemplateToaster Website Builder
Create Your Own Website Now