How To Create Submenus in Joomla 3.4

The menus help to organize the content of the website. When you have a lot of content on your website, it is a good idea that you organize it using submenus. Earlier we have described you creating and displaying menus in the Joomla content management system. In this article, we are going to describe you to create a submenu in Joomla website and you can also download free Joomla templates. If you are new to our tutorial series, you may read our Joomla hosting and previous articles to get the learning started from the beginning.
Henceforth, here at Templatetoaster Joomla template creator showcases the steps to create the submenus.
Step 1. Navigate to Menus

I are showing you to create a new menu item inside the Main Menu, which comes preloaded with the sample data while installing Joomla.
In the menu of Joomla administration panel, go to Menus –> Main Menu –> Add New Menu Item.
You can access the same options from the left sidebar of the administration page as well.
Step 2. Create A Menu Item
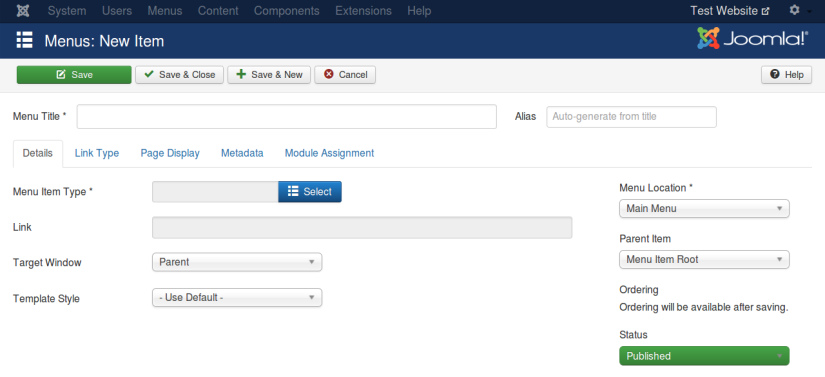
Above screen will appear on clicking “Add New Menu Item”. On this page, you will need to fill up the necessary fields to create a menu item. You can see our previous article to know about each option offered on this page. For the sake of this article, I will explain you the main options only.
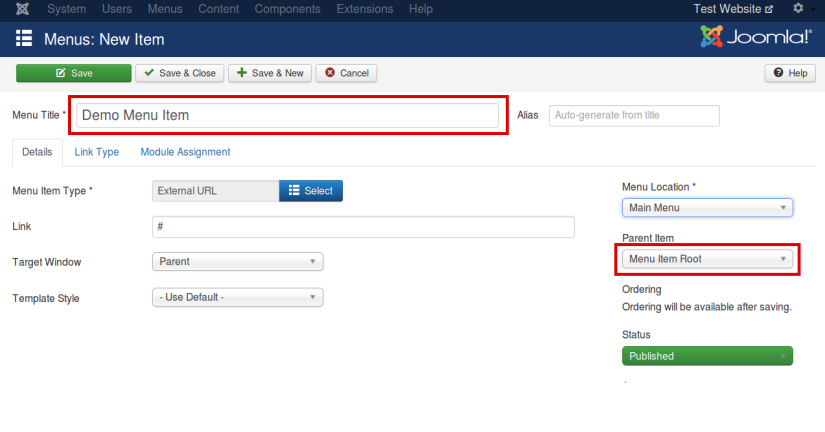
For illustration purpose, we’ve created a new menu item with the title “Demo Menu Item”. After giving a title to the menu, we need to select Menu Item Type. We want our Demo Menu Item to be an empty item so that it would contain submenu items. Therefore, I select System Links–>External URL. And, put “#” in the link field.
Notice the options on the right part of the page. You can see the Menu Location, which is Main Menu (comes with the sample data). It can be changed if you require so. Just beneath the Menu Location, the option to select the Parent Item is given. By default it remains “Menu Item Root”. That means the item you are creating will be a top-level item. After clicking Save & Close option, we visit our site. And, see the new menu item added in the menu of the site.
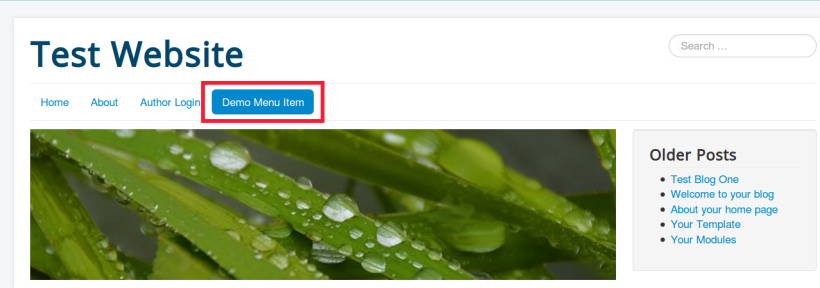
Step 3. Create Submenu Items
Now, I am creating the submenu items. The whole process of creating the submenu item is same as that of creating a menu item, except one step, which is to choose the Parent Item. When you will select “Parent Item” option, a drop down list that includes all the menu items of the particular Menu Location will be shown to you. Select the menu item in which you want to add the submenu.
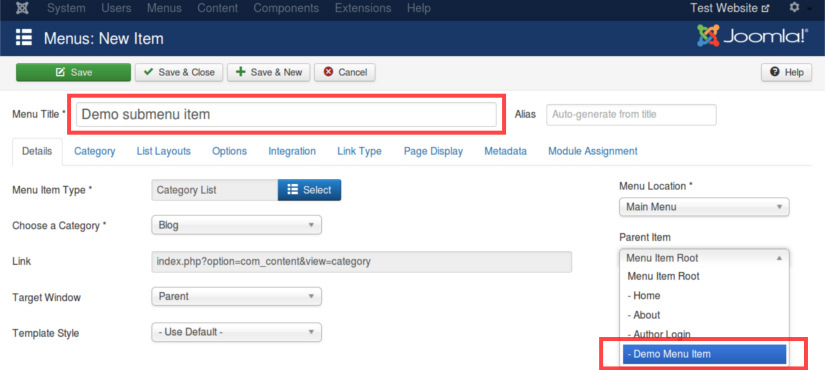
In our case, we have selected the “Demo Menu Item”, created in previous step. You can repeat this process as many times as the number of submenu items you want to add. I have created and added three submenu items to our demo menu item. Have a glance at following image to know how the submenu looks like on the site.
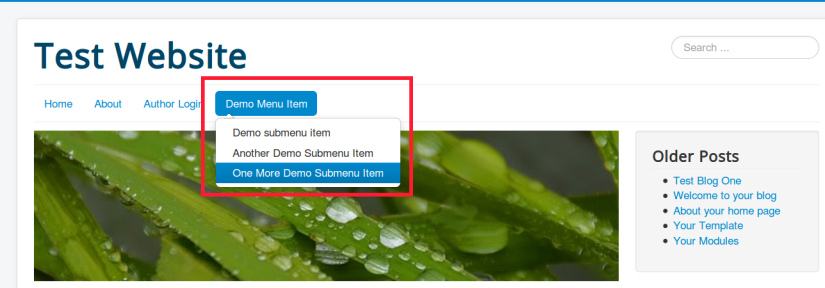
You can add another level in the hierarchy of the menu. The process is same. Create a menu item by filling up the required fields and select the Parent Item as shown below.
Well, this is not it! Yet we need to enable the display of submenu on the website.
Step 4. Enable “Show sub-menu Items”
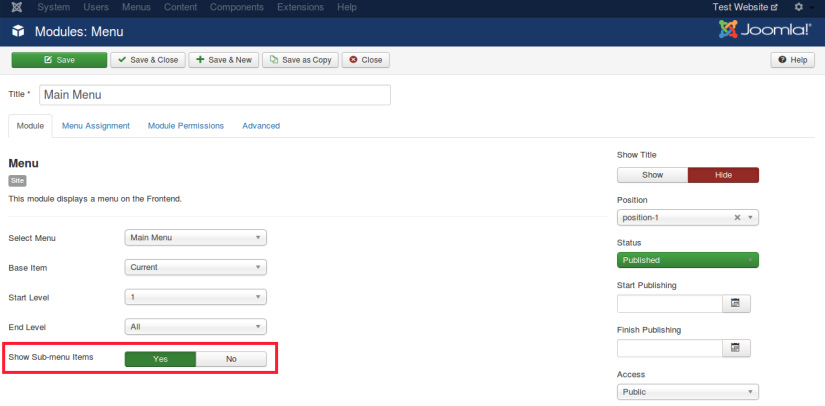
Joomla doesn’t display submenu items by default We have to enable the option in order to display submenu items on the website.
For doing this, go to the Menus –> Manage. Select the linked module of Main Menu to edit its settings.
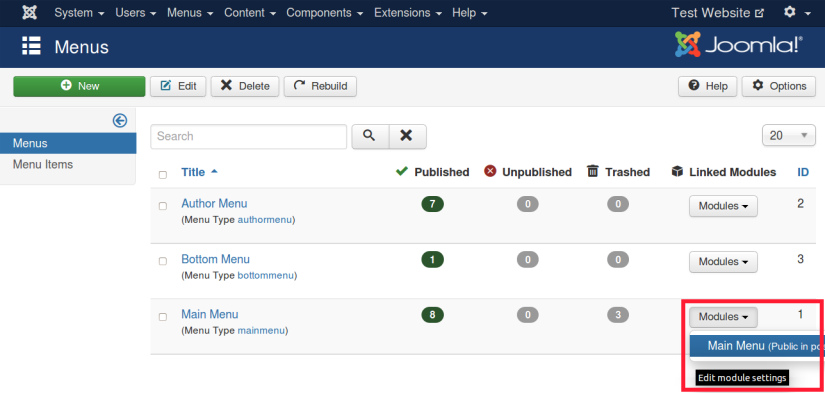
You will see the module editing screen like the image below. From this screen, turn the “Show sub-menu items” option to “Yes”. Save & Close the settings.
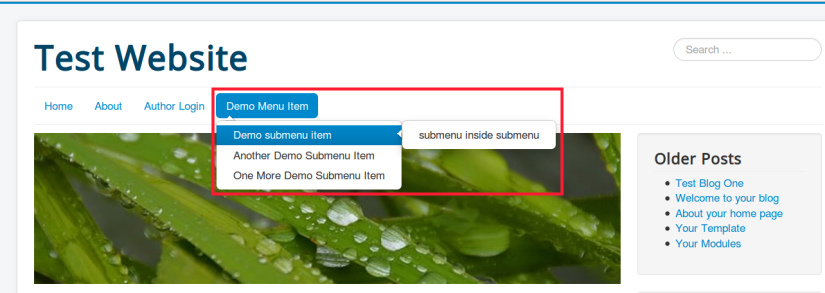
After this, you can see the “sub” level of the submenu on the site. Following image shows our hierarchical menu on website. And, that is it.
Digest of the Tutorial
I have given a four steps tutorial to create the hierarchical submenus in Joomla. The version of Joomla is the most latest i.e. Joomla 3.4.4. In the very first step, we created a menu item inside the main menu of the site. For your demonstration, we titled the menu items as “Demo Menu Item”.
In the second step, we created some more menu items and set the “Demo Menu Item” as their Parent Item. In the next step, we demonstrated you to create a further level of submenu. For this, the second step was repeated with Parent Item as the submenu item created in step 2. In the fourth and last step, I edited the corresponding module of the menu to enable the display of submenu items on the site.
I hope that you’ve learned to create submenus in Joomla. If you’ve any query regarding the menus or submenus, you may drop us a comment. I will certainly chime in with the answer.
Build a Stunning Website in Minutes with TemplateToaster Website Builder
Create Your Own Website Now