7 Easy Ways to Install WordPress: Step-by-Step Guide
Learning How to Install WordPress is one of the most cost-effective ways to set up a website yourself. This guide will walk you through every step of installing WordPress, ensuring a smooth setup so you can get your website up and running quickly.
Before diving into the steps for How to Install WordPress, it’s helpful to understand the flexibility WordPress offers, and how you can customize your site to fit your needs. Tools like a WordPress Theme Builder make it easy to customize the look and feel of your site. Alternatively, if you want to learn How to create a WordPress Theme, WordPress provides ample resources for doing so. For those seeking ready-made options, you can also explore a variety of Free WordPress Themes to quickly get started. Once your WordPress site is installed, you’ll have complete control over its visual style and functionality, allowing you to create a unique online presence tailored to your goals.

- How to install WordPress on Bluehost?
- How to install WordPress on SiteGround?
- How to install WordPress using Softaculous?
- How to install WordPress using Bitnami?
- How to install WordPress using FTP?
- How to install WordPress on Windows?
- How to install WordPress on Google Cloud?
How to Install WordPress: The 7 Ways
How to Install WordPress on Bluehost?
Bluehost is the most popular and widely used web hosting provider in the industry. Moreover, it is officially endorsed by WordPress.org itself because of the WordPress compatible features it offers.
Here is a step-by-step guide to install WordPress on Bluehost with Marketplace
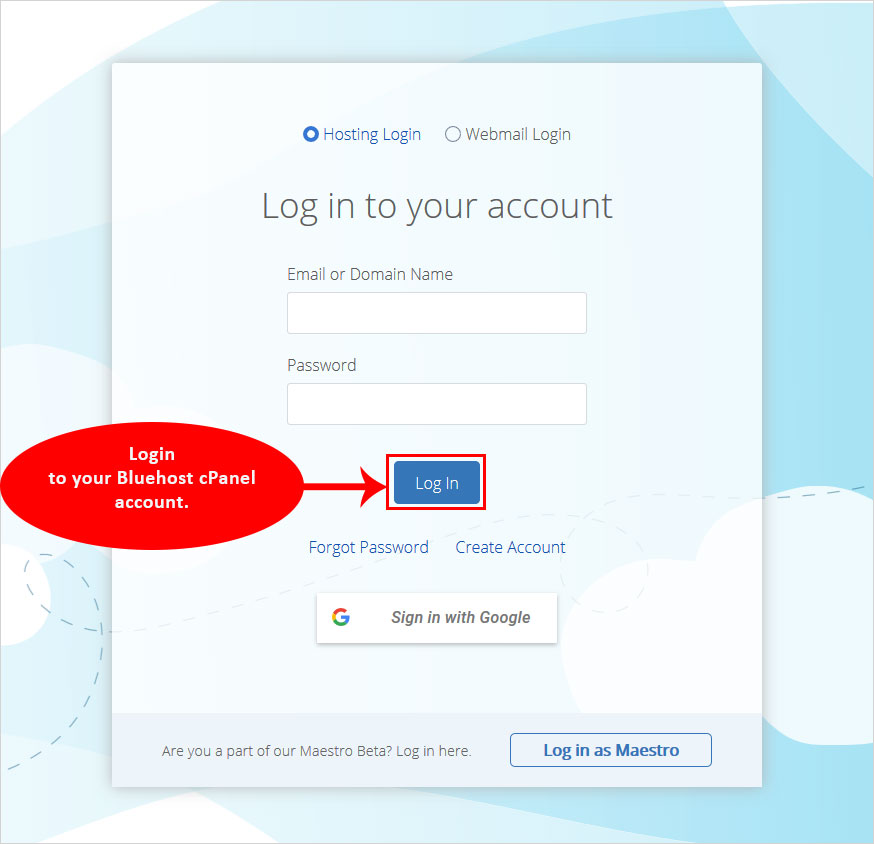
- Login to your Bluehost cPanel Account.

- Navigate to the Website section and select the Install WordPress option.

- Click on the Install button.
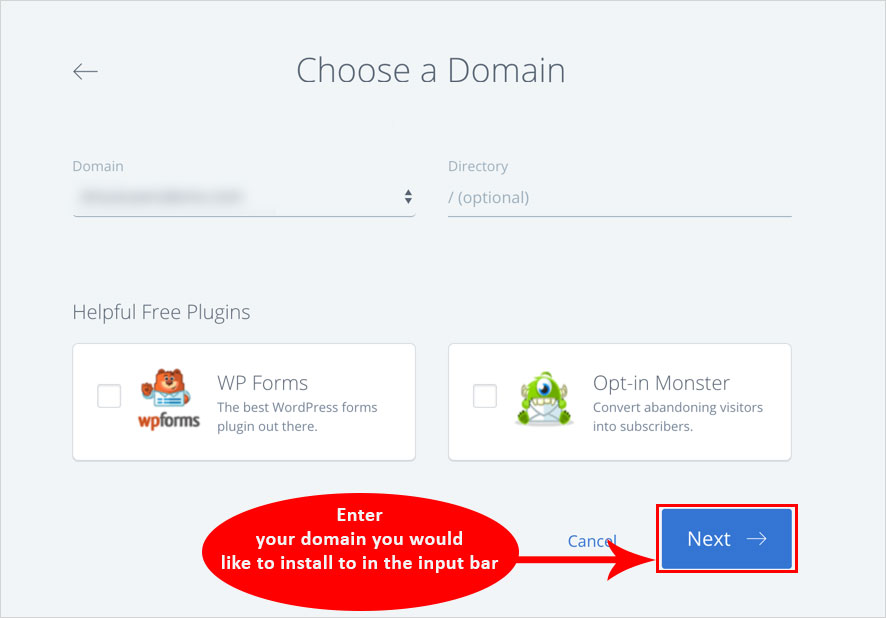
- After that, choose the domain name to install it to. It also allows you to add a subfolder, but it is optional.

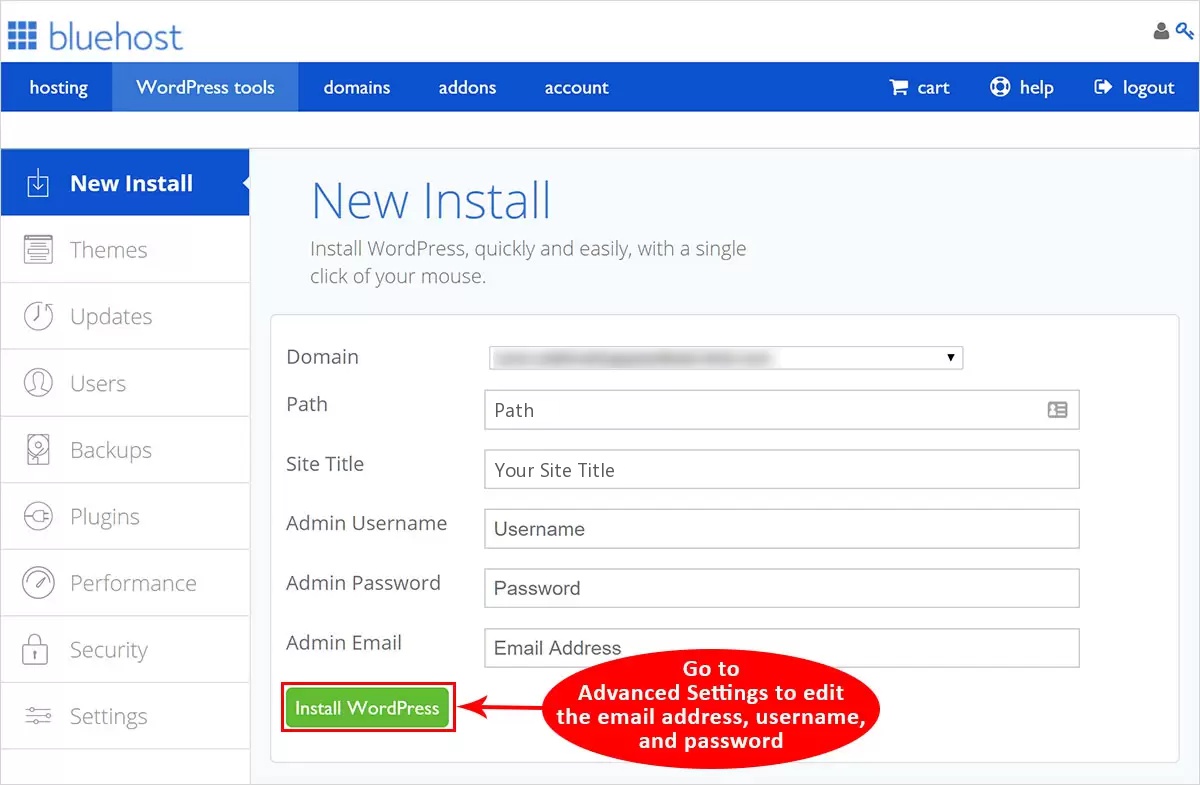
- If necessary, you can go to Advanced Settings to edit the email address, username, and password for the new WordPress installation.
- Read the terms and conditions and check the boxes to indicate you agree.
- Click the Install Now button.


How to Install WordPress on SiteGround?
SiteGround offers exceptional web hosting services and is widely used. Although it offers one-click WordPress installers and automatic setup packages, we will go with the automatic method.
Here is the step-by-step guide on manual installation of WordPress on SiteGround-
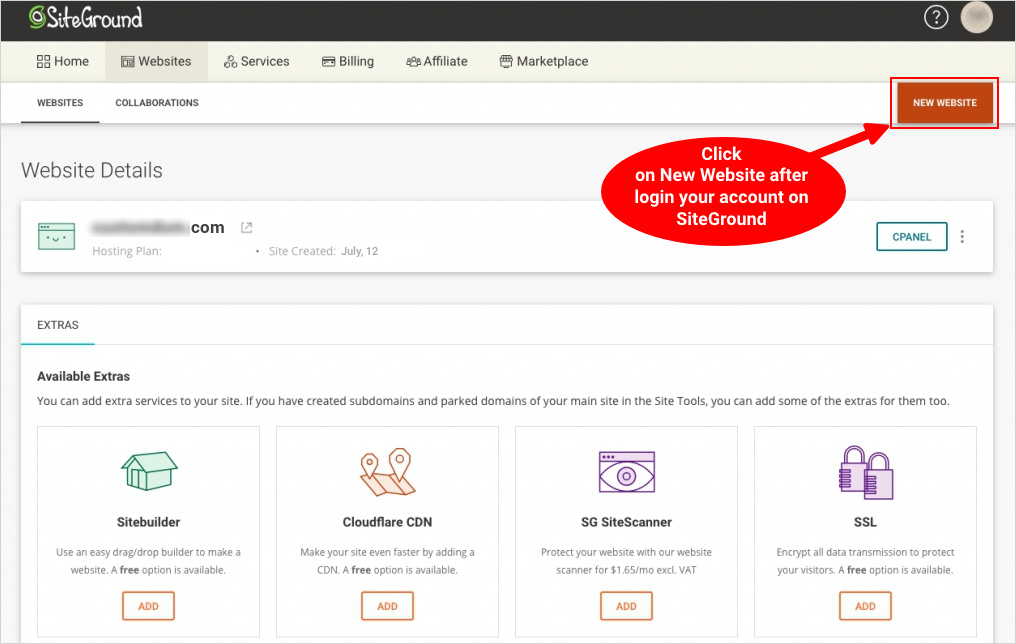
- Login to your SiteGround dashboard. Under the Website option, click on New Website.

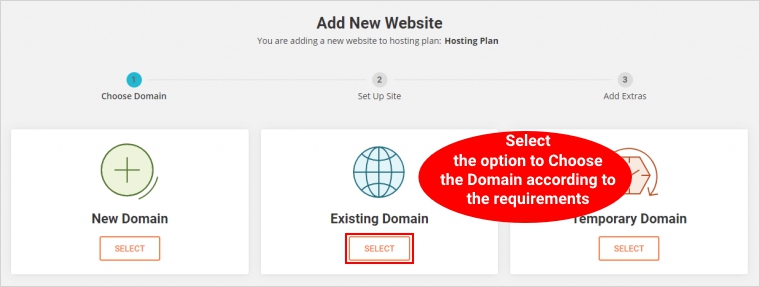
- Here, you need to choose a domain name. You can choose between New Domain, Existing Domain, Temporary Domain. For this guide, we will select Existing Domain. However, it totally depends on your requirements.

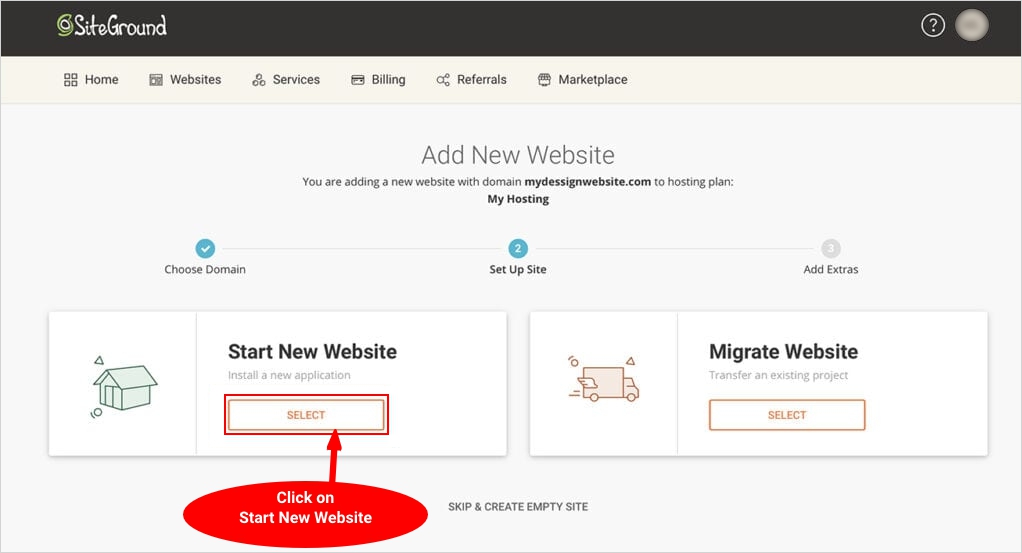
- Now, click on the Start New website option. However, it’s up to you whether you want to Start a New Website or you want to Migrate a Website.

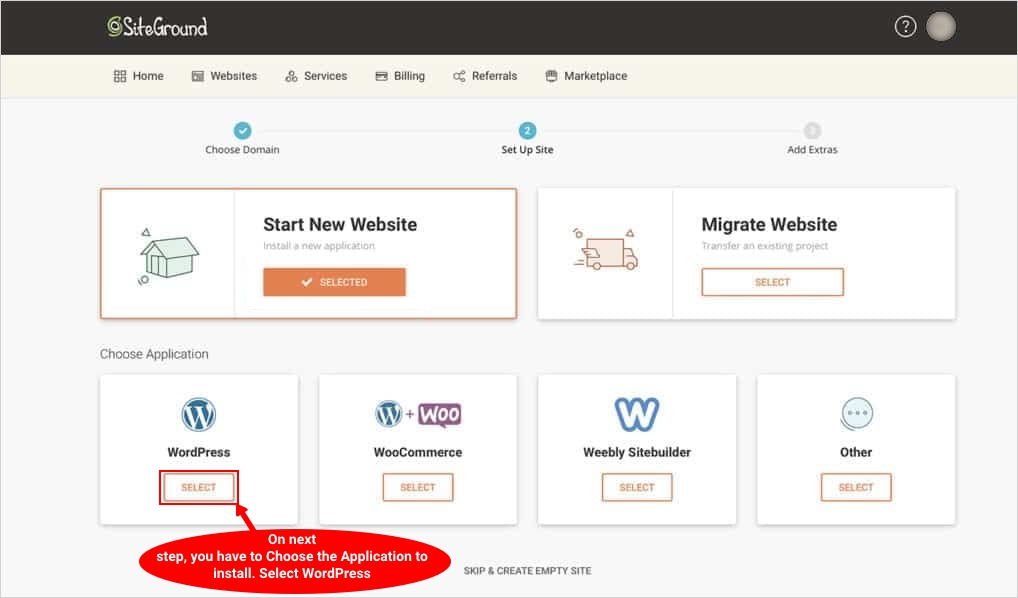
- Once you selected Start New Site → Now you need to go to Choose Application. Here, select the WordPress option.

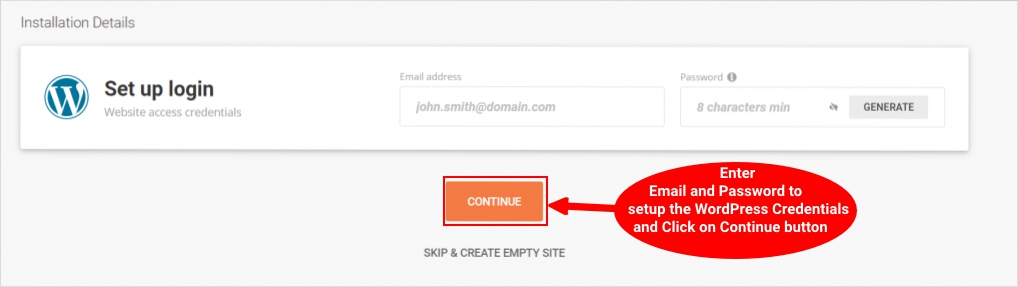
- After you have selected WordPress, it’s time to add Installation Details. Simply enter your Email Address and Password and click on the Continue button.

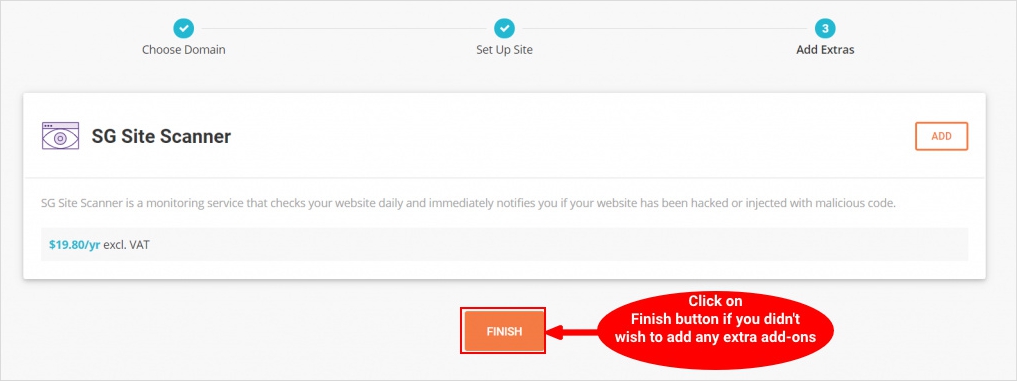
- You shall now see SG Site Scanner, where simply hit the Finish button to actually finish the process.

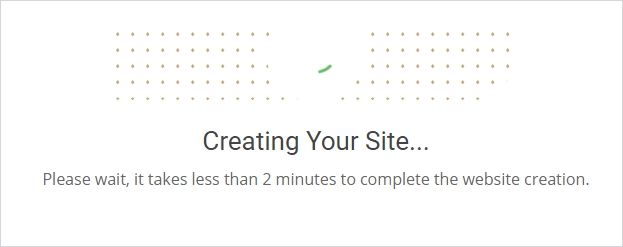
- Now, it will take a few minutes to create your website using WordPress.

- Congratulations you have successfully set up your new website using WordPress. You can now View Your Site, Access WordPress Admin, Go To Site Tools.

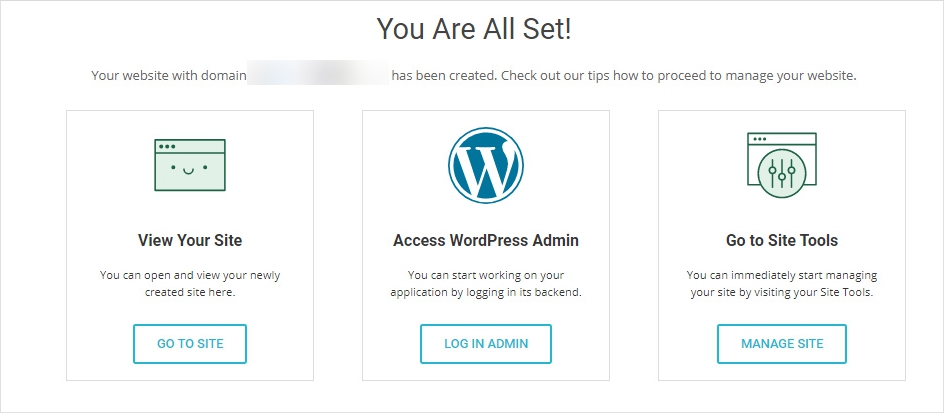
This is it! You are ready with your website simply start using it.
How to Install WordPress using Softaculous?
Softaculous is a widely used installer by lot of web hosting providers for an easy WordPress installation.
Have a look at the following steps to install WordPress using Softaculous-
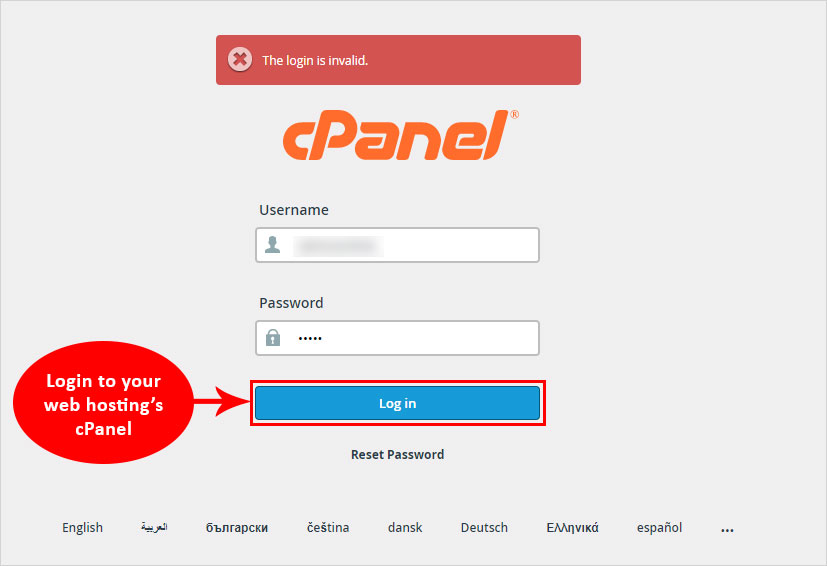
- Log in to your web hosting’s cPanel

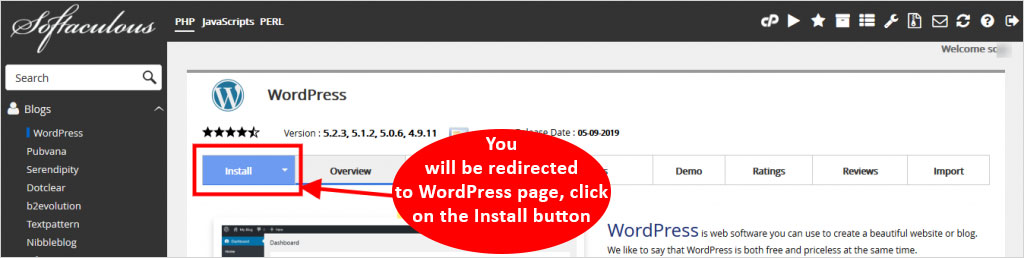
- Look for the Softaculous icon and click on it

- After that, look for WordPress icon and click on it

- You will be redirected to the WordPress page, click on the Install button

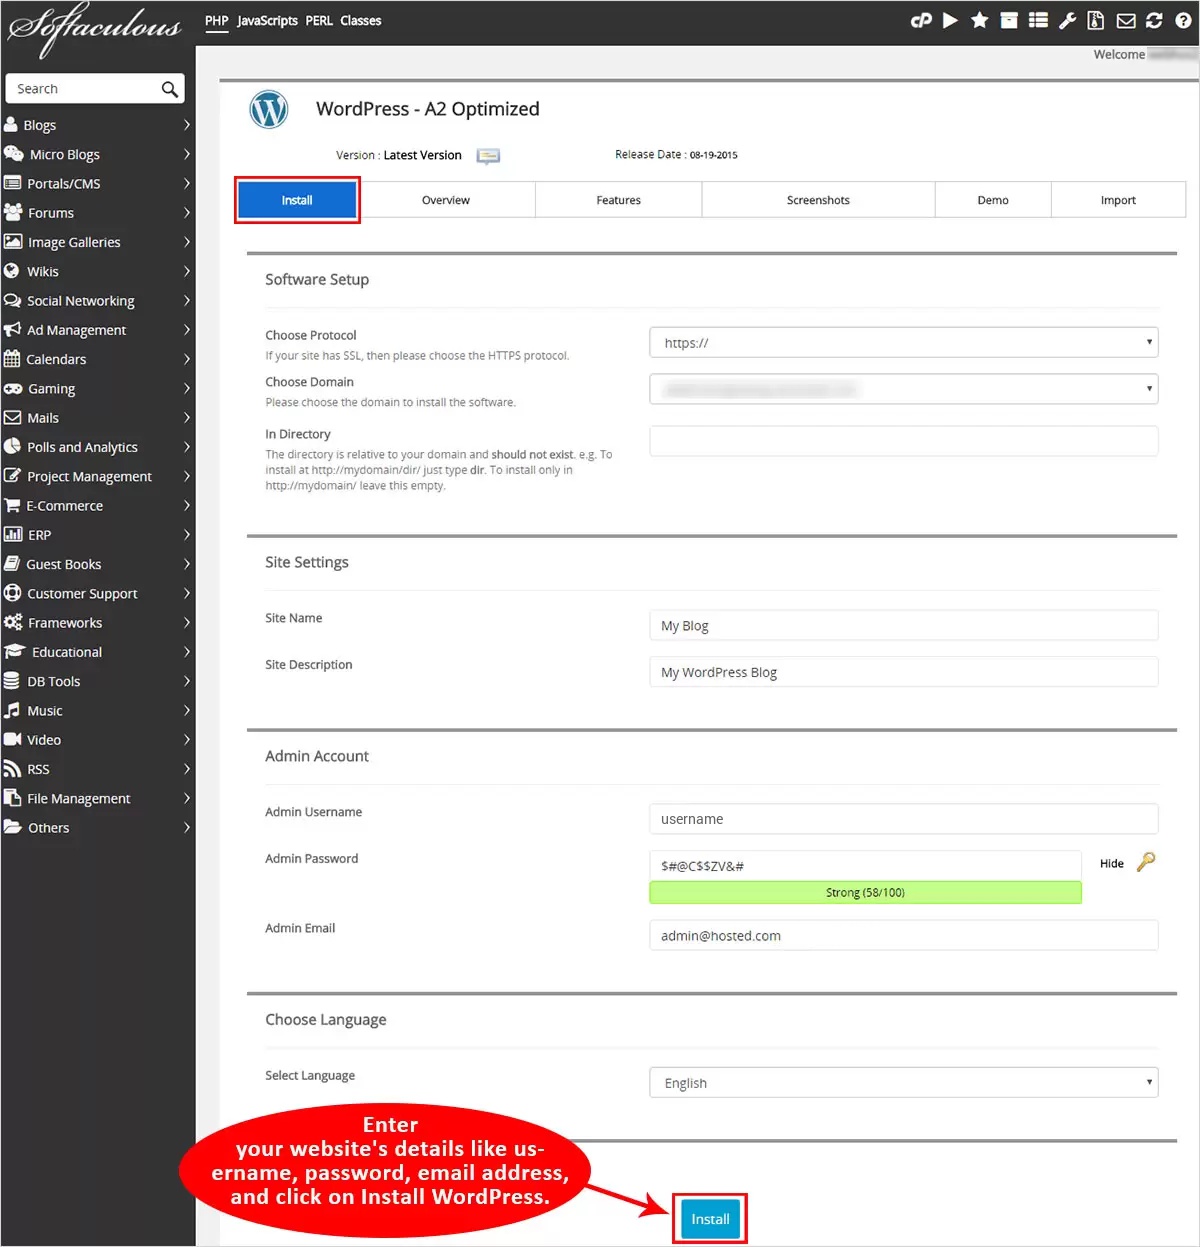
- You will have to fill the install form, including information like choose installation URL, Username, Password, Email, Language, etc, and click on the Install button.

- Sit back and relax!
A progress bar will appear and on the completion of installation, it will notify you about the successful completion. It also offers much more than just installation including upgrading, backup, data retrieval, staging, etc.
How to Install WordPress using Bitnami?
Bitnami native installer offers a pre-packaged automated WordPress installer for popular server software i.e. Windows, Linux, and Mac OS X. It is also available on Google Cloud and Amazon Cloud, but that option is quite different from this one.
Here is a step by step guide for WordPress installation using Bitnami-
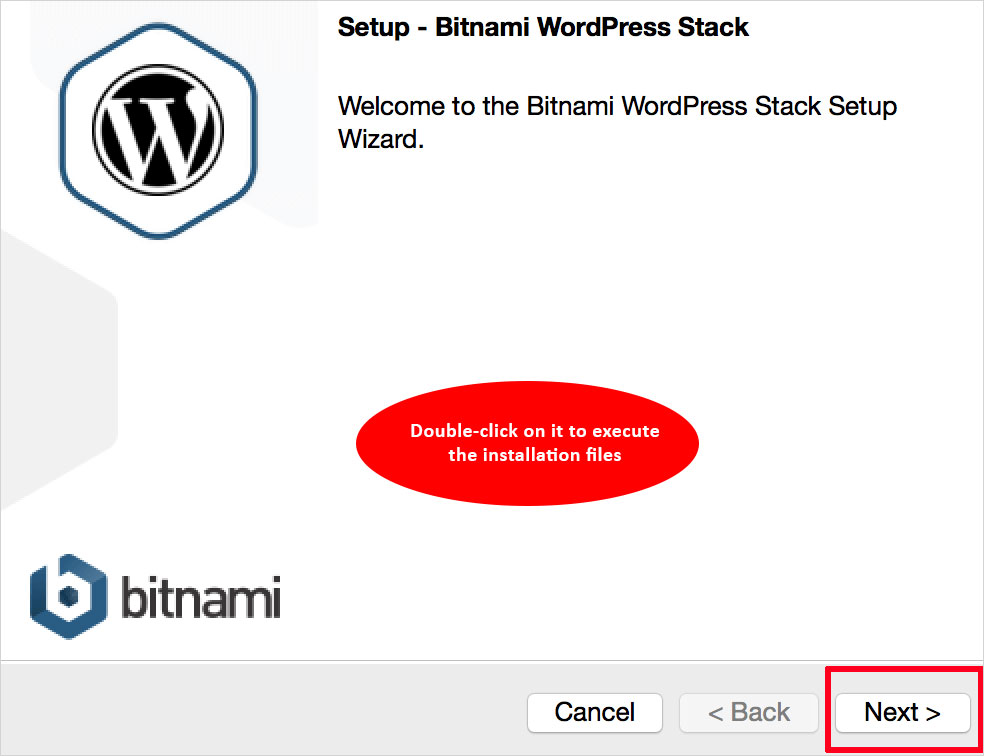
- Download the Bitnami WordPress installation executable and double-click on it to execute the installation files

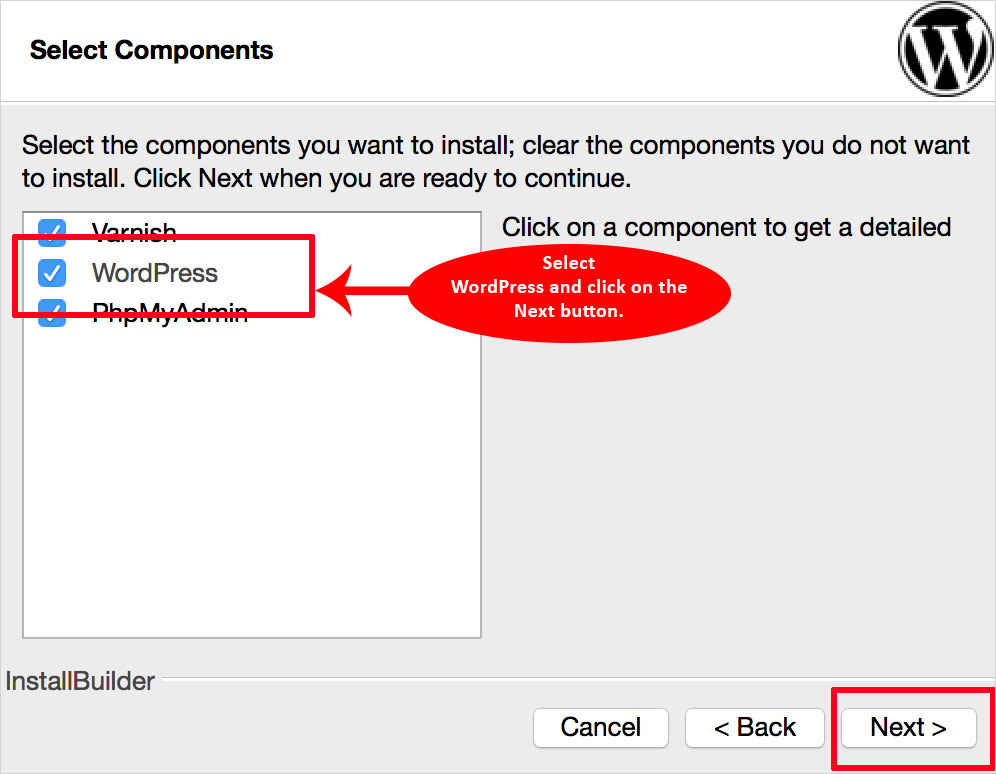
- Select WordPress and click on the Next button.

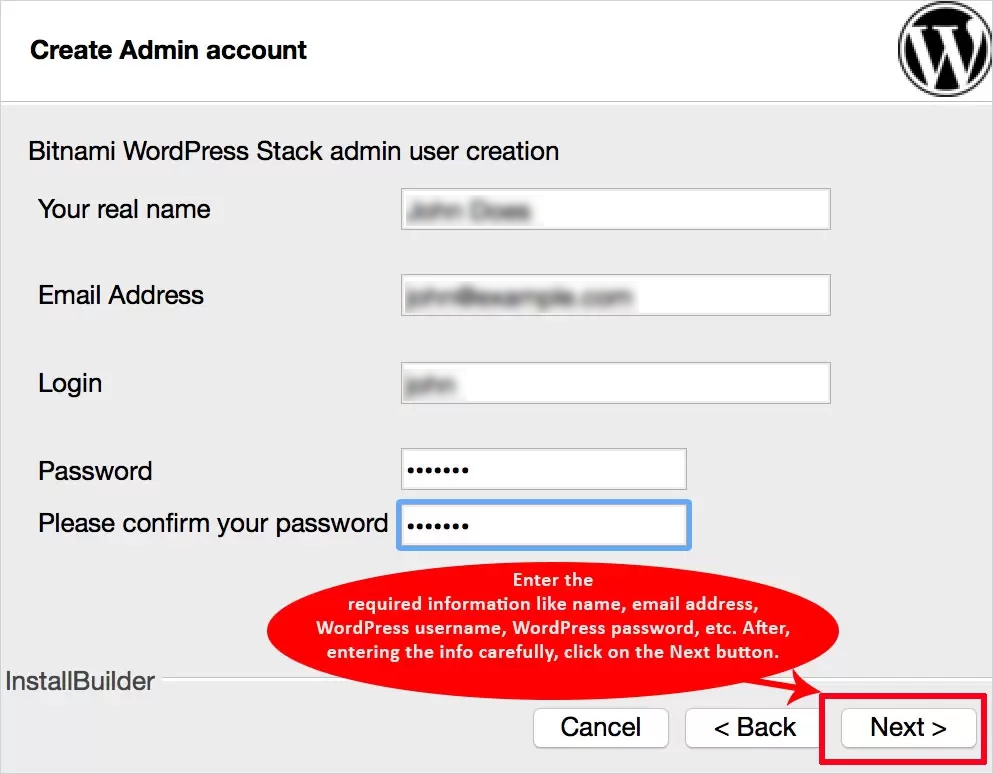
- Enter the required information like name, email address, WordPress username, WordPress password, etc. After, entering the info carefully, click on the Next button.

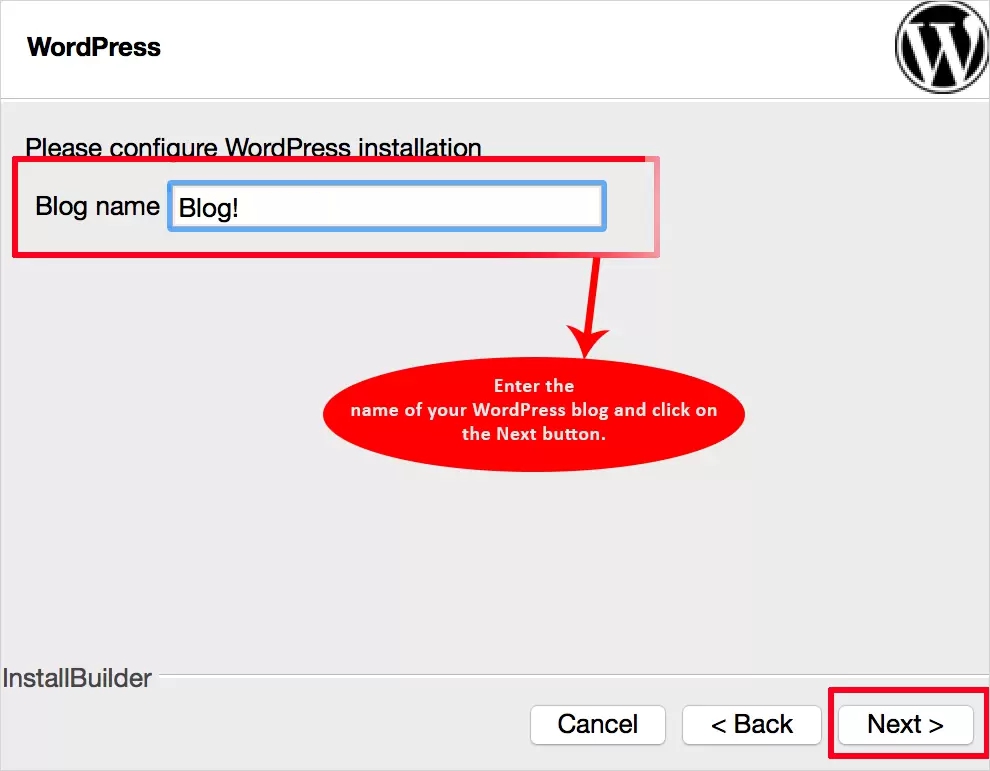
- Enter the name of your WordPress blog and click on the Next button.

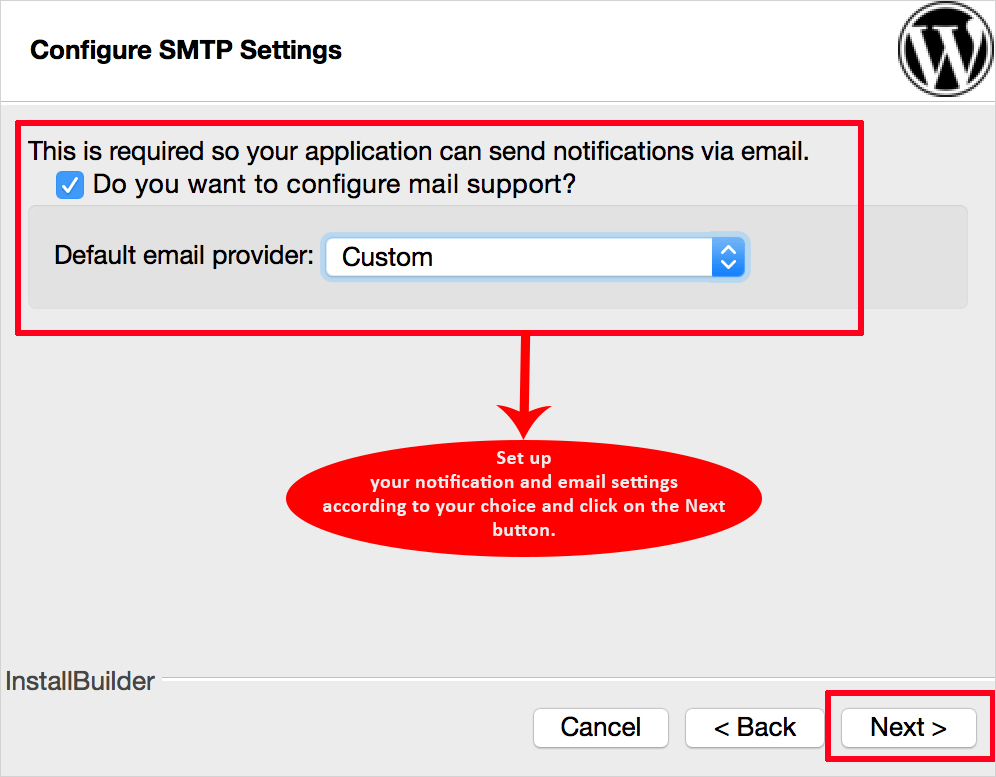
- Set up your notification and email settings according to your choice and click on the Next button.

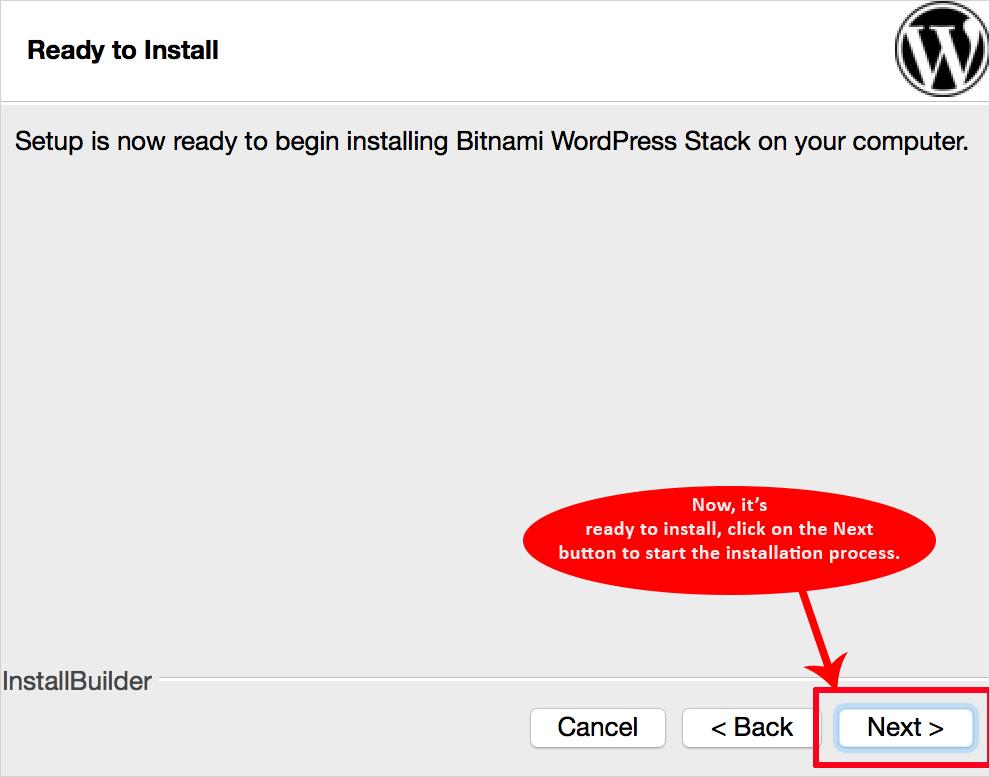
- Now, it’s ready to install, click on the Next button to start the installation process.

Now sit back and relax. You will see the installation progress bar. After the installation completes, you will get a success message. Login to your WordPress with your username and password and start using it.
How to Install WordPress using FTP?
Installing WordPress using FTP is the classic method used by professional developers. Considering it is a manual way to install WordPress, there are some crucial steps involved like extracting .zip files, creating databases, etc. This way of WordPress installation is commonly known as the famous 5 minute install. Remember that you need an FTP client or the file manager feature of your hosting panel to proceed this way.
Follow step-by-step guide on how to install WordPress using FTP-
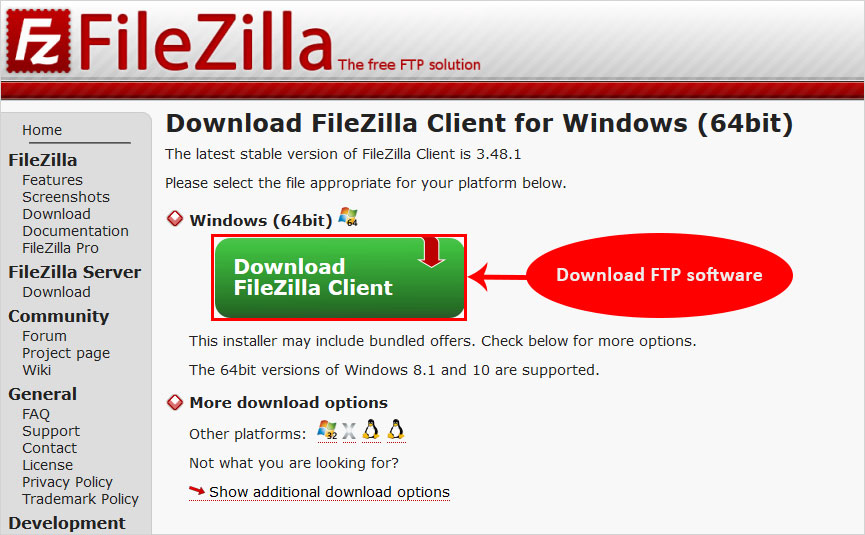
- Download FTP software (we recommend Filezilla) or open the file manager option of your hosting provider.

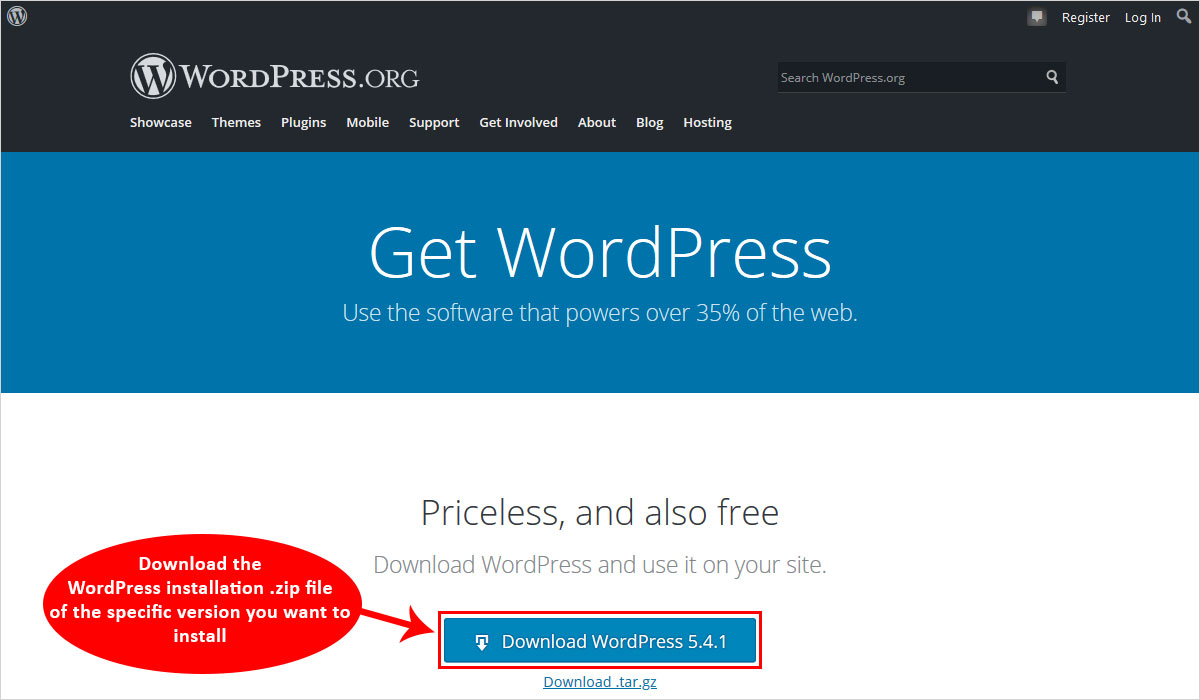
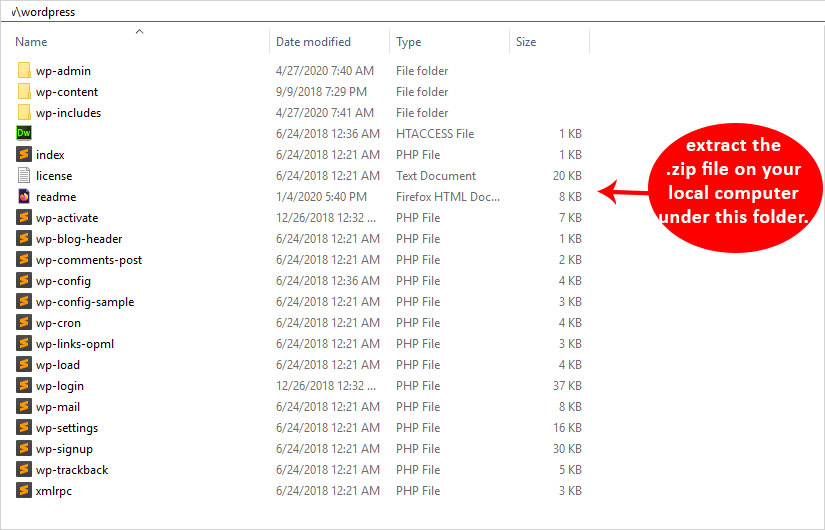
- Download the WordPress installation .zip file of the latest version and extract the .zip file on your local computer.

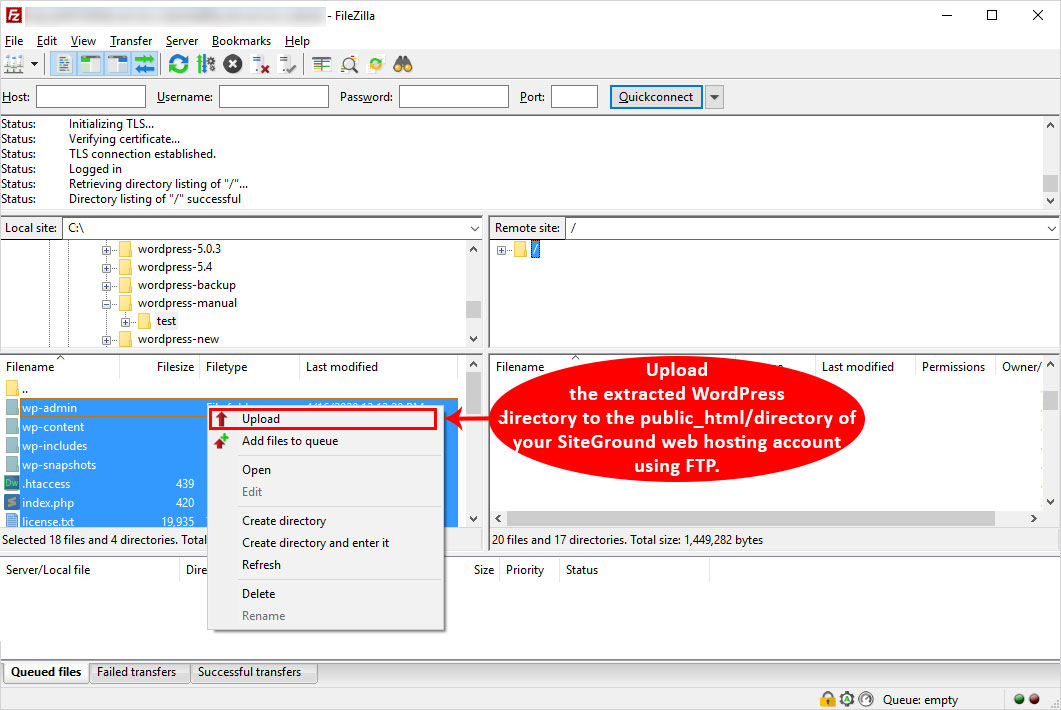
- Upload the extracted WordPress directory to the public_html or a sub directory of your web hosting account using FTP

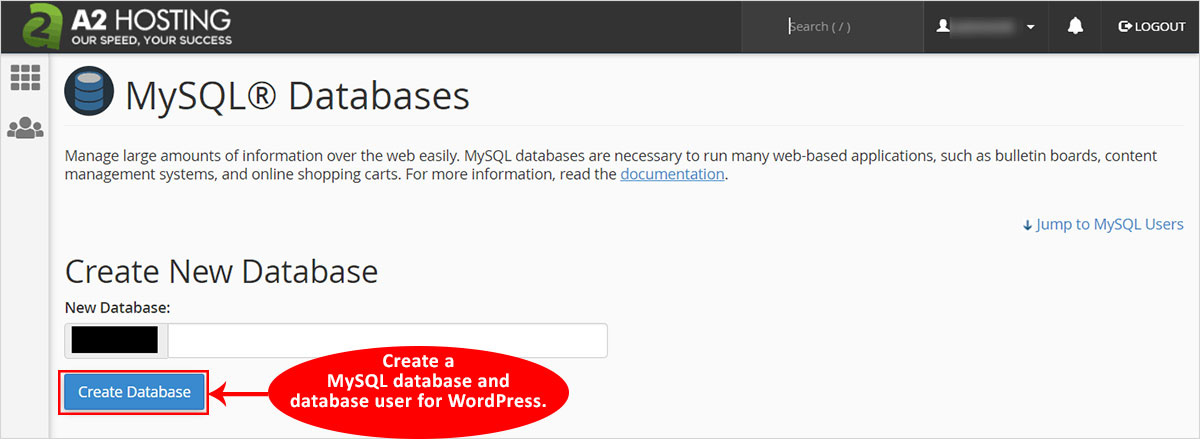
- Login to your cPanel and create a MySQL database and database user for WordPress.

- Run the install by navigating to the directory URL, where you uploaded WordPress.
- Click on create the configuration file
- Click on the Let’s Go button on the configuration page. Enter the information like name for database, username, and password that you created in last step above. After entering the required information, click on the Submit button.

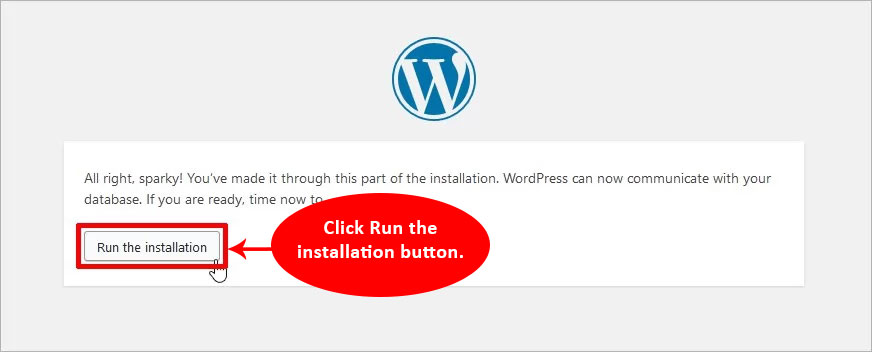
- Now, you will see a Run the install button on screen, click on it.

- Enter your website’s details like username, password, email address, and click on Install WordPress.

Now wait for the installation to complete. After the completion of installation, you can simply login using your username and password and start using it.
How to Install WordPress on Windows?
If you are a professional developer, then installing WordPress locally on your PC is essential.
Follow the given steps to install WordPress locally on Windows-
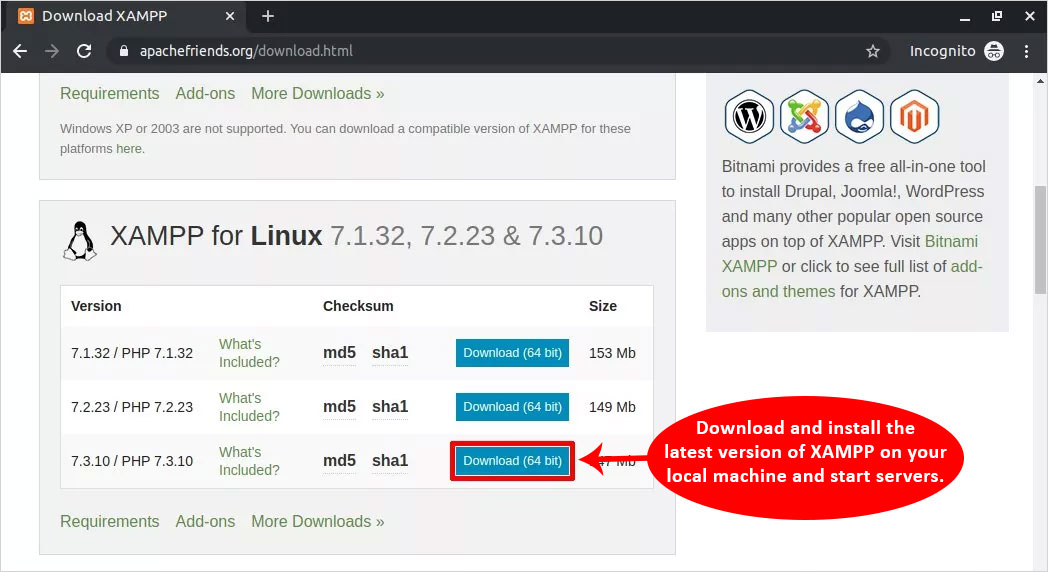
- First, create an environment on your machine by installing a local server. It can be WAMP, XAMPP, or MAMP, whichever you like. For your Windows Machine, I personally recommend XAMPP. Download and install the latest version of XAMPP on your local machine and start servers. Once the servers are up and running, your local server is ready to work. If you like to read this way in detail, here is a dedicated tutorial to how to install WordPress on XAMPP.

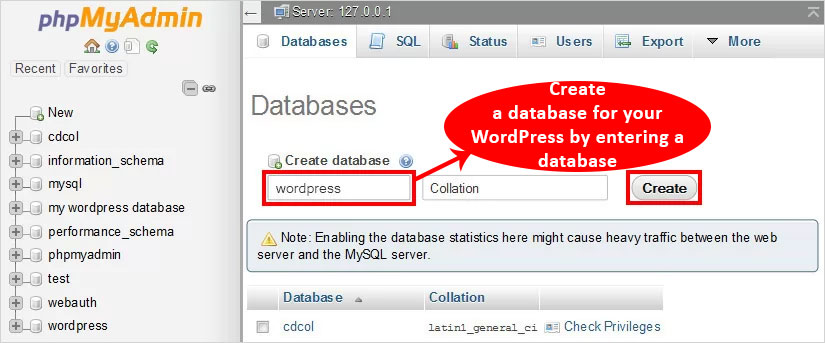
- Now, open your web browser and visit http://localhost/WordPress. Create a database for your WordPress by entering a database name, username, password, and host information, and click on the Create button to finish the process.

- Visit the official WordPress website and download the .zip file for the latest WordPress version and extract the file.
- Move the unzipped file to XAMPP installation folder inside htdocs, which must be in your C drive.

- Now, switch back to http://localhost/website/ on your browser and start configuration by choosing your preferred language.
- Click on Let’s Go! Button and keep the default settings as it is.

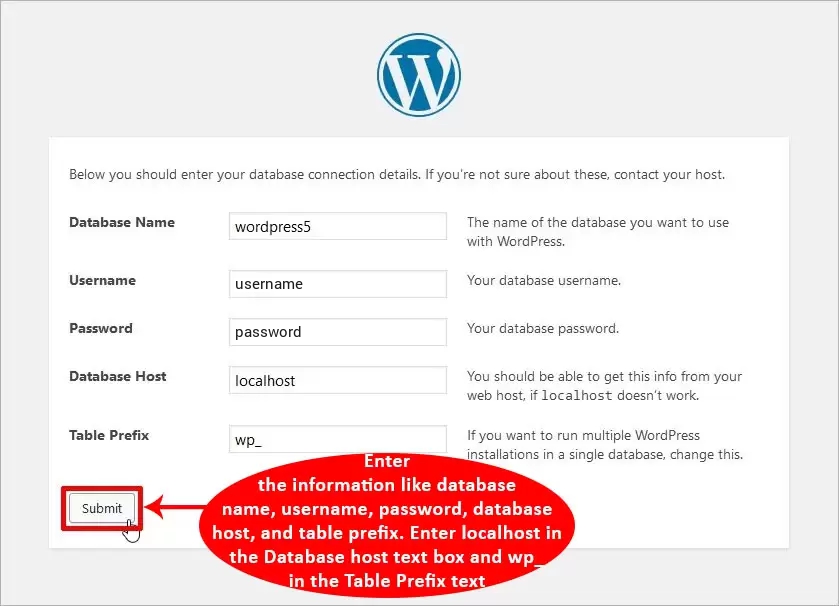
- Now, set the value of database name to whatever you have created in above step, username to root, password to blank/empty, Database host to localhost, and Table Prefix to wp_. After entering the required information, click on the Submit button.
- Rename “sample-wp-config.php”to “wp-config.php” and save these settings in the file.
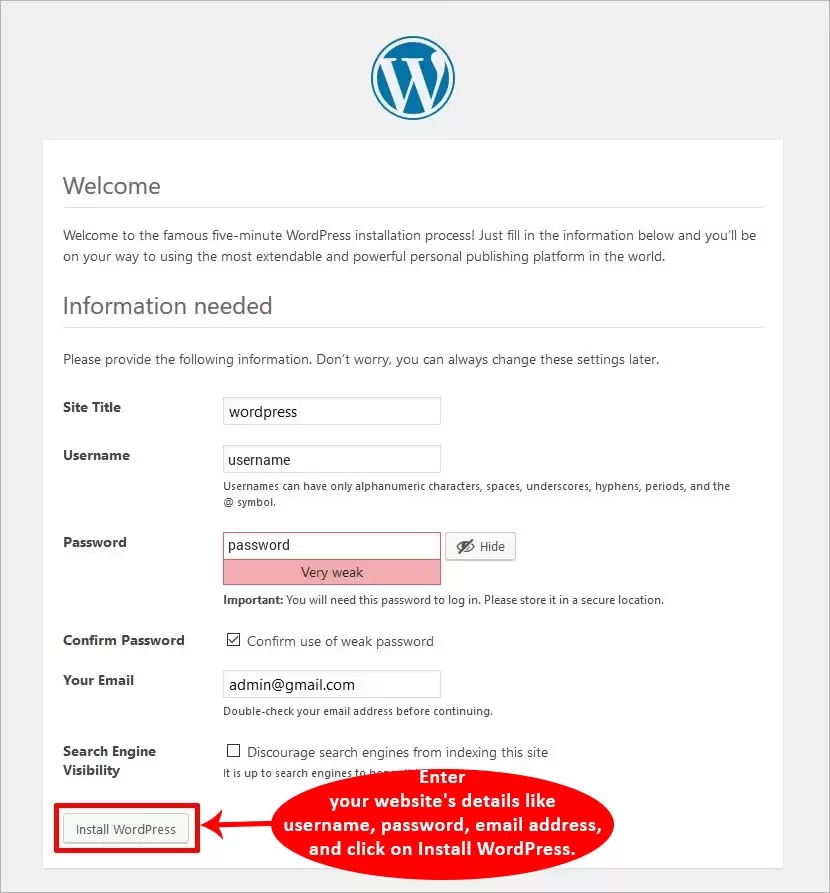
- Now, enter your website’s details like username, password, email address, and click on Install WordPress to finish the process.

In case you decide to go with any other local server like WAMP or MAMP, the steps still remain almost identical and you will still be able to install the WordPress on Windows.
How to Install WordPress on Google Cloud?
If you want a cloud hosting solution, then it is better to get a Google Cloud(GCP). It can help you adapt to high traffic surges in a cost efficient manner. Furthermore, the scalability offered by GCP is unmatched.
Here is a step-by-step guide to install WordPress on Google Cloud-
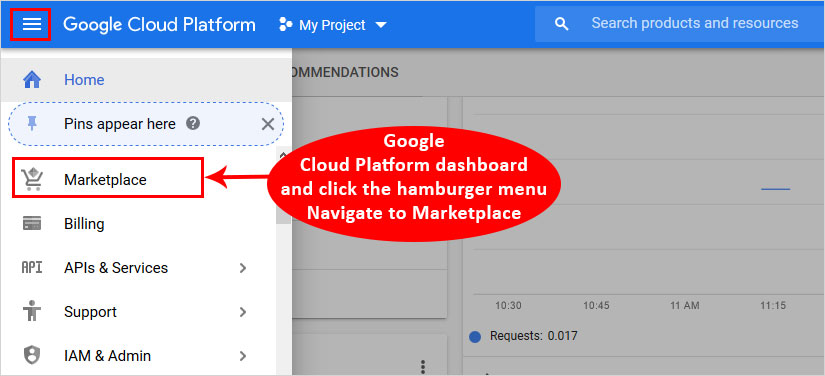
- Go to your Google Cloud Platform dashboard and click the hamburger menu

- Navigate to Marketplace and select the WordPress Click-to-deploy version

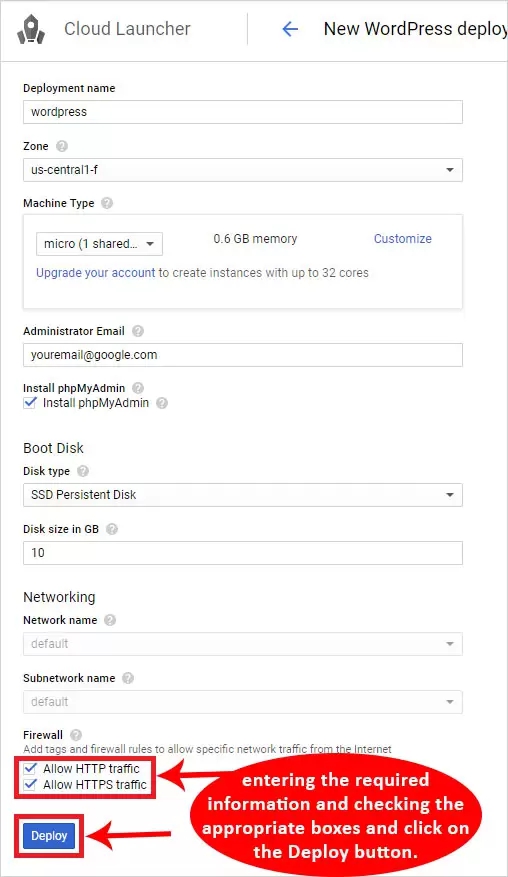
- Click the Launch on Compute Engine button to continue.

- Now, configure the WordPress installation by entering the required information and checking the appropriate boxes and click on the Deploy button.

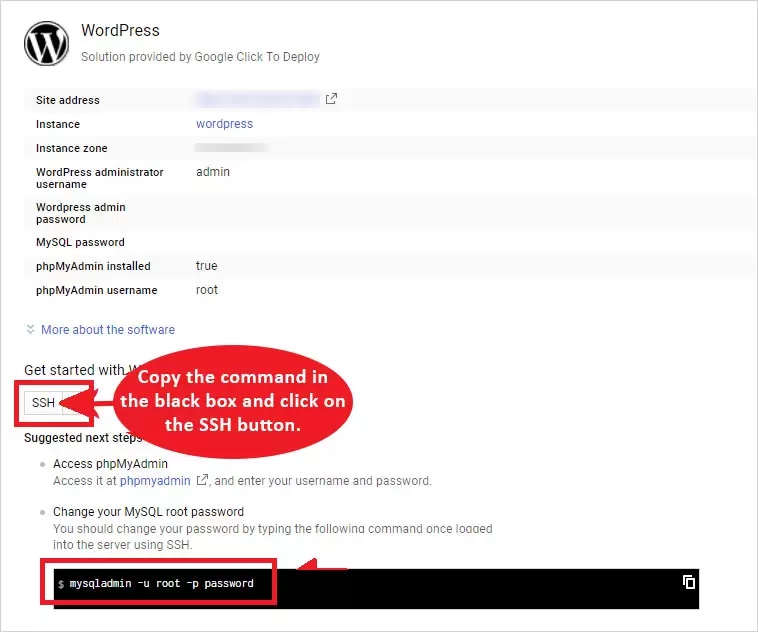
- After deploying WordPress instance successfully, copy the command in the black box and click on the SSH button.

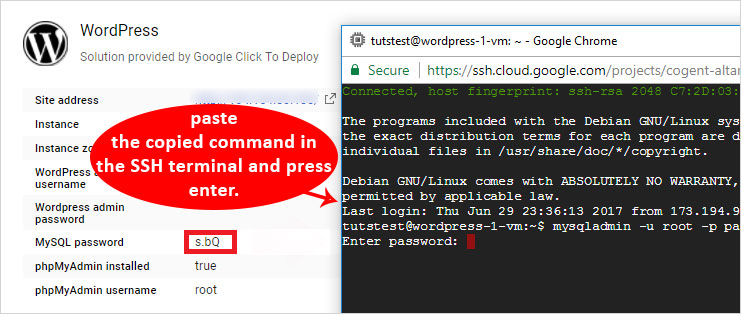
- Then, paste the copied command in the SSH terminal and press enter.

- Now, you will see a page with your credentials on it, with a link to phpMyAdmin. Click on it and enter your username and password to gain access to your WordPress.


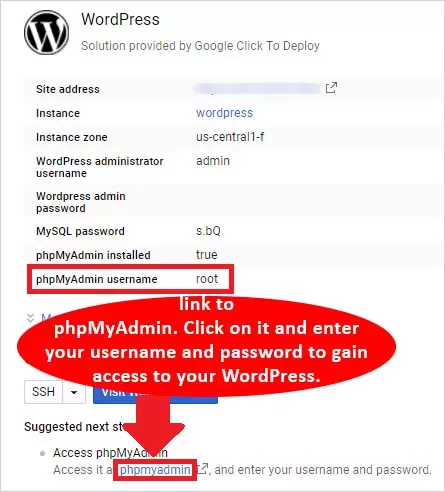
That’s it, you’ve successfully installed WordPress on Google Cloud. It is configured and ready to use now.
How to Install WordPress – Conclusion
Again if you are just a beginner, using an auto installer is your best bet. It is easy, quick, mess-free, and often comes with prompt customer assistance. Or better yet, go for a host that offers pre-installed WordPress. However, if you want to do it locally, then you can do it manually using WAMP or XAMPP. All you have to do is follow the instructions and you will be fine. Now there are a lot of additional fine-tuning things you can do further to improve your WordPress website performance, SEO, Security and much more using free WordPress plugins.
Build a Stunning Website in Minutes with TemplateToaster Website Builder
Create Your Own Website Now
I think it is one of the best articles I have ever seen about installing WordPress. I have found it really helpful for beginners as it has covered all the possible ways to installing WordPress and described that in a clear way. . Thanks for making this helpful content and sharing it with us.
I am installing wordpress using Bitnami, these steps are very clear and easy.
Installing WordPress using Softaculous is more reliable.
I have installed WordPress on Google Cloud today using their free credits.