How to Create WordPress Theme: Step by Step Guide
Creating a WordPress theme from scratch can be quite simple if you have a basic understanding of HTML, CSS, and JavaScript. If you’re new to WordPress, there’s no need to worry. By following the steps outlined in this beginner-friendly guide, you’ll be able to build your own custom WordPress theme with ease. I’ve broken down the process into straightforward steps to help you create a theme from scratch without any hassle. Let’s dive into this tutorial and learn how to create a WordPress theme from scratch.
- How to Create a WordPress Theme
- Setting Up Your WordPress Development Environment
- Essential WordPress Theme Files
- Building the Basic Structure of Your Theme
- Create Additional WordPress Template Files
- Understand the WordPress Loop
- Creating Logic with PHP
- Optimizing Your Theme for SEO and Performance
- Testing and Debugging Your WordPress Theme
- How to Create WordPress Theme with TemplateToaster
How to Create a WordPress Theme: Steps
Step1: Set Up Your WordPress Development Environment
Step2: Create Essential WordPress Theme Files
Step3: Create Directory & Structure Your Theme Files
Step4: Write Code and Interlink the Files
Step5: Enqueue Styles and Scripts
1: Setting Up Your WordPress Development Environment
Before you begin building your custom theme, you’ll need a development environment to preview and test your work. This setup allows you to safely build and edit your theme without affecting a live site.
In this section, I’ll guide you through how to create a WordPress theme using hand coding. Later in the article, I’ll also show you how to create a WordPress theme using a WordPress theme builder for a more streamlined approach.
Tools You’ll Need:
- Local Development Server: Use software like XAMPP or LocalWP to run a WordPress instance locally.
- Code Editor: Install a code editor such as Visual Studio Code or Notepad++ on your computer.
- Browser Developer Tools: You can use Chrome or Firefox developer tools to inspect and debug your site’s code. Just Right Click-> Inspect.
Setting Up:
- Install XAMPP or LocalWP as your local development server. LocalWP gives you the option for one click automatic install of WordPress. So you can skip following steps in that case.
- Download WordPress from https://wordpress.org/download/.
- Extract the files into the appropriate directory /htdocs/ for XAMPP.
- Create a new MySQL database via phpMyAdmin.
- Now install WordPress on Localhost.
2: Essential WordPress Theme Files
You can Create a WordPress Theme by creating just two files: style.css and index.php but to organize and standardize your WordPress theme in a nice way it is recommend to create following 5 files.
- index.php: The main template file used by WordPress.
- style.css: The primary stylesheet for your theme.
- functions.php: A file used to register theme features and functions.
- header.php: Contains the opening HTML tags and site header.
- footer.php: Contains the closing HTML tags and site footer.
3: Building the Basic Structure of Your Theme
- Create the Theme Directory:
Navigate to /htdocs/sitename/wp-content/themes/ and create a new folder for your theme, such as my-theme.
- Add Core Files: Inside your theme folder, create all above mentioned 5 files or at least following three core files:
- index.php
- style.css
- functions.php
- Activate Your Theme
Go to the WordPress dashboard, navigate to Appearance > Themes, and activate your newly created theme. Your theme is now active, but it lacks structure and design. Let’s move on to adding more functionality and customization.
Tip: If you are inspired by the design of a WordPress website, you can easily check what WordPress Theme a website is using. Now you can search & download that theme and can view its structure and files to get an inspiration.
4: Create Additional WordPress Template Files
WordPress uses a template files to decide which file to load for different content types. For example when you load a page on your website WordPress fill utilize the page.php, for posts it uses single.php, for categories it fire category.php and so on.
- Single Post: single.php
- Page: page.php
- General Archives: archive.php
- Category Archive: category.php
- Tag Archive: tag.php
- 404 Error Page: 404.php
If a specific template file is not found, WordPress falls back on the more generic files, ultimately defaulting to index.php.
5: Understanding the WordPress Loop
The WordPress Loop is the PHP code used to display posts and pages dynamically. It’s a fundamental concept when learning how to create a WordPress theme. It is used everywhere in WordPress for fetching and displaying content.
<?php if (have_posts()): ?>
    <?php while (have_posts()):
        the_post(); ?>
       <?php the_title(); ?>
        <?php the_content(); ?>
    <?php
    endwhile; ?>
<?php endif; ?>
6: Creating Logic with PHP
One of the key reasons to learn how to create a WordPress theme is the ability to add dynamic content using PHP. WordPress uses PHP functions to retrieve and display data from the database.
index.php:
This file is loaded by WordPress initially. It contains the WordPress loop and is used to display the content on your home page. It display all your posts or a specific page on your home page depending on what you have set under settings from Admin -> Settings-> Reading. Generally it contains the following code:
<?php get_header();
if (have_posts()):
    while (have_posts()):
        the_post();
        the_content();
    endwhile;
endif;
get_sidebar();
get_footer(); ?>
single.php:
This file contains a WordPress loop and is used to output a single post. You can call/add a sidebar in it if you need the same besides the content of single posts on your website.
page.php:
This file is used to output single page on your website, you can add the get sidebar function if you need a sidebar on single page(s).
archive.php, category.php and tag.php:
archive.php is used to output all the archives until you create a category.php, which will output only categories and the tag.php, which output only the tags.
functions.php:
functions.php file is used to add custom functionality in your theme. You can extend functionality of your website upto any level by adding actions or filters hooks in this file. WordPress offers various built-in features that can be added to your theme through the functions.php file. These features include featured images, custom logos, automatic feed links etc.
I have discussed the functionality thing here because you can enhance functionality of your website either through your theme or through a plugin. To understand the difference you should read WordPress Theme vs Plugin.
For example following code add custom image thumbnail sizes in your theme’s functions.php. Now on when you upload a new image on your website it’ll generate additional thumbnail sizes as instructed in code:
if(function_exists('add_image_size')){
add_image_size( 'featured', 500, 350, true );
add_image_size( 'post-thumb', 105, 65, true );
}
header.php:
This file output the header and menu in your WordPress theme. Structure and code should look something like:
<h1 id="head">
<a href="<?php bloginfo('url'); ?>"><?php bloginfo('name'); ?> </a>
</h1>
footer.php:
This file output the closing of body tags and footer section in your WordPress Theme. Here is some sample code that should go to it:
<footer>
<p>© <?php echo date('Y'); ?> My Custom Theme</p>
</footer>
<?php wp_footer(); ?>
</body>
</html>
sidebar.php
This file is used to add sidebar(s) on your theme. In order to use, first you need to register sidebar(s) in your functions.php as following:
register_sidebar()
Now you need to add following function in your sidebar.php itself:
<div id="sidebar-primary" class="sidebar">
	<?php dynamic_sidebar( 'primary' ); ?>
</div>
Now you can load the sidebar where you want using following function:
<?php get_sidebar(); ?>
style.css:
This file is used for styling your website’s front end and also define Name, Author Name and Version of your theme.
/*
Theme Name: My Theme
Theme URI: http://yourwebsite.com
Author: Your Name
Author URI: http://yourwebsite.com
Description: My new Custom WordPress theme.
Version: 1.0.0
License: GPLv2 or later
License URI: http://www.gnu.org/licenses/gpl-2.0.html
Text Domain: my-theme
*/
Custom Page Templates i.e. page-about.php:
If you want to have a different layout on a specific page(s), you can create and use custom page templates. This file is very similar to page.php. For example you need to display your About Us page very differently from rest of the pages of your website, just create a new page template as per your needs and apply it to your About Us page from your website admin.
if ( is_front_page() ) :
	get_header( 'home' );
elseif ( is_page( 'About' ) ) :
	get_header( 'about' );
else:
	get_header();
endif;
screenshot.png:
In order to give look and feel of your WordPress Theme, you need to capture/create its screenshot and it keep it among other files. It’ll appears in the admin panel.
7: Optimizing Your Theme for SEO and Performance
Building a theme from scratch gives you the opportunity to optimize your website for SEO and performance right from the start. Poorly optimized themes can slow down your site, affect user experience, and lead to lower search engine rankings.
SEO Optimization for WordPress Themes:
- Semantic HTML5 Markup: Use semantic HTML tags like <header>, <footer>, <section>, and <article> to improve SEO and accessibility.
- Meta Tags and Title Tags: Ensure the proper use of <title> tags and SEO meta descriptions. You can dynamically add these tags in the header.php file:
<title><?php wp_title(); ?></title>
<meta name="description" content="<?php bloginfo( 'description' ); ?>">
<?php custom_breadcrumbs(); ?>
<meta property="og:title" content="<?php wp_title(); ?>" />
<meta property="og:description" content="<?php bloginfo( 'description' ); ?>" />
Performance Optimization:
- Minify CSS and JavaScript: Use tools like Autoptimize or LiteSpeed Cache or any other solution to minify & combine CSS and JavaScript files, which can reduce file size and improve loading speed.
- Lazy Load Images: Enable lazy loading for images to improve initial load time.
- Enqueue Files Correctly: Ensure that styles and scripts are enqueued properly using
wp_enqueue_scripts
to avoid loading unnecessary files. Deferring and asynchronous loading of additional scripts also helps a lot.
Translation:
If you are planning to make your theme open for public use, you may like to translate your WordPress Theme to different languages.
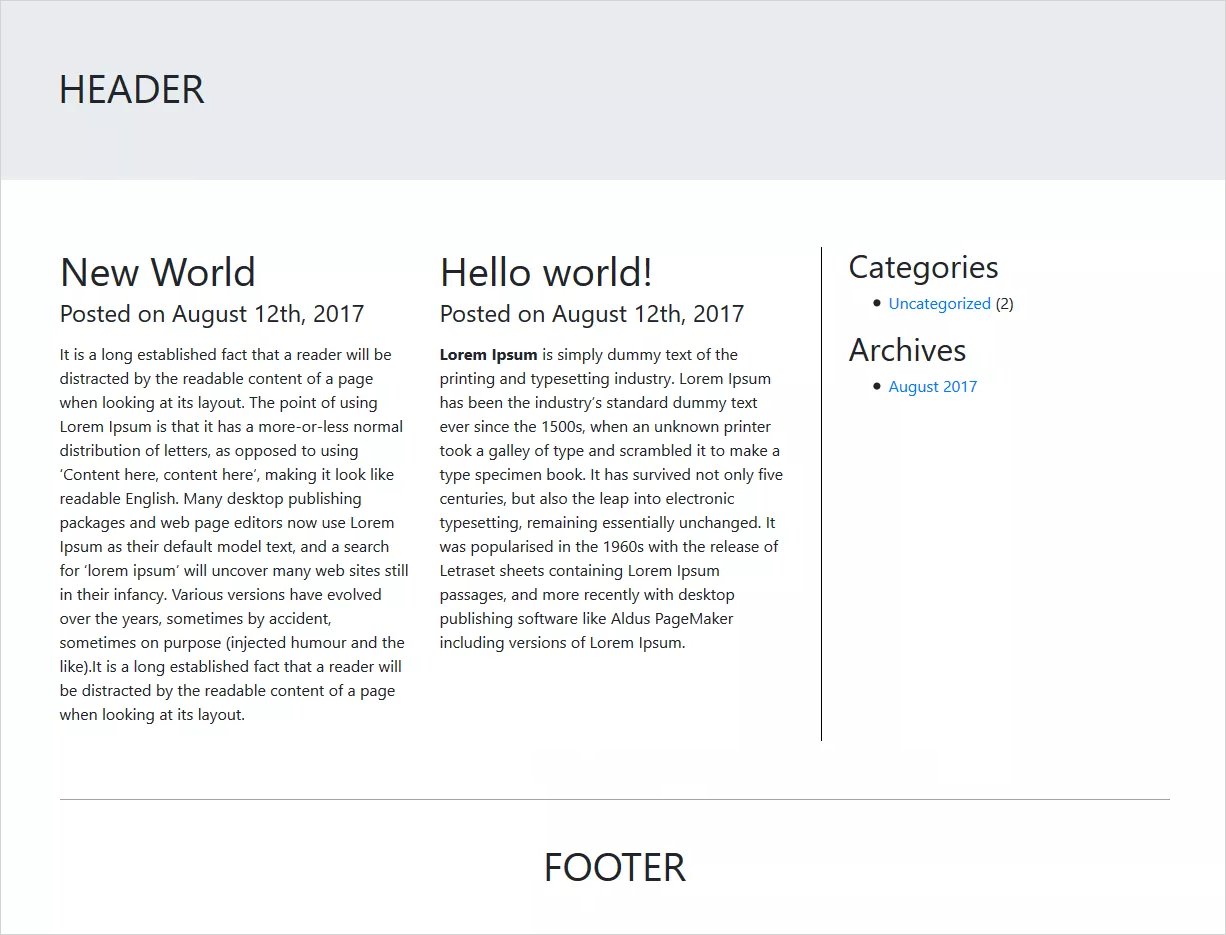
Your new WordPress Theme is Ready and would look like this:
8: Testing and Debugging Your WordPress Theme
Before releasing or using your theme on a live site, it’s critical to test and debug it thoroughly. This will help you catch any bugs, fix performance issues, and ensure the theme works across different devices and browsers.
Key Testing Areas:
- Cross-browser Compatibility: Test your theme on major browsers (Chrome, Firefox, Safari, Edge) to ensure it displays correctly across all of them. You can use any online Cross Browser Testing Tool for it.
- Responsive Design: Check how your theme looks and functions on different devices (desktop, tablet, and mobile). You can use browser developer tools to simulate different screen sizes. You can use Media Queries if it need any adjustments on any specific screen size.
- Performance Testing: Use tools like Google PageSpeed Insights to evaluate your theme’s performance and identify areas for improvement. Google Core Web Vitals highly depend on your theme performance, so make sure your theme loads fast.
Debugging Tips:
- Enable Debug Mode: In the wp-config.php file of WordPress, enable debug mode by setting WP_DEBUG to true:
define( 'WP_DEBUG', true );
This will display errors and notices to help you identify issues in your theme’s code.
- Use Debugging Plugins: WP Plugins like Query Monitor can help you monitor your theme’s performance and log errors.
- Validate HTML/CSS: Use tools like the W3C Markup Validation Service to check for valid HTML, and CSS Validation to check for valid CSS.
- Find Errors using WordPress Theme Check Plugin: Just install WordPress Theme Check Plugin on your test site to find and fix bugs.
9: How to Create WordPress Theme with TemplateToaster
TemplateToaster is pretty easy to install and it doesn’t involve any coding at all. Simply visit the software website and download the TemplateToaster installer. However, the trial version is free. Now, all you have to do is follow these easy steps to make your own WordPress theme. The first screen that will appear after installation looks like
Follow These Steps to Create WordPress Theme & Initiate your WordPress Theme Development
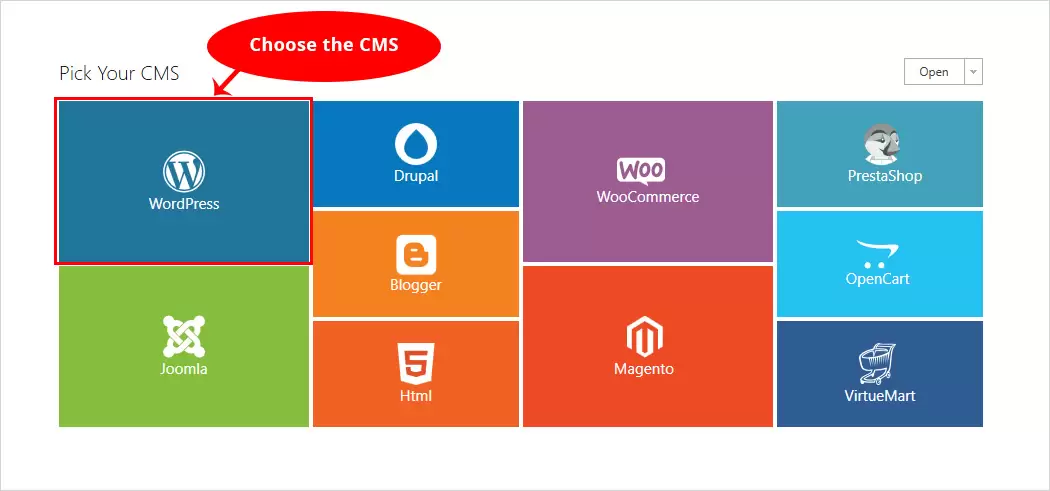
Step 1: Choose a Platform
The first screen that will appear after installation looks like the following. Here, you can make the CMS selection. Since we are creating a WordPress theme so the obvious choice here should be WordPress.
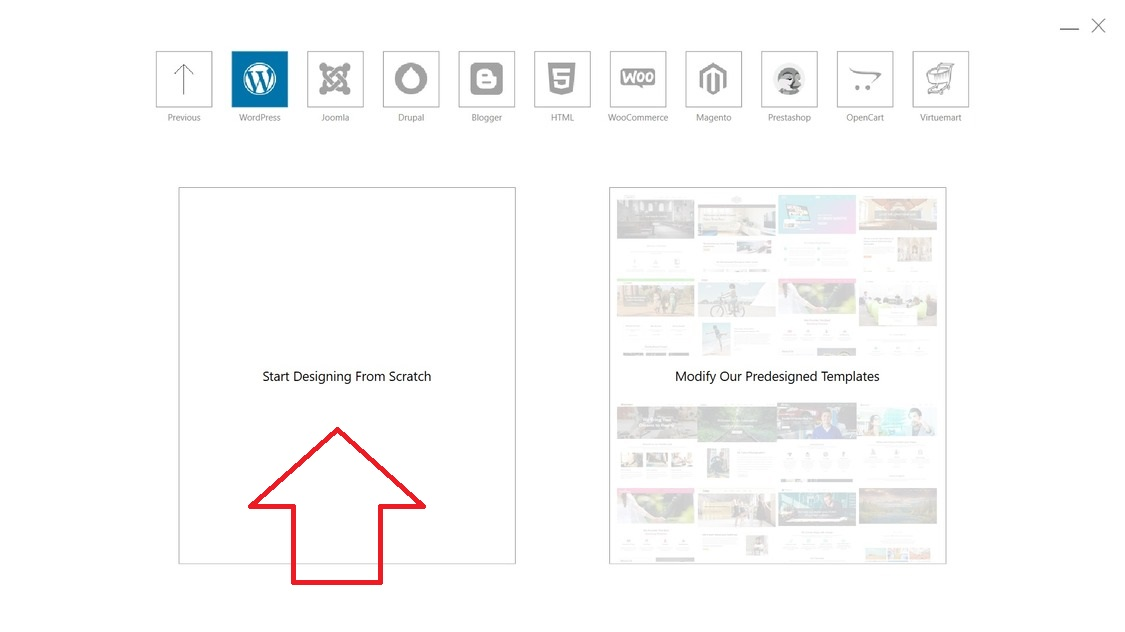
Now you can see a screen with two options i.e. Go with Sample Templates and Start from Scratch. You can easily find one suitable template from the plethora of free WordPress themes. Since we are involved in WordPress template development thus, I will choose “Start from Scratch”.
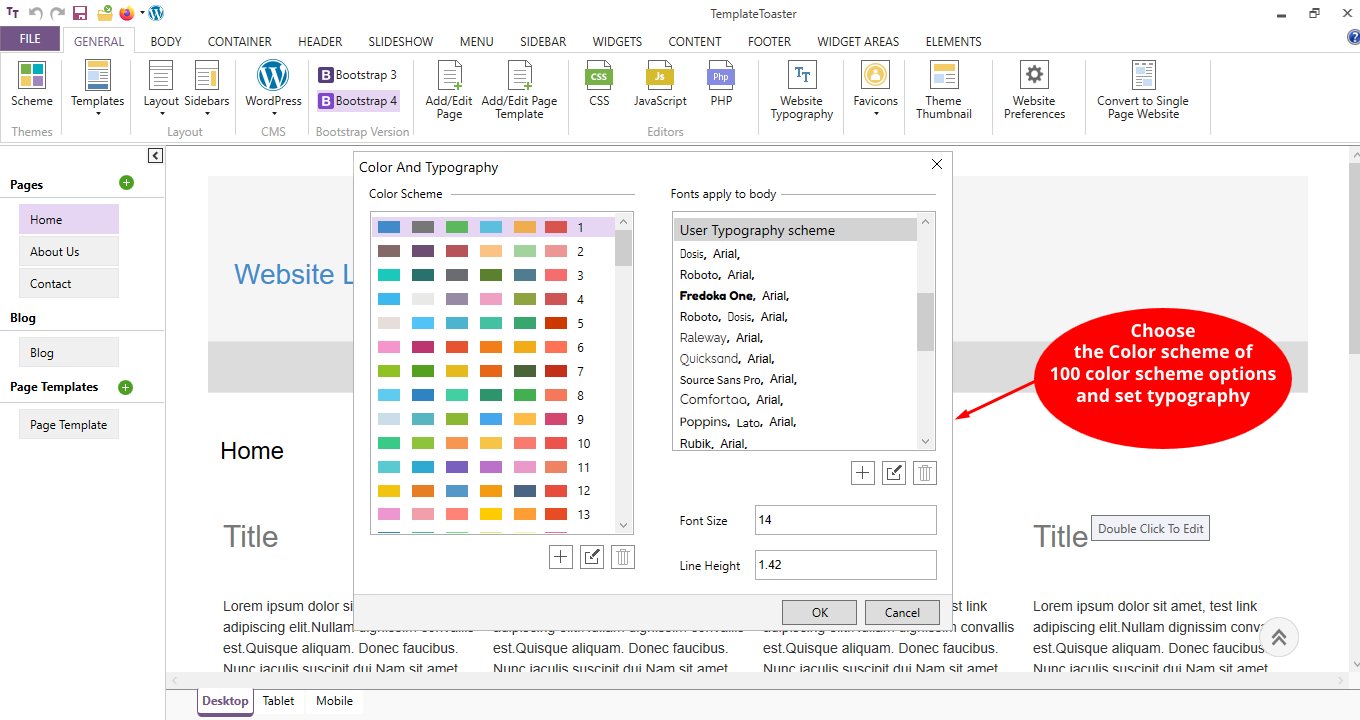
Now, you shall see the very first pop-up asking you to select Color and Typography for your WordPress theme from the given options. Click on the OK button to confirm your choice.
Step 2: Design a Header
Here you need to select the width and height of the header. You can keep the width to full width, equal to container width, and custom width can also be set.

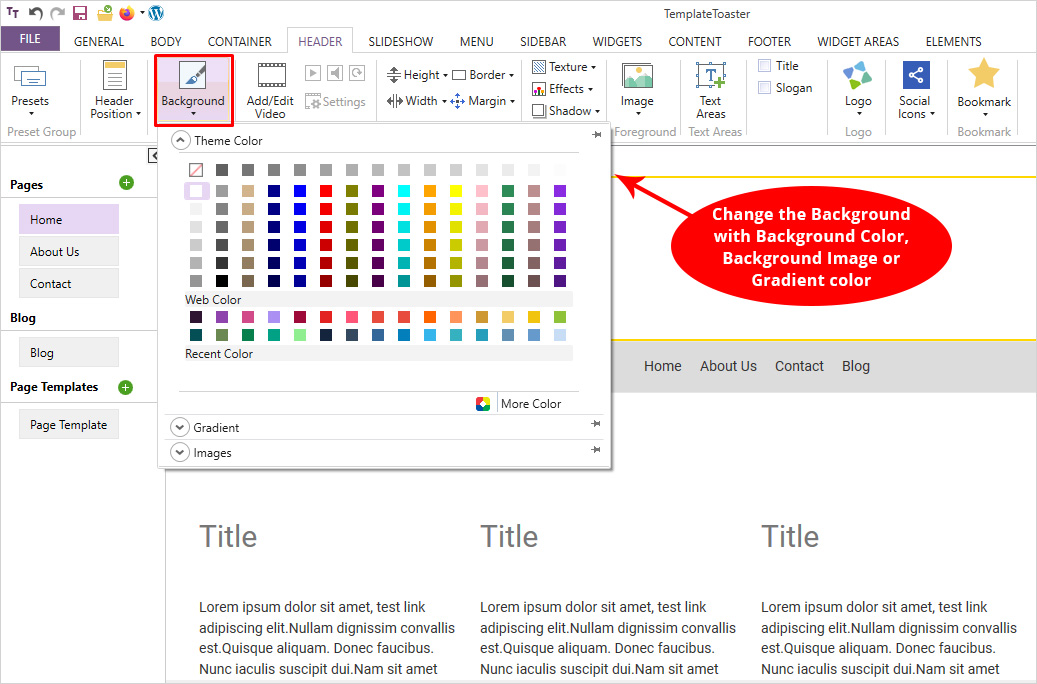
Next, you need to select the Background Color for your header. You can set a color, gradient, or you can also browse an image either from the built-in image gallery or you can use your own custom image.
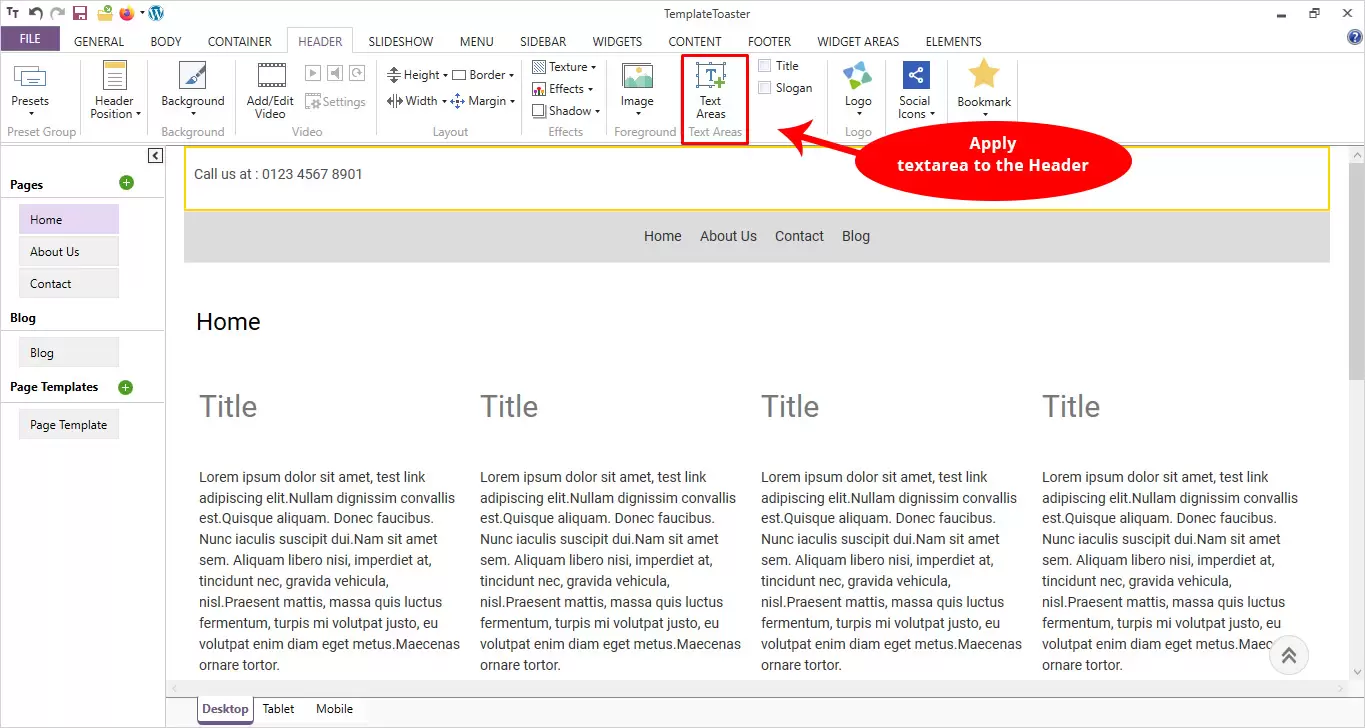
Now, you can add ‘Text Area’ to your header and add text of your choice.
Next, you can easily add Social Media Icons and make your header as interactive as you want.
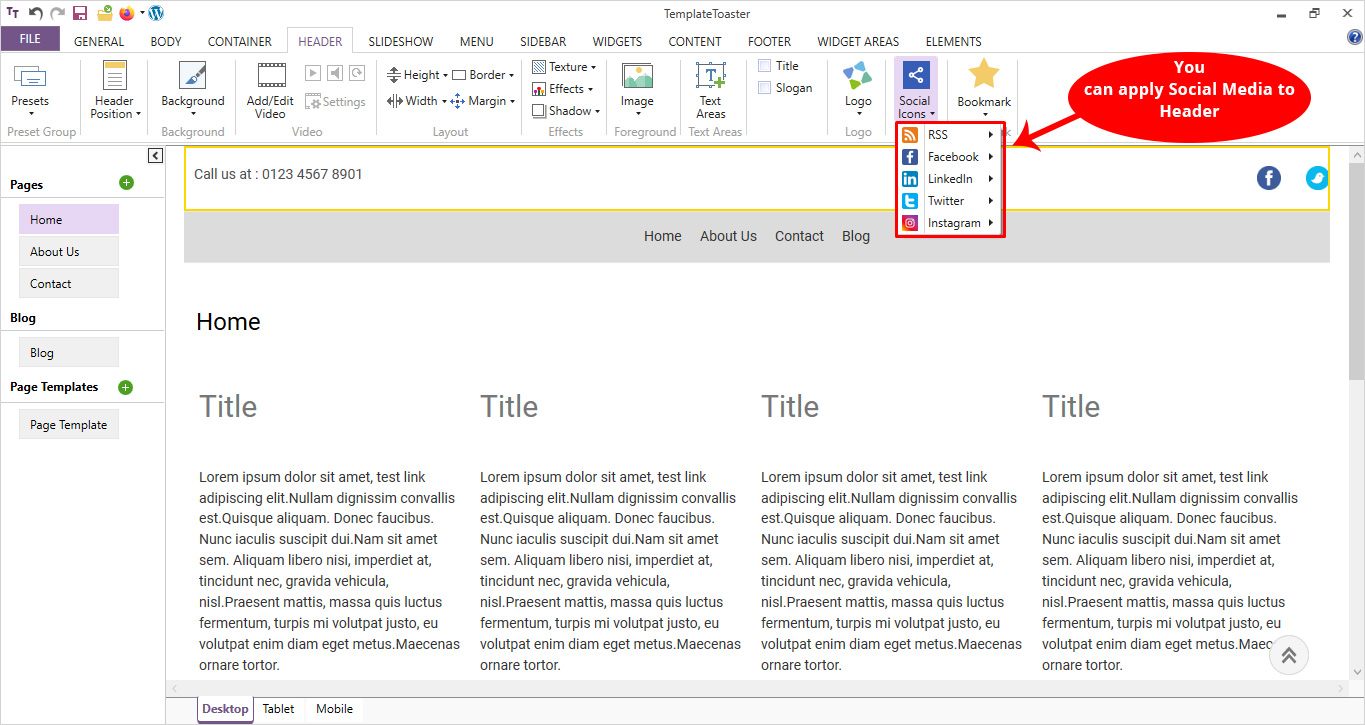
The Header is ready now.
Step 3: Design Menu
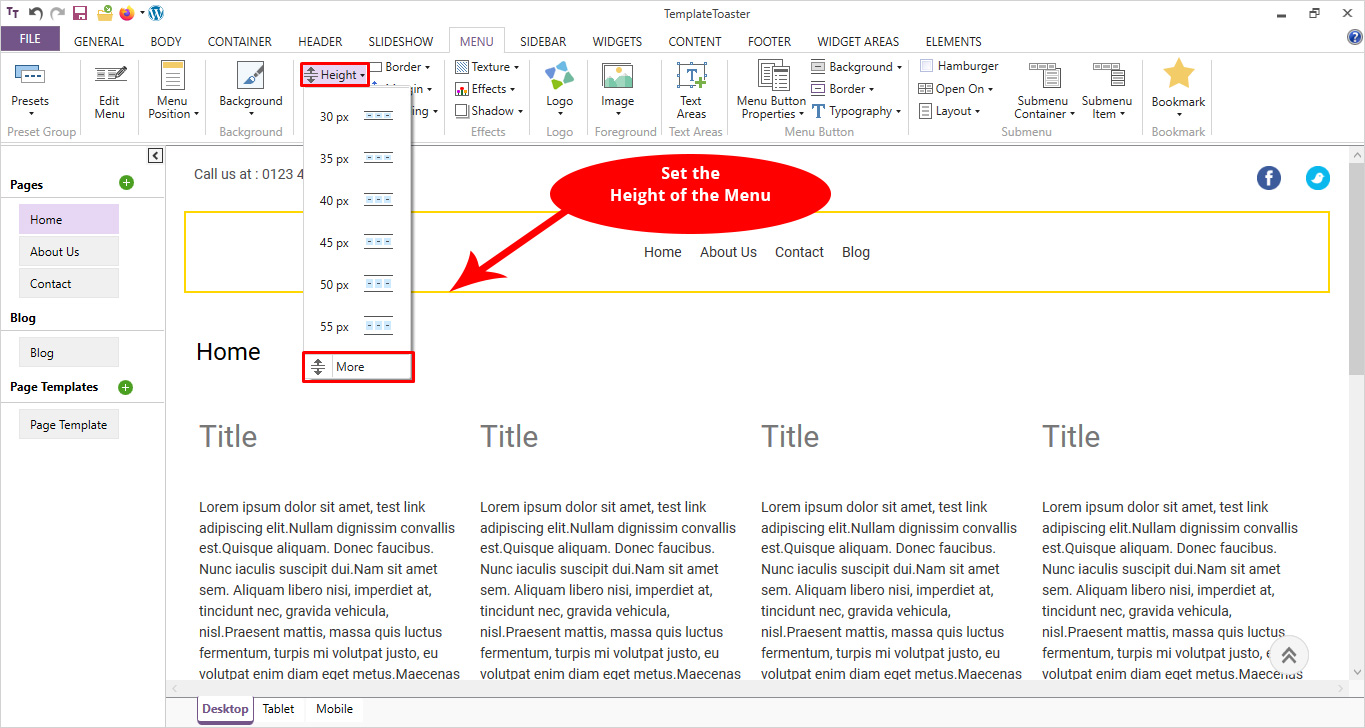
Now, is the time to design the Menu. Go to the Menu tab and select the width and height you want to set for your Menu from the given options.
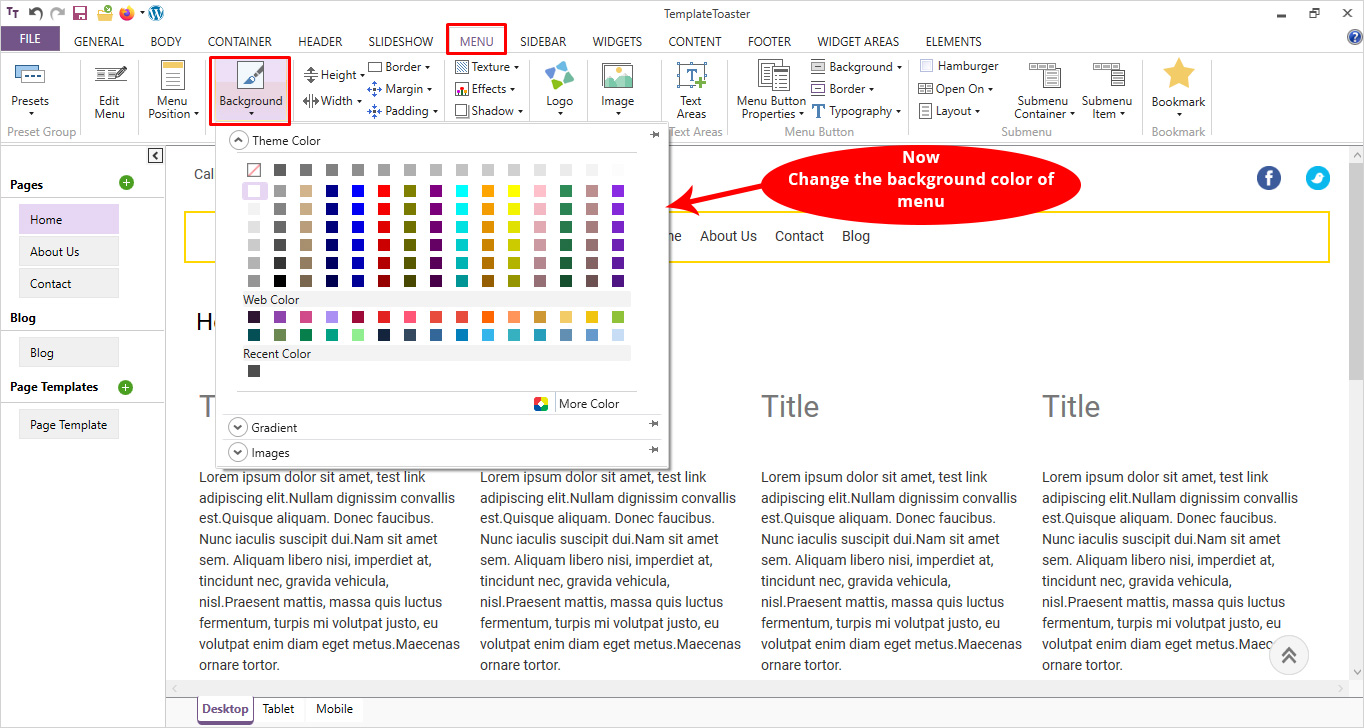
Similarly, you can set the background for your menu. You can select from the given options such as Color, Gradient, and Images.
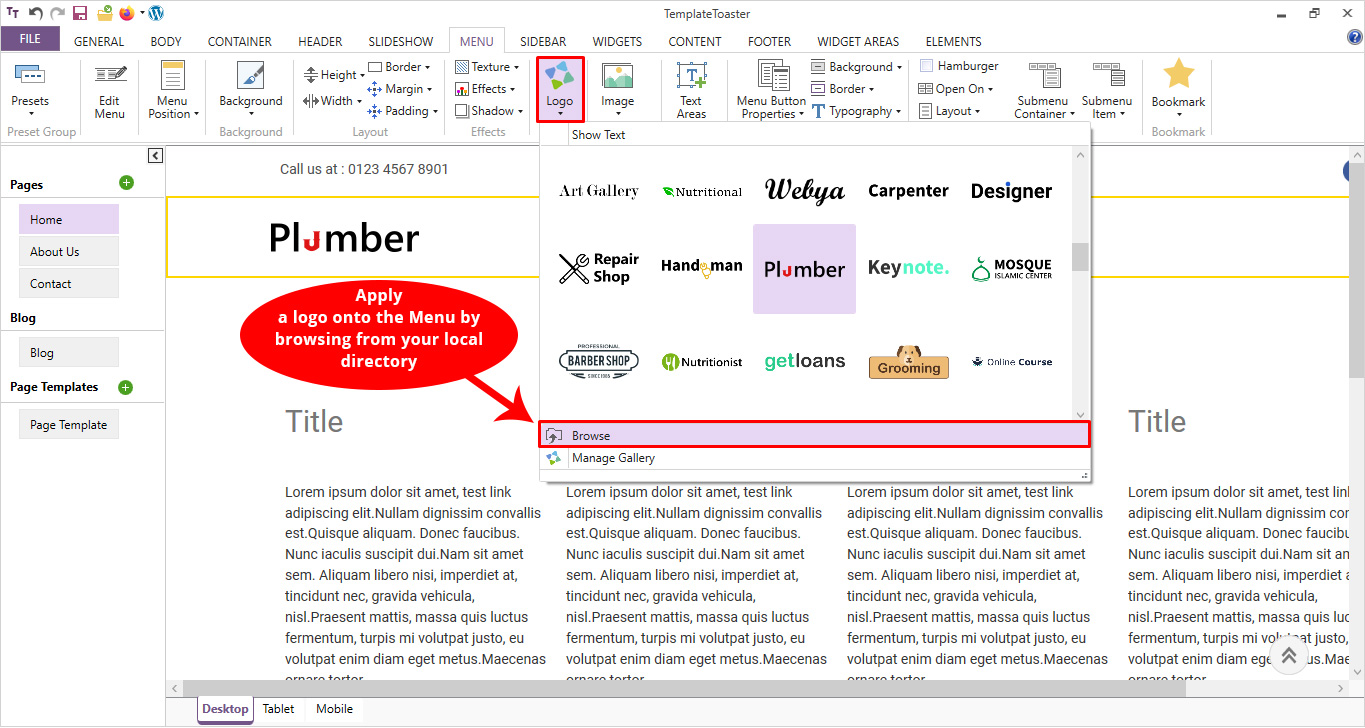
Now, select the Logo for your Menu. Go to the logo tab and choose any logo if you find any suitable logo from the gallery. Otherwise, you can choose your own custom logo as well. Just go to the browse option and look for your logo and have it on your Menu. It’s important to choose the color, font, and shape for your logo according to your business goals and services.
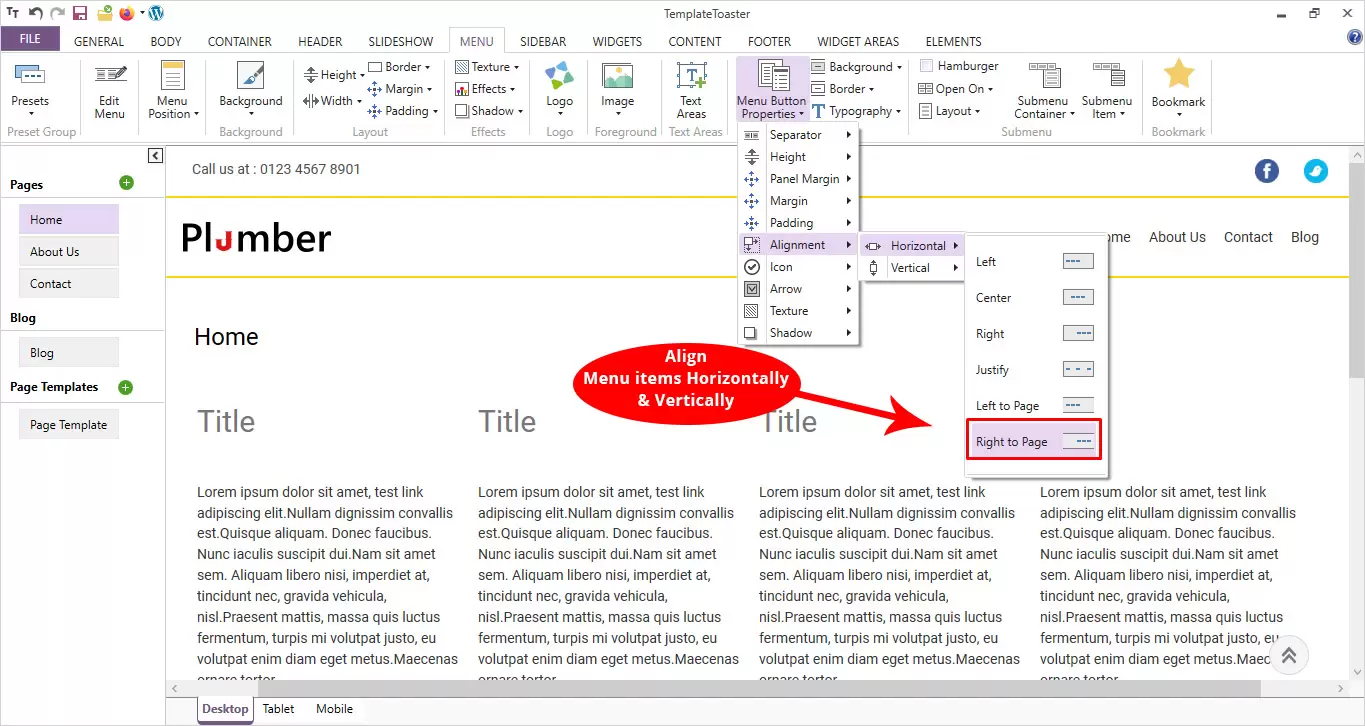
In order to set the Menu Buttons, head to the ‘Menu Button Properties’ and then align the button like Alignment → Horizontal → Right to Page. This will align your menu buttons to the right of the page.
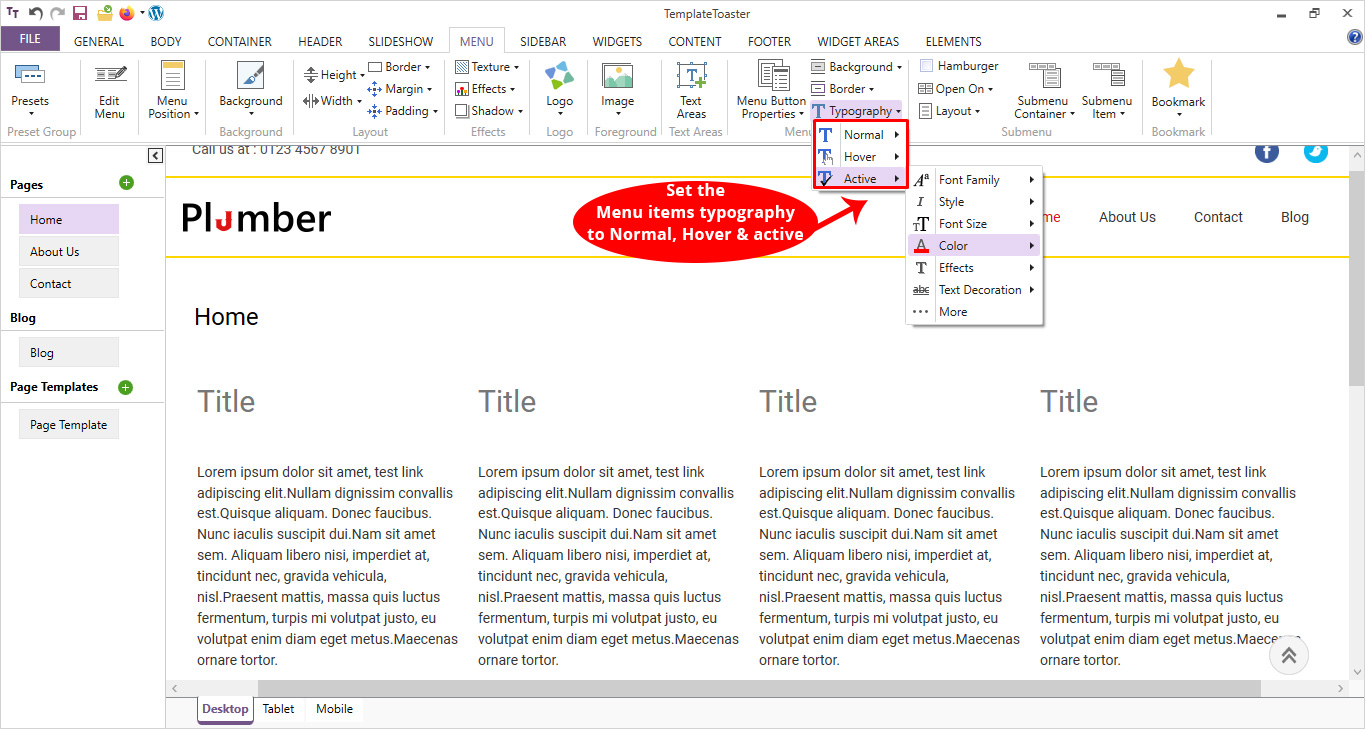
However, you can also set the typography for your menu. Simply by going to the Typography → Normal/Hover/Active. Whereas, there is an option to change text color as well.
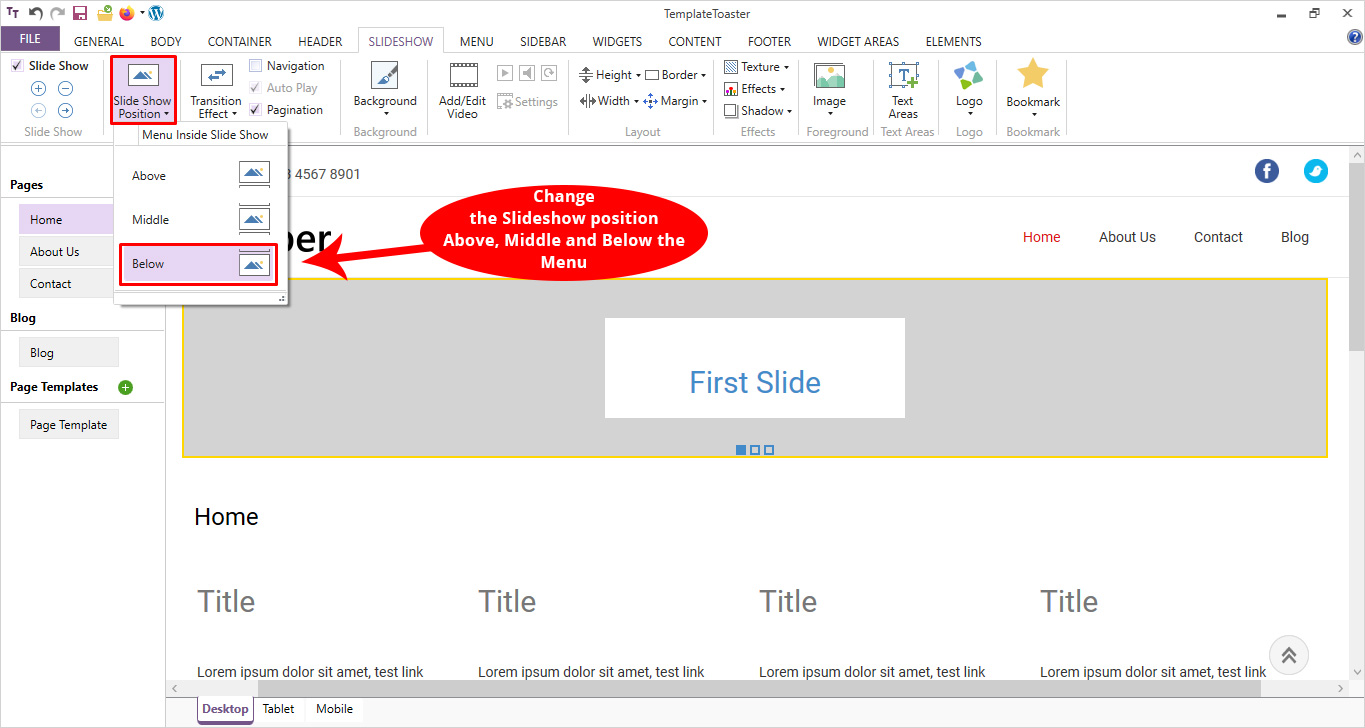
Step 4: Create and Stylize a Slideshow
In order to add a slideshow, go to the Slideshow tab and check the slideshow option provided at the left extreme corner. You need to check the checkbox and it will add a slideshow to your WordPress theme.

There are options to set the position of the slideshow such as below, above, or middle. Likewise, you can set the height and width of the slideshow so that it should match with other elements available on your WordPress theme.
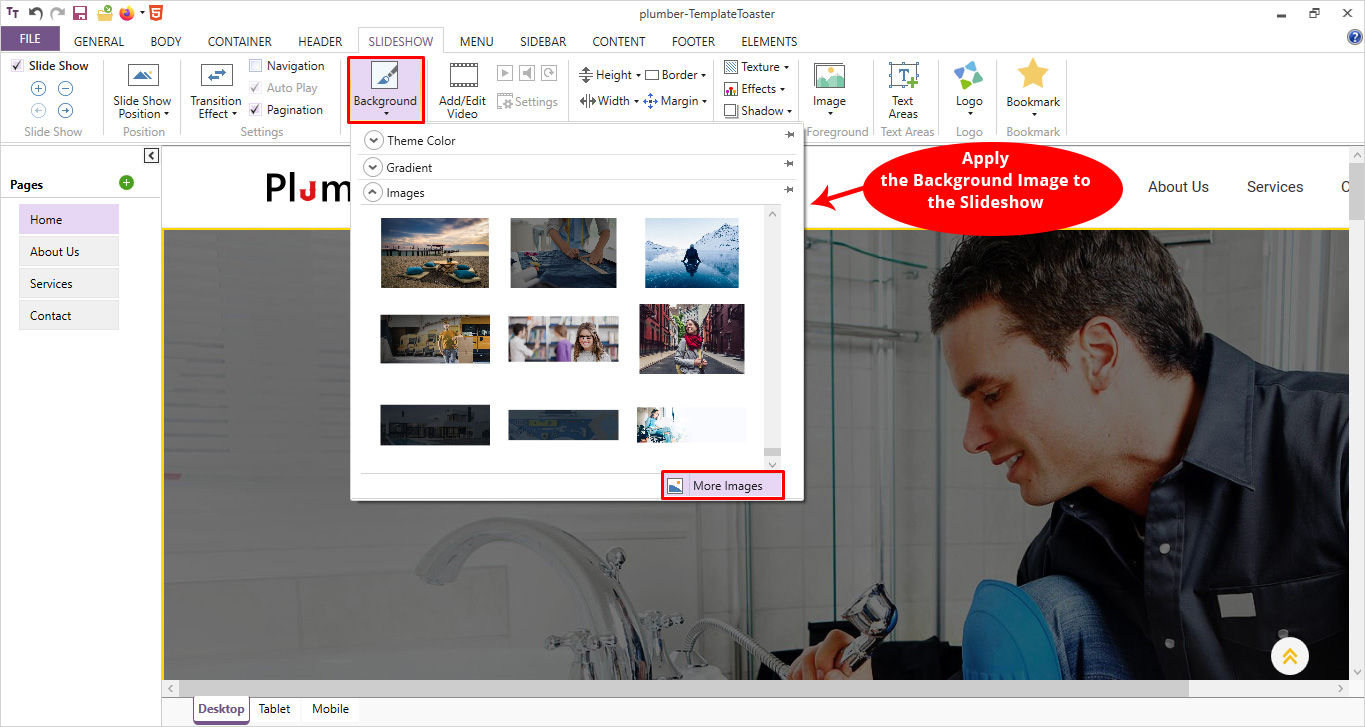
You can select what Background Color and Background Image you want for the slideshow. Click on the background option and you are free to select images either from the built-in gallery or you can choose your custom images too.
Further, you can easily stylize it by applying properties like the position of the slideshow, transition effects, width, height, border, etc., and make it as beautiful as you want. You can then add a text area to display the required information.
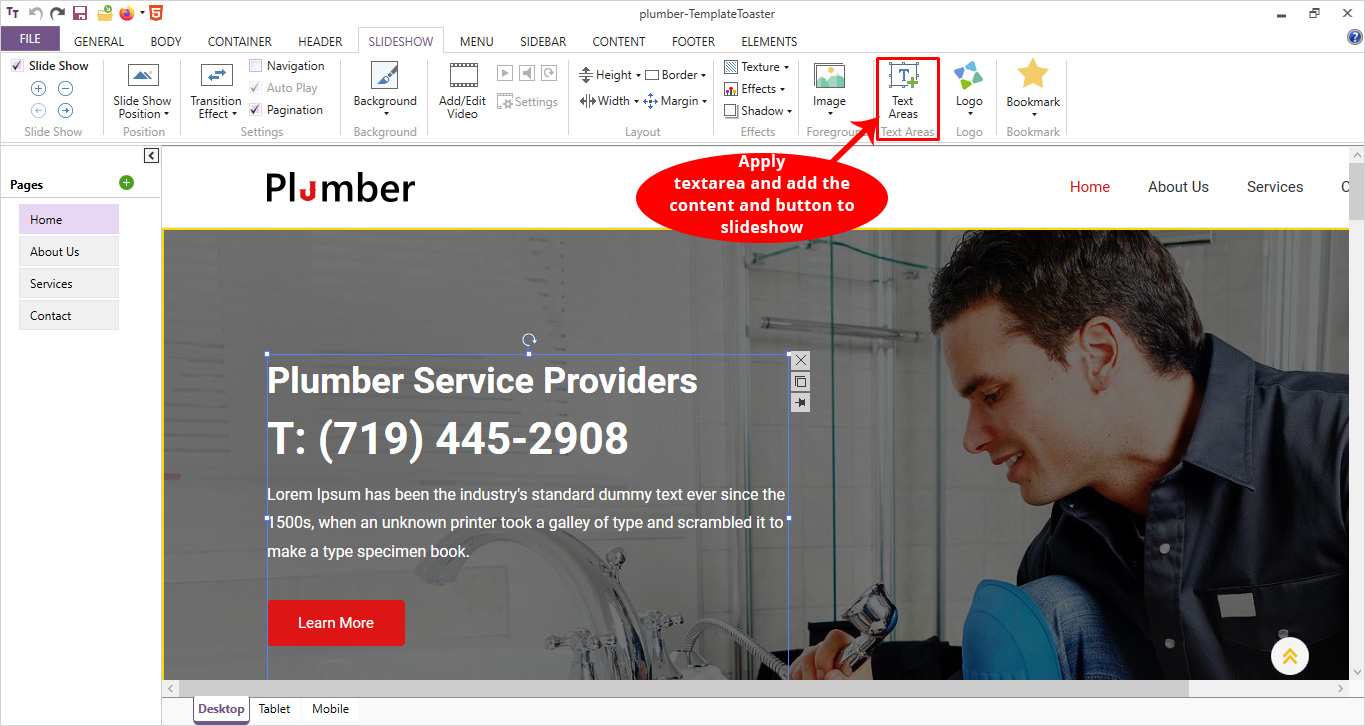
These and many other components top WordPress developers include in their theme to make them more engaging for users.
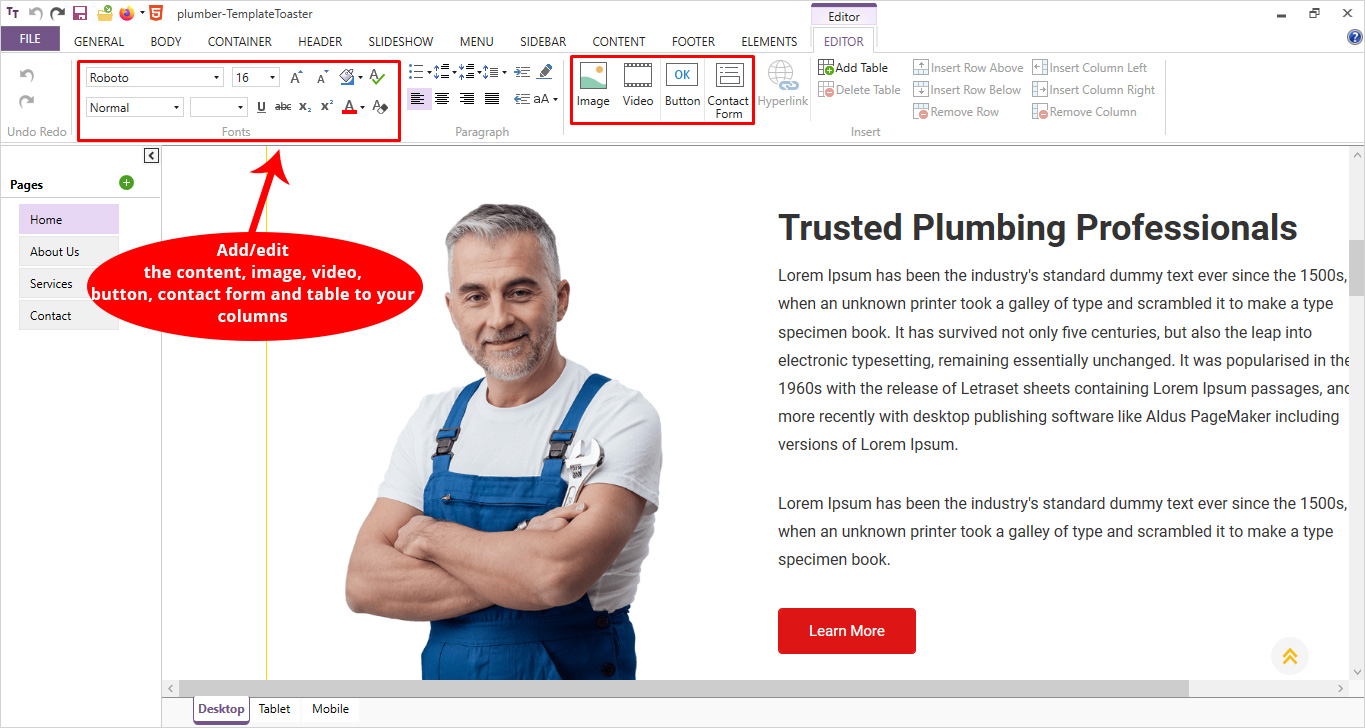
Step 5: Edit Your Content (Main Area)
Now comes the main area i.e. Content area. Simply by clicking on the text, you will be able to add the content to your site. However, you can use various options like you can set the typography, font color, text alignment, font size, video, images, contact form, tables to your columns, and much more. This way you can get your text ready. Because content plays a significant role. You can find and engage your target audience with content.
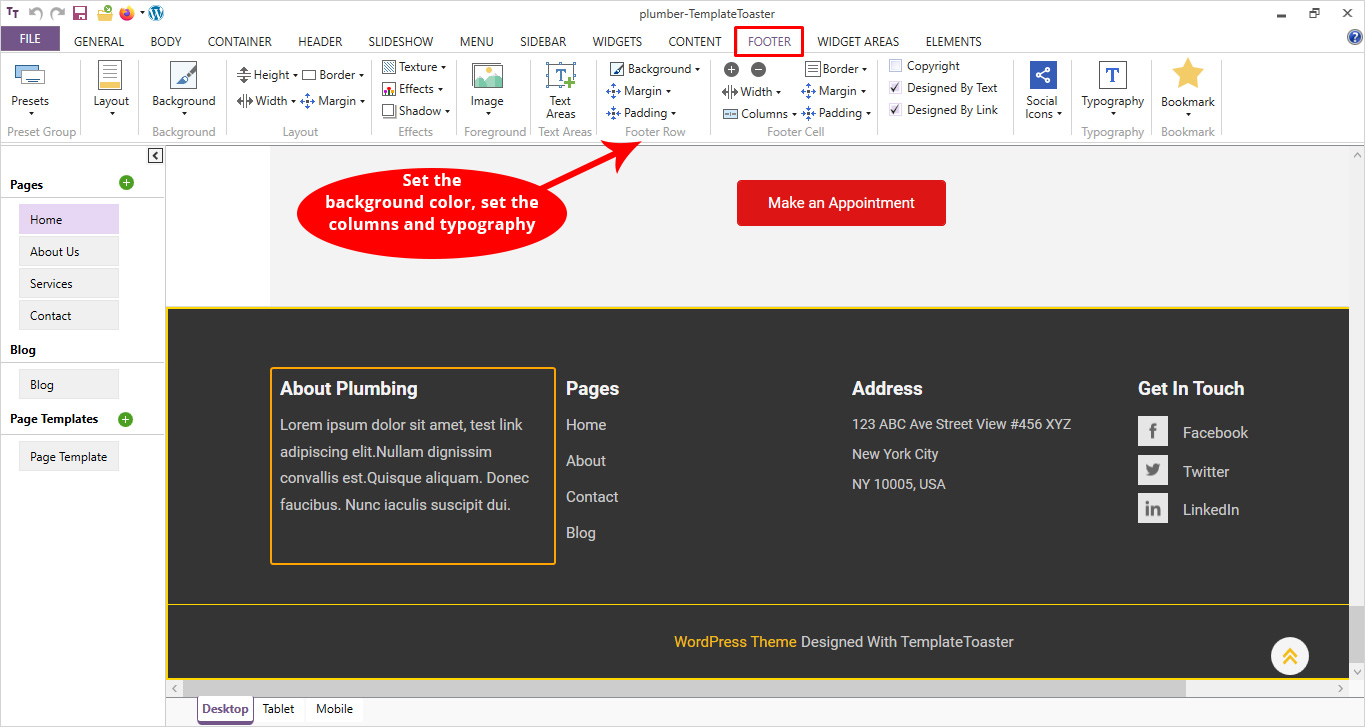
Step 6: Design/Customize the Footer
In order to design your Footer, go to the Footer tab and start picking up the options to customize it. You will get to see many options like setting the Background Image or color, Typography, Margin, Padding, Height, Width, etc. You can also have social icons in your footer, links, hyperlinks, and much more.
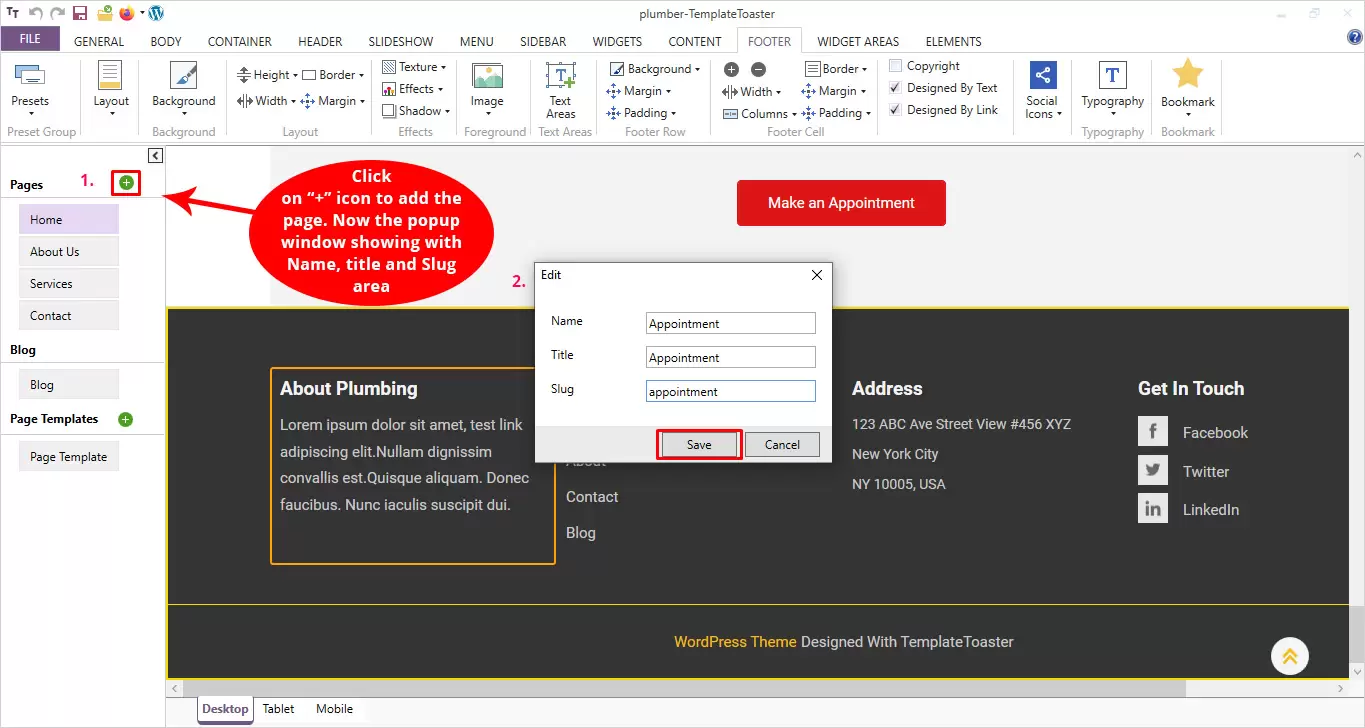
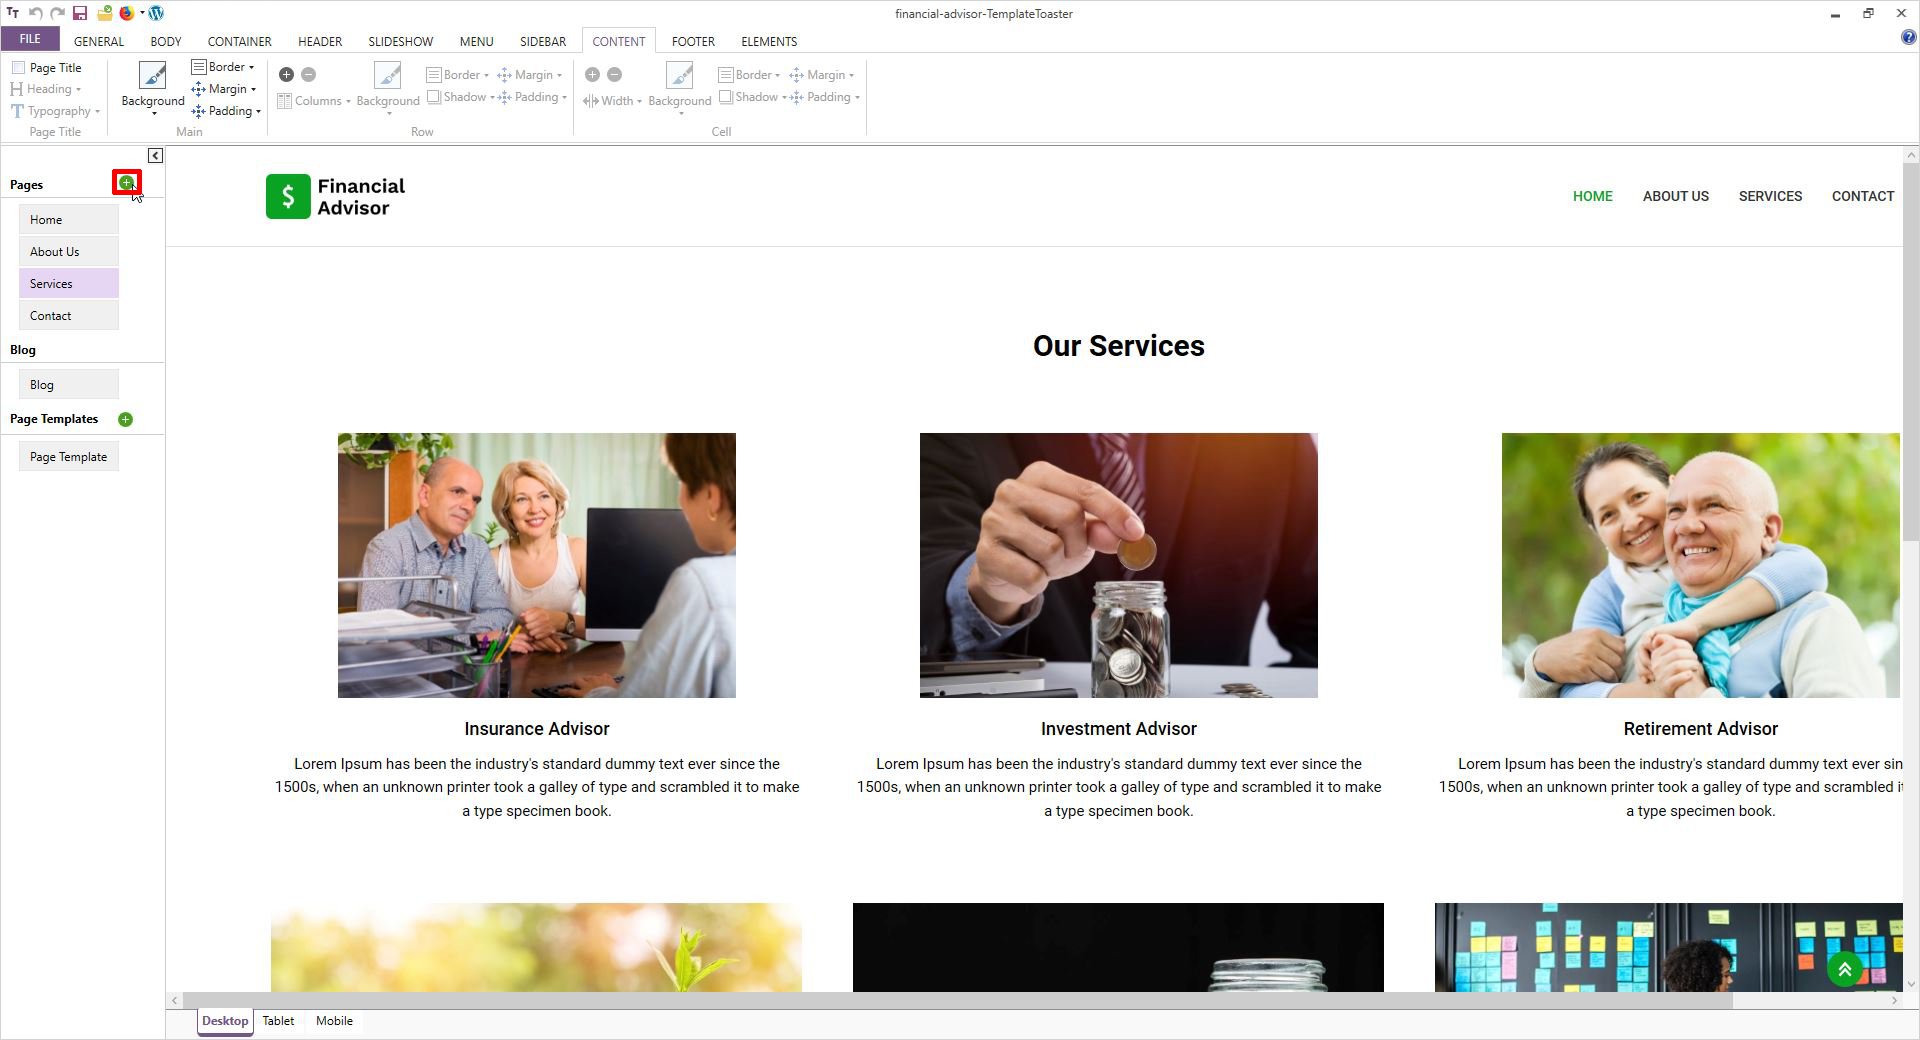
Step 7: Add More Pages
So, you have successfully designed the home page. Similarly, you can create other pages too. All you have to do is click on the ‘+’ icon on the left side and add as many pages as you want. When you will click on the + icon, a pop-up will appear where you have to enter your Name, Title, Slug, and then click on the Save button to confirm your action. This way you can add as many pages as you want.
However, if you want to add a child page for any particular page, you can do that as well. All you have to do is click on the ellipses (three dots) corresponding to the page name and then right-click being present on the desired page and choose the ‘Add Child Page’. Something like showing a virtual hierarchy.
Page Name → ⋮ → Add Child Page
Here, you will see other options such as Remove, Edit, and Clone. You can use options to take suitable actions.
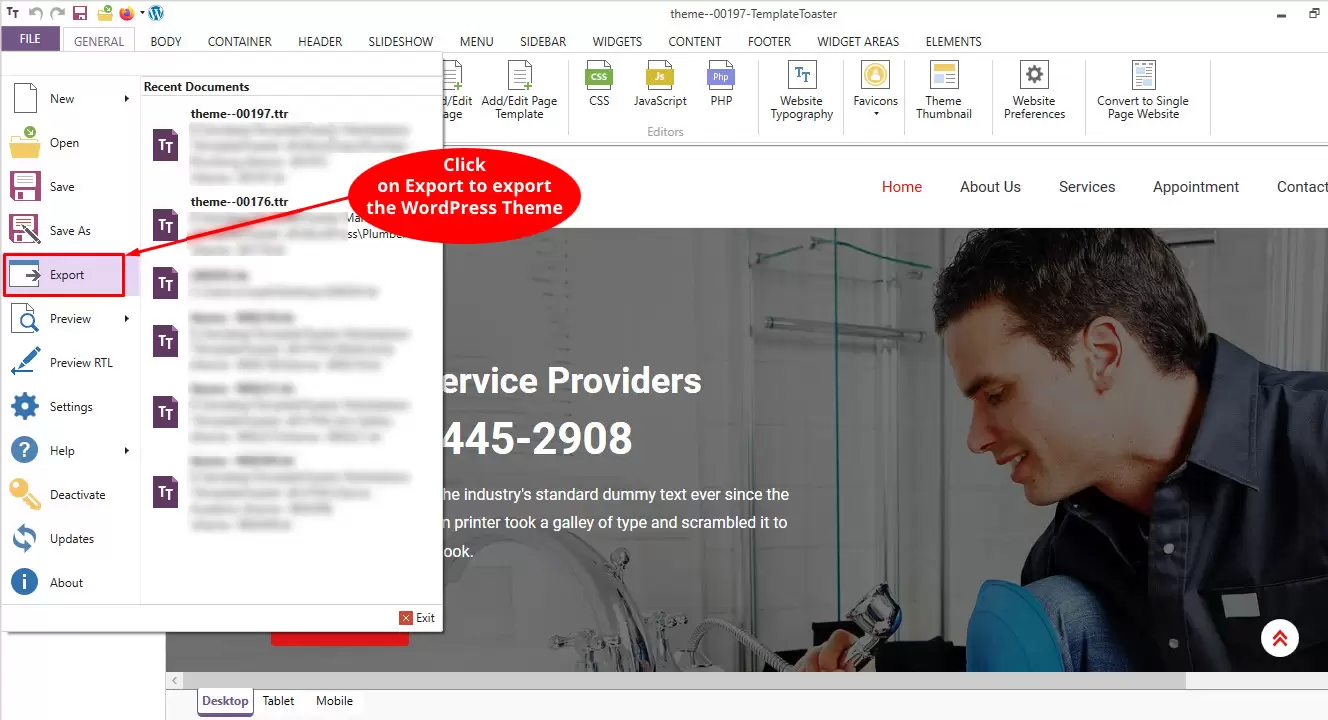
Step 8: Export Your WordPress Theme
After you have successfully created your WordPress theme, now you need to export it. Go to the File tab and click on the ‘Export’ option there.
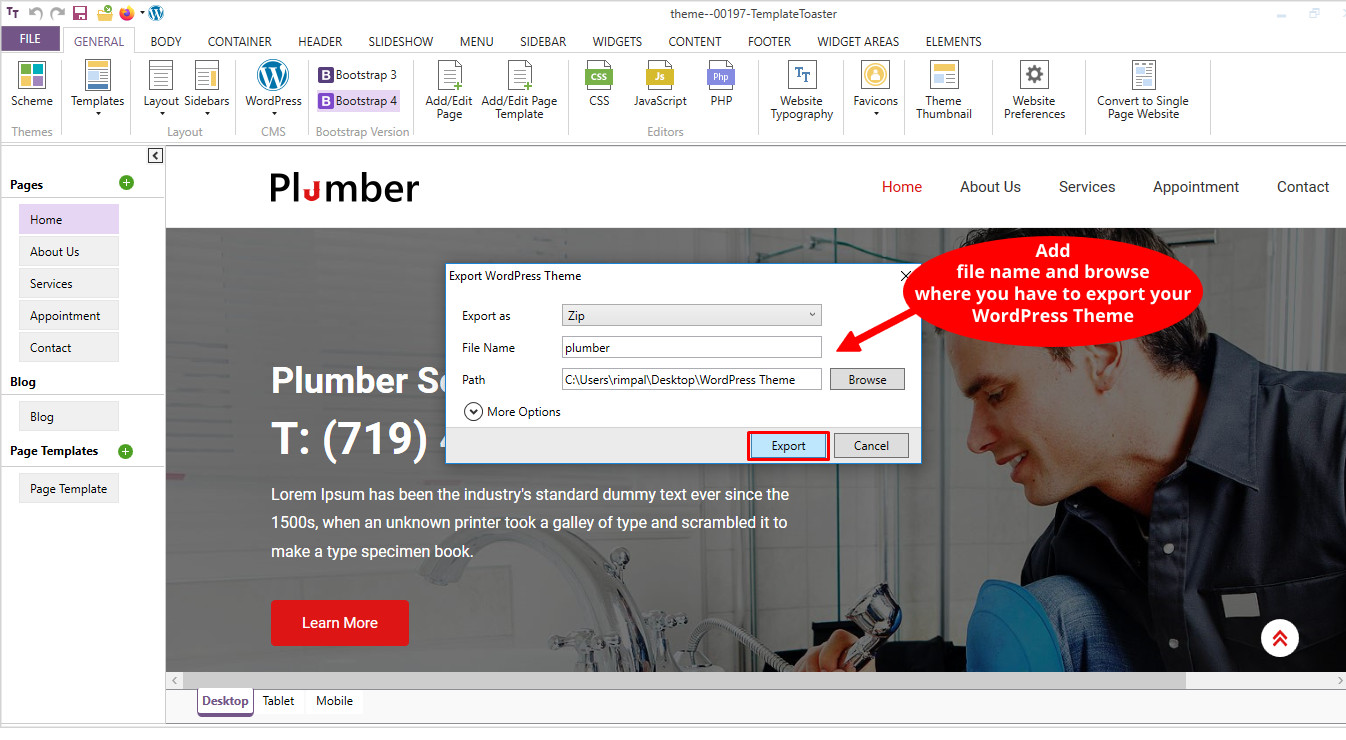
After you click on it, you shall see an ‘Export WordPress Theme’ pop-up. Here you need to add the file name and then browse the path where you wish to export your WordPress theme. Once you are done, hit the Export button.
Step 9: Log in to Your WordPress Admin Panel
Now, login to your WordPress dashboard and go to Appearance → Theme → Add New
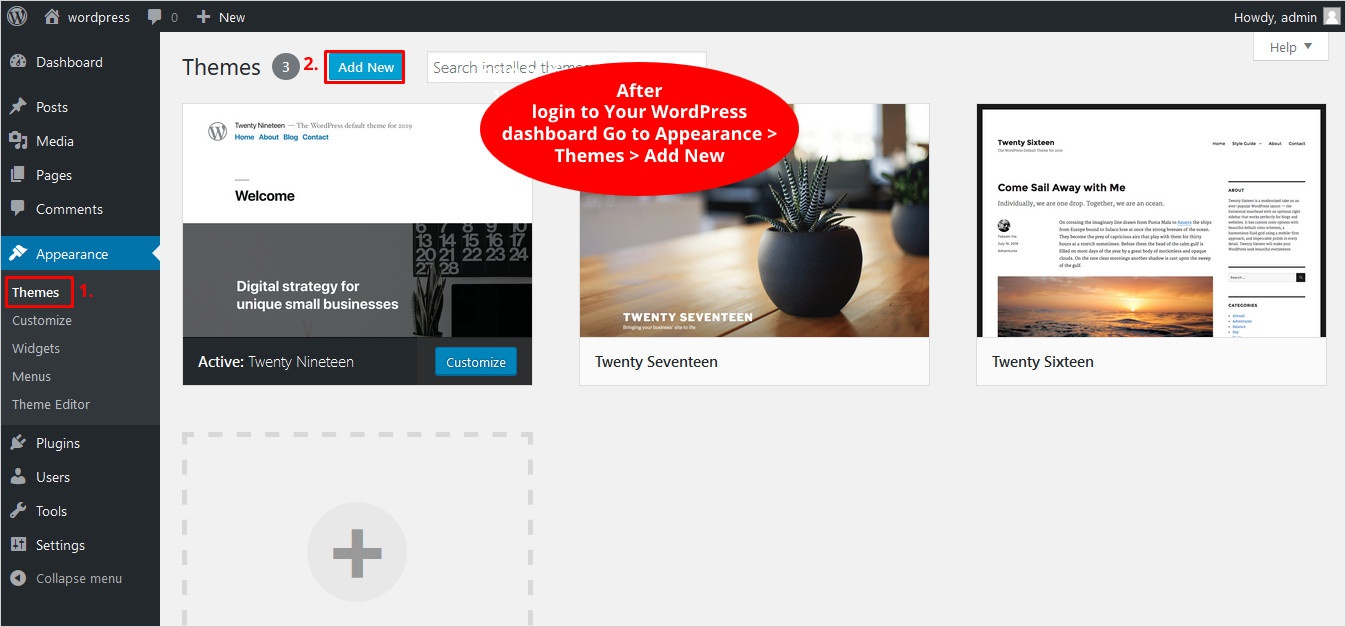
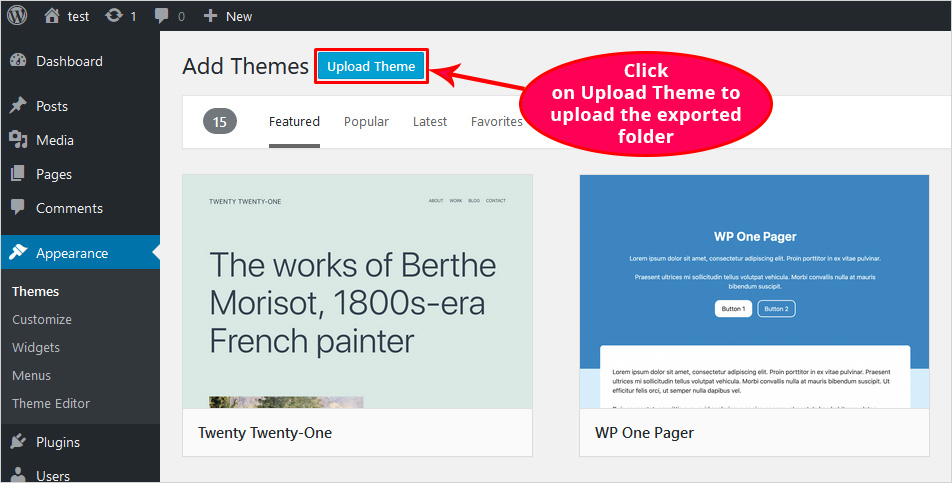
There’s an option given ‘Upload Theme’. Click on this option to upload your theme to WordPress.
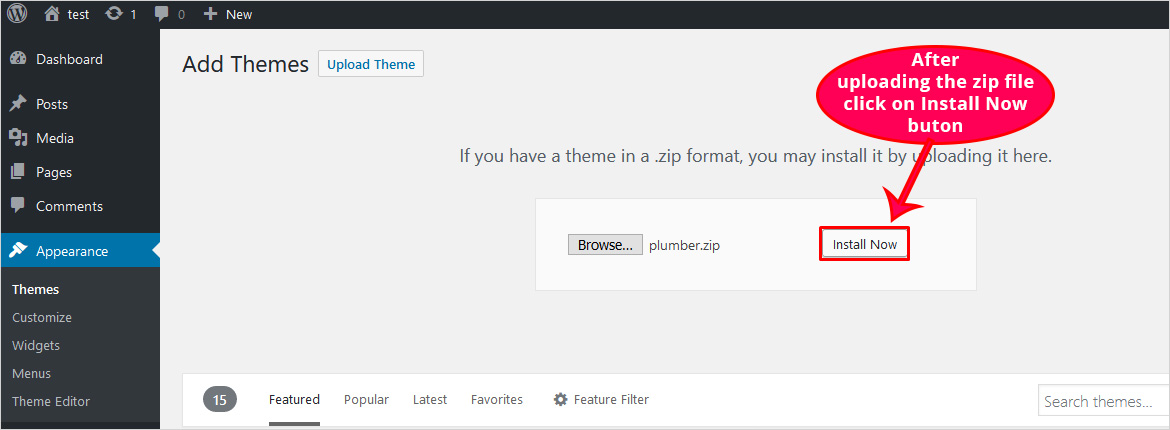
Browse your WordPress theme (it will be a zip file) and hit the Install Now button to confirm your choice.
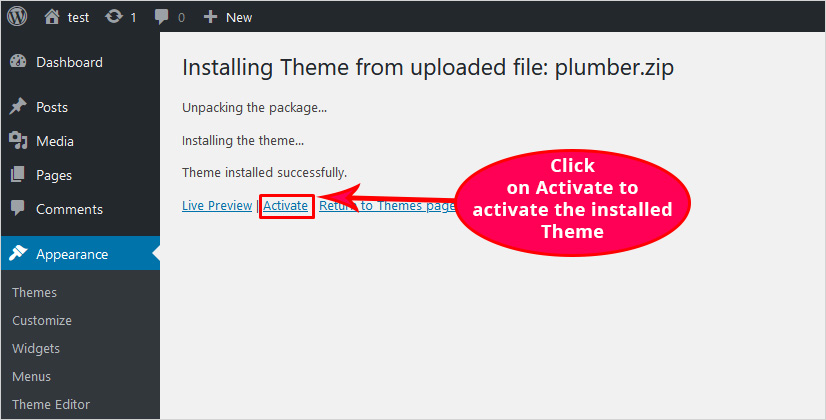
You shall now see a screen with the message ‘Installing Theme from uploaded file: yourfilename.zip’. Here, you need to click on the Activate button and this will activate your installed theme.
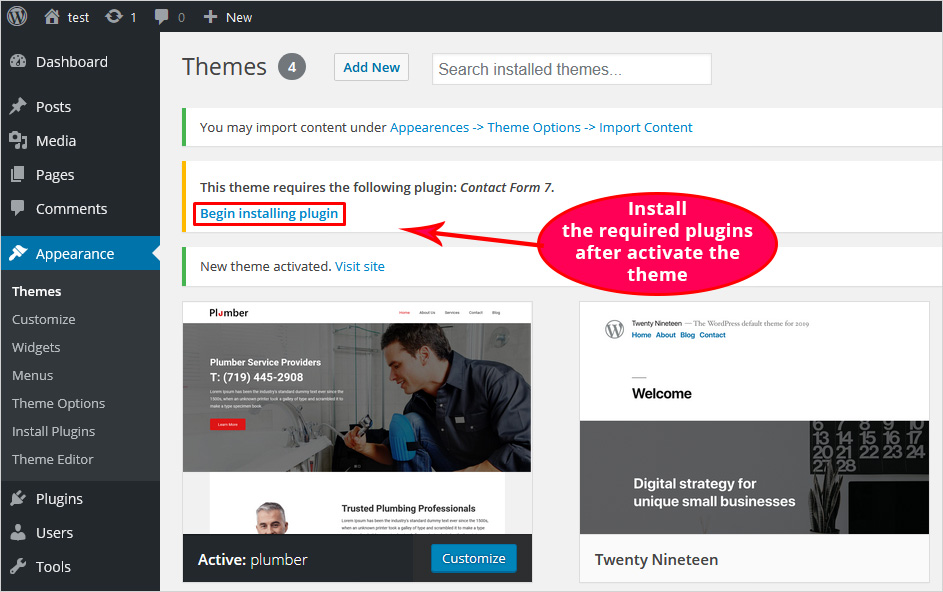
However, you have created your WordPress theme with TemplateToaster, it provides a default Contact Form 7 integration. Therefore, it will display a message informing you about the theme you have created requires Contact Form 7 installed. So, click on the ‘Begin installing plugin’ option and let the plugin install for your WordPress.
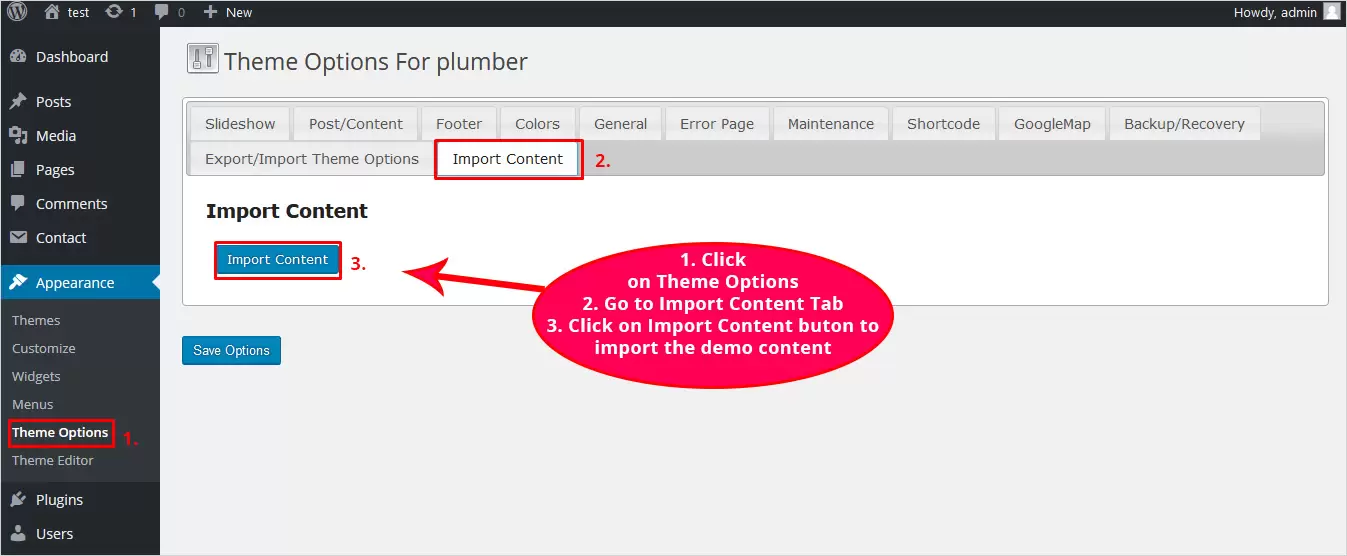
Since TemplateToaster comes with the ease to add content to your theme. So, whatever content you have added to your WordPress theme while creating it can be directly exported here. All you have to do is go to
Appearance → Theme Option → Import Content Tab → Import Content Button
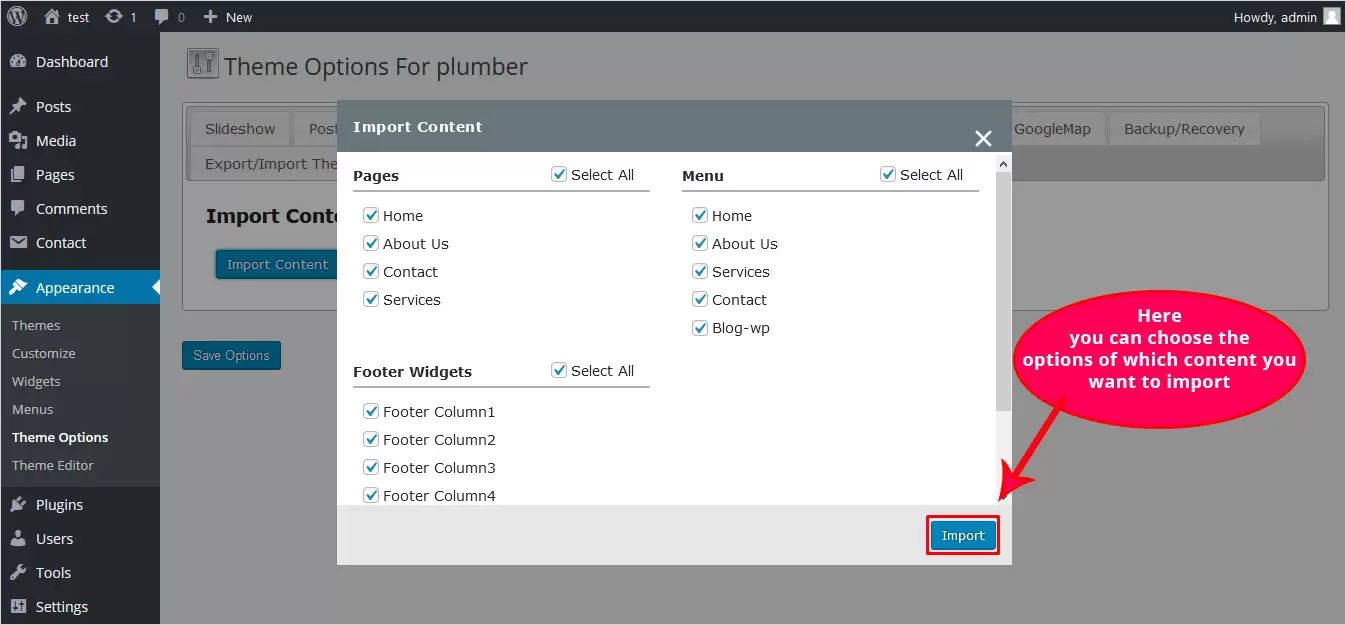
Now, there appears another pop-up the ‘Import Content’ pop-up. Here you can choose what content you wish to import. Pages, Menu, Footer Menu, all the options are given and you are free to choose which page or what content you wish to show. However, you can select all options and let all of your content be imported all at once.
After all the steps you are now ready with your WordPress theme. It will look something like the below screenshot.

Hurry! Your theme looks beautiful. I am sure all these steps are now clear to you and you are ready to create your own custom WordPress theme using TemplateToaster.
However, if you want to add a child page for any particular page, then you can do that as well. And all you have to do is click on the ellipses (three dots) corresponding to the page name t have to right-click being present on the desired page and choose the ‘Add Child Page’. Something like showing a virtual hierarchy.
Page Name → ⋮ → Add Child Page
Here, you can see other options also i.e. Remove, Edit, and Clone. You can use them to take suitable actions.
Hurray!! You have completed process of creating WordPress theme form scratch. And you can earn profit with WordPress theme development and keep your little secret weapon safe. Here is our Free WordPress Themes section.
From time to time you might be adding new features to your theme, you can upload your new theme version and can delete your old theme with just a few clicks.
How to Create a WordPress Theme: FAQ
What is the advantage of creating a WordPress theme from scratch?
Creating a WordPress theme from scratch gives you complete control over your website’s design and functionality. You can tailor the theme to meet specific business or personal requirements, optimize the code for performance, and avoid unnecessary features or bloat that come with pre-built themes. Custom themes also provide better flexibility for SEO, accessibility, and branding.
What are the basic skills required to create a WordPress theme?
To create a WordPress theme from scratch, you should have a basic understanding of HTML, CSS, and JavaScript for front-end development, as well as PHP, which WordPress uses for back-end functionality. Familiarity with WordPress’ file structure and template hierarchy is also important to build a dynamic and functional theme.
How long does it take to create a WordPress theme?
The time it takes to create a WordPress theme from scratch depends on your level of experience and the complexity of the theme. A simple, minimal theme might take a few hours, while more complex themes with custom functionality could take several days.
Build a Stunning Website in Minutes with TemplateToaster Website Builder
Create Your Own Website Now
I am glad you wrote this to give alternative ways. My one complain about Template Toaster has always been that I cannot submit themes created with it to the official WordPress repos. I really hope your team will resolve the issues preventing that.
This article obviously took significant time to put together. Very well written, very clear, very helpful. Nice work!
In the sidebar.php you have an unopen tag: me&optioncount=1&hierarchical=0′); ?>
What’s the rest of it?
Hi Jeff, we are sorry for that. It was a human error. We have updated the code. Thanks for pointing out.
Is it possible to add a menu? And if so, how?
Is it possible to add custom login plugin when creating WordPress theme from scratch in TemplateToaster?
And Thanks for sharing this informative post!
yes of course, you can add.
Plugins like Admin Custom Login plugin, Loginer, ThemeMyLogin works fine.
I just installed TemplateToaster and came across this article. Really helpful.
Created a WordPress theme from scratch successfully. Thanks !!
How can i have swiping images in the home page?
Good day! I could have sworn I’ve been to this
blog before but after reading through some of the post I realized it’s new to me.
Nonetheless, I’m definitely delighted I found it and I’ll be book-marking and checking back frequently!
Creating a WordPress is not a tough nut to crack but still you can get stuck anywhere and need some guidance. Very Impressive post. Thanks for sharing 🙂
Best post witnessed for WordPress theme from scratch!
Thanks TemplateToaster blog.
Very True! I have been looking for this kind of blog.
And Creating a WordPress theme with TemplateToaster is also very easy. Thanks TemplateToaster blog.
Indeed an impressive post!
All the information at one place. WordPress is becoming easier and easier day by day with these kind of blogs.
Do you know any WordPress custom login page plugin ?
Loginer is a good WordPress plugin to create login page
Thanks for replying, I am already using it, Good plugin
I was regularly getting some error in the script. Your blog came to me as rescue.
Thanks for sharing.
This post must have taken a great time and is totally appreciable.
Creating a theme from scratch is not easy , a single error can drive you crazy.
Thanks for sharing the post.
Very true, front end development is also a tough task since this makes most impact on the visitor of the website. This post is very helpful
Very impressive post 🙂
Please recommend me a WordPress plugin for email newsletter.
You could try MailChimp for email marketing and newsletter services.
This post is a Gem for WordPress lovers!
Looking for it from a long time.
WordPress theme from scratch is a good option but also modifying the pre-designed templates can also get your work done.
hi , which editor would you recommend to modify a Premium WordPress theme?
You guys always come up with great content. This article is really helpful and must have taken good amount of time to put it together.
How can i add a video in the home page of the website using TemplateToaster?
Best post ever witness on WordPress theme from scratch. Thanks for sharing.
Indeed a great post. WordPress theme from scratch is really tough but with time and practice finally got success.
Yes, clearly explained. Thanks for sharing.
How can i design a corner ad in the home page?
TemplateToaster is a great platform to create WordPress templates. Thanks for the article.
Does TemplateToaster’s free trial provide this feature of creating the theme from scratch?
No, Only its professional edition has this feature of creating Themes from scratch.
How can I add custom Images in TemplateToaster?
Creating from scratch is not a cake walk, thanks for sharing the post.
Great post! Thanks for the complete tutorial, very well explained
Professional web designers can use TemplateToaster to create WordPress themes from scratch doing all the customizations with tge WordPress theme builder .
Which WordPress version you are using in your example ?
I am using the same code as in step 5 but need assistance.
In step 5 WordPress Loop is explained. It means if there are posts on your WordPress website, fetch and display them with title and content.
While creating a WordPress Theme how can I add dynamically updating copyright year in footer ?
It is handled by your theme, your theme might have provided a short code for dynamic copyright update, I recommend you to use that.
Do I need to bother about the PHP version while creating a WordPress Theme using this tutorial ?
No, you need not to bother for the PHP Version for creating a basic WordPress theme using above instructions. However latest version of PHP 8.2 is recommended.