XAMPP phpMyAdmin: How to Create Database and Tables
Want to learn how to How to Create Database and Tables in phpMyAdmin? It is always suggested to install XAMPP, and test your web project locally before making it live. Learn how to install and configure XAMPP phpMyAdmin on your local system.
XAMPP is an open-source software which is used to create a website on your local PC. The XAMPP server setup lets you create and test your website on a local server before making making it available for everyone on the web. Also, you can use the XAMPP control panel to manage all the software that comes along with it. Thus the software i.e. Apache Web Server and PHP and MySQL Database etc. that is a part of the XAMPP program can be started or deactivated using the XAMPP control panel.
It consists of Perl, MariaDB, and PHP. Also, the XAMPP stack offers MySQL database, which is a vital component of the stack. It offer a package named phpMyAdmin to add and modify the database tables. Thus, with XAMPP, you can easily use phpMyAdmin to create and use the MySQL database quickly. XAMPP is a lightweight solution that works perfectly on multiple platforms like Linux, Windows, and Mac OS.
Additionally most of the developers use XAMPP to test their new WordPress plugins, check updates, and test new themes before implementing any changes to the live version. This way developers can easily find any errors or issues that might occur. Let’s now dig a little deeper and move toward phpMyAdmin to understand the data flow.
XAMPP phpMyAdmin What is it?
phpMyAdmin is a free and open source software that lets you manage the administration of MySQL over the web. You can easily manage the database through a graphic user interface known as phpMyAdmin in this case. phpMyAdmin is written in PHP and has gained a lot of popularity in terms of web-based MySQL management solution. You can perform operations on MySQL via phpMyAdmin user interface while you can still directly execute SQL queries. And it lets you carry out operations like editing, creating, dropping, amend MySQL database, alter fields, tables, indexes, etc. In fact, which user should be given what privileges, you can manage that too. phpMyAdmin has huge multi-language community support.
The Graphical User Interface is written in PHP programming language and a popularly used in finding and managing web-based MySQL administration solution. The user can easily manage the MySQL using phpMyAdmin interface while also directly executing MySQL queries. Also it can be used to manage excess control over the data by giving permission and benefits. Thus phpMyAdmin plays a crucial role in managing and handling databases.
Main Features of XAMPP:
- As compared to other servers XAMPP is easier to setup.
- XAMPP offers two options: Complete and Standard.
- It supports cross platform, which means it can run smoothly on Windows and Linux. Also you can run and end the complete Web Server and Database Stack with a single command.
- The control panel comes with Start and Stop button to carry out specific functions, such as Apache, which can run from the Control Panel.
- OpenSSL, MediaWiki, phpMyAdmin, WordPress, Joomla, and many other modules are present.
MySQL with XAMPP
As mentioned above XAMPP is an open-source stack of software which offers several functionalities through a stack of software. The software programs that are a part of XAMPP program can be easily managed i.e. activated and stopped using the XAMPP control panel. It helps in testing and editing the projects offline before making them live or available for everyone on the web. One of the most important functionality provided by the XAMPP is to create MySQL database. This is possible using the phpMyAdmin. We are going to discuss this in detail here.
Create Database on XAMPP phpMyAdmin
phpMyAdmin support a wide range of MySQL operations which makes working with database easy and simple. Moreover, the interactive user interface of phpMyAdmin helps you manage the queries pretty easily. In order to create a XAMPP MySQL database, you need to launch XAMPP first.
Now navigate to http://localhost/phpmyadmin
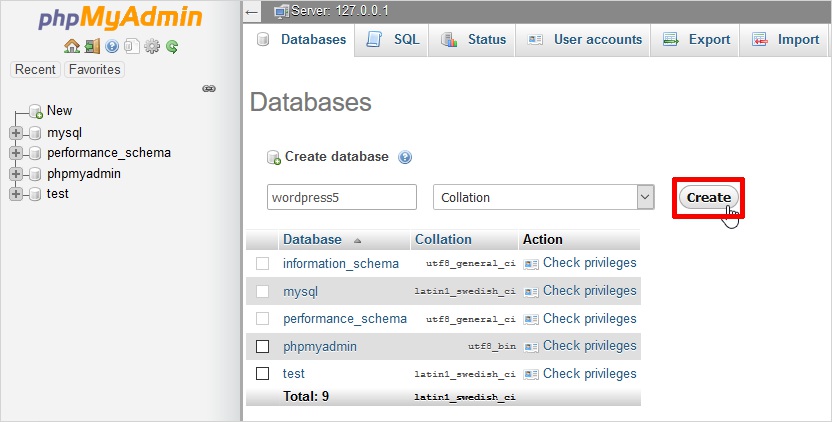
And click on the Database tab. Now you should see the option to Create a Database and input field to enter the database name. Write the database name and hit the ‘Create’ button. You will see a success message in a while.
From the list of tables, you can view your database. You are free to use this database wherever you like with default settings. By default the HostName is ‘localhost’, MySQL user is ‘root’ and have no password.
Create Tables Using phpMyAdmin XAMPP
Tables play a vital role in the storage of information (dynamic content). On XAMPP MySQL store the information in the tables. You can easily add tables to MySQL using the intuitive phpMyAdmin user interface. In the phpMyAdmin click on the ‘Structure’ tab. Below the tables list at the bottom of the page, click on the ‘Create new table on database’ wizard to get started. First, add the table name and the total number of fields and hit the ‘Go’ button.
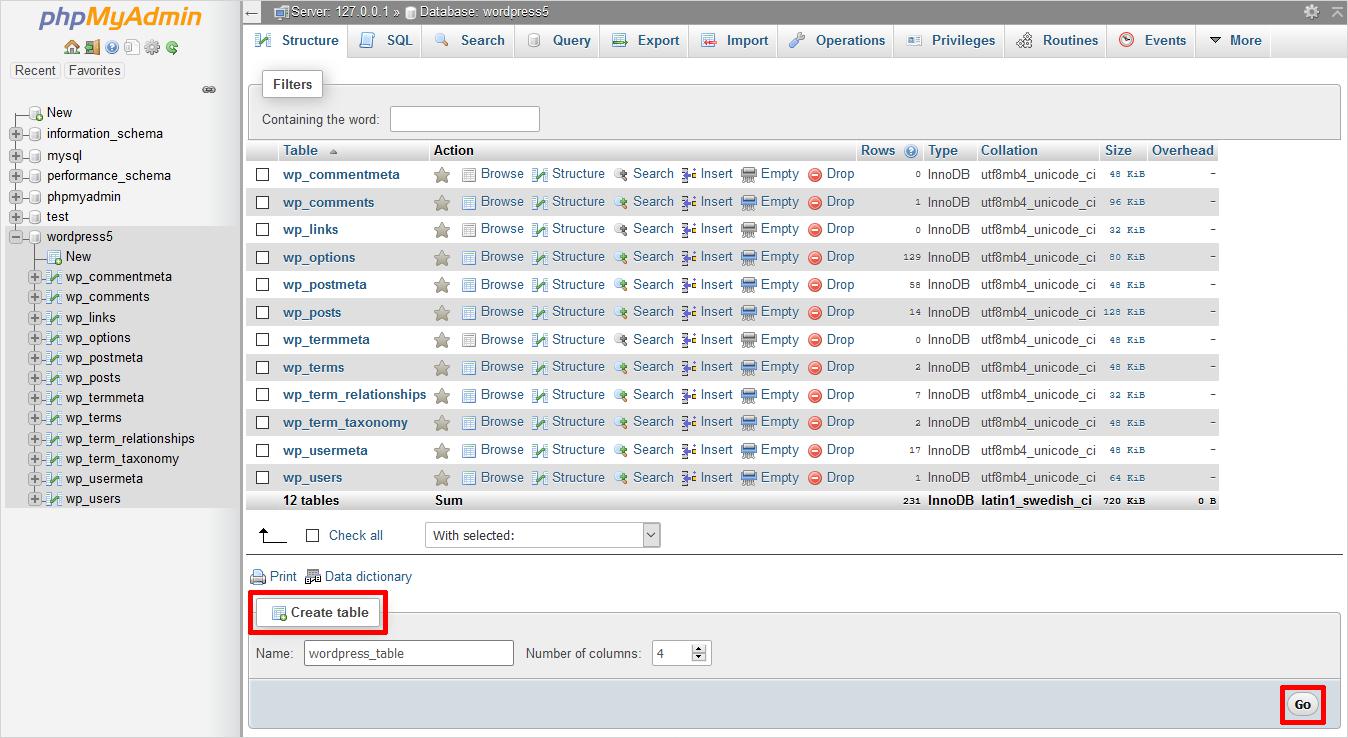
This way you will be launched to a step-by-step wizard where you need to fill up the required fields. First off, name all the fields and select the relevant type for every field. However, in order to choose the type, use ‘Type’ drop-down menu and fill a value for the length of each field. Next, assign ‘Attribute’ to each field. From the ‘Null’ drop-down menu select the null option and define whether the specified field is a primary key or not. And finally, select the table type and collation method and click the ‘Save’ button to finish the table creation process.
Set Password to phpMyAdmin on XAMPP
When we install the XAMPP server on a local machine, by default the username is ‘root’ and the password remains empty. Since it is a local server that’s why developers don’t set any password. However, it’s entirely your choice to set or change the password to phpMyAdmin on XAMPP. If you want to set a password you can follow the following steps.
1: Start the XAMPP server by clicking on the ‘Start’ button parallel to MySQL and Apache server like shown below.
2: Parallel to MySQL in the Actions column, click on the ‘Admin’ button. And this will open a page whose URL will be localhost/phpmyadmin. However, you can directly open this page simply by entering this URL in the browser.
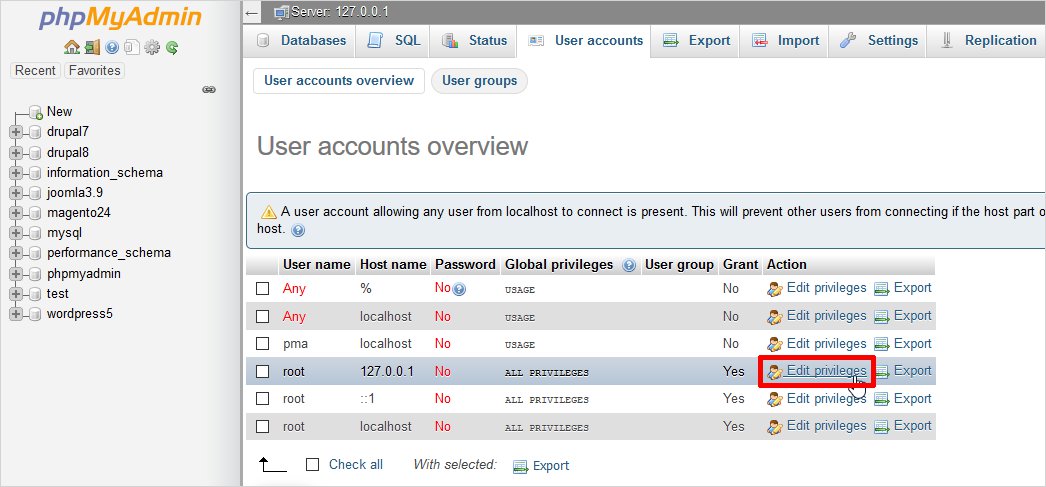
3: On this page, click on the ‘User accounts’ option at the top of the page.
4: Now press the ‘Edit Privileges’ under ‘Actions’ option for the Username ‘root’ and Hostname ‘localhost.’
5: Now choose the third tab ‘Change password’ and type your password in the provided field, retype the password to confirm it and then finally click on the ‘Go’ key to conclude the process.
That’s how you can set a password to phpMyAdmin XAMPP!!
Import / Export Database on XAMPP phpMyAdmin
In order to manage the MySQL database, phpMyAdmin provides you an efficient platform. You can handle the data from anywhere using phpMyAdmin. Moreover, the capability to import & export database gives you the best chance to recover from any sudden or unavoidable data loss. Likewise, migrating data from one server to another can be done flawlessly. It is a web-based interface that allows you to recover the data from anywhere.
Import Database on XAMPP phpMyAdmin
However, it is easy to import or export data and the following steps can help you with that. So to import the database using phpMyAdmin XAMPP carry out the following steps.
- Open the Database in phpMyAdmin.
- Click on the Databases from the top menu.
- Select the name of the database from the drop-down menu which you want to import.
- Click on the Import tab.
- Browse your .sql file by clicking on the ‘Choose File’ option that you wish to import. And then click on the ‘Go’ button at the bottom.
- You’re done!!
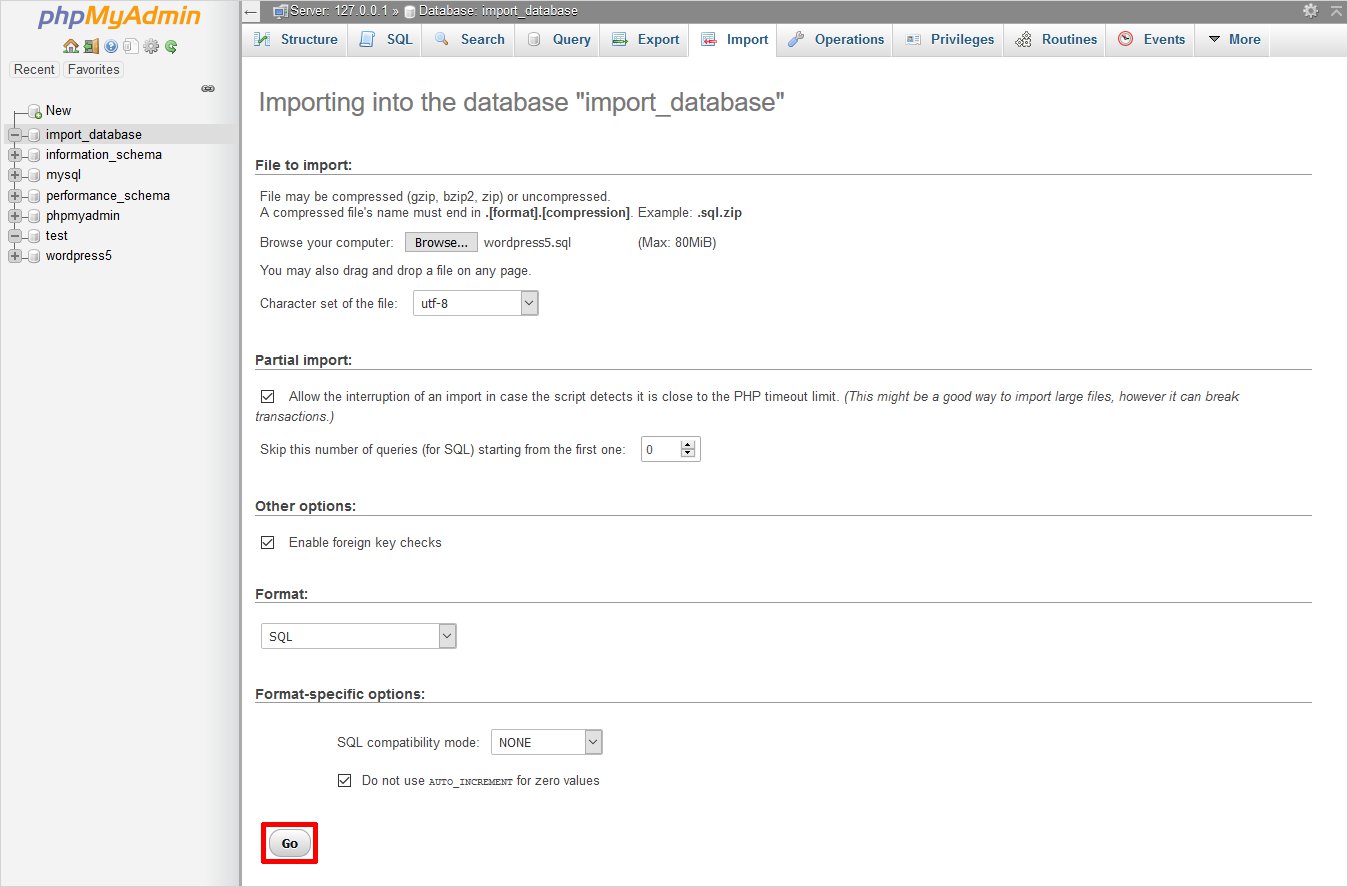
You have successfully imported the database if the syntax of your .sql file is correct, now you should see a confirmation message on your screen. Similarly, you can see the tables in the column to the left in the phpMyAdmin interface.
Export Database on XAMPP phpMyAdmin
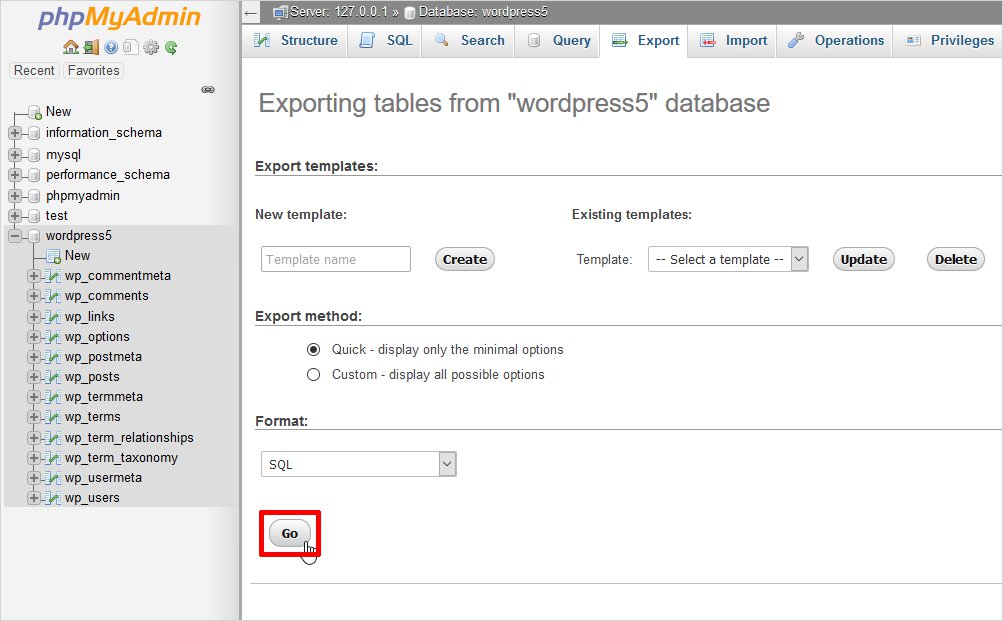
In order to export MySQL database via phpMyAdmin XAMPP, follow the following step.
- To begin the export process, log in to the cPanel and open the phpMyAdmin interface.
- In the left pane of the phpMyAdmin, select the database you want to export.
- Select the ‘Export’ tab at the top.
- Now, you shall see two options i.e. Quick and Custom. You can select Quick if you want to go with default option or select Custom if you want to select particular tables and compression type of the exported file in addition to many other options.
Note: The older version of phpMyAdmin does not support Quick. So you’ll have to follow another method for that.
- Now, single out the format you wish to export your database in. Click on the drop-down menu and opt out the one from the given list.
- Confirm your choice by clicking on the ‘Go’ button.
- Now, you will be asked to either open or save the chosen file. You may select save the file and save it to your desired location.
Congratulations!! You have successfully exported the file.
How to create Database and tables XAMPP phpMyAdmin – Conclusion
As you can see all the things in phpMyAdmin XAMPP are greatly powerful that gives you the freedom to manage the database efficiently. Now you also know how imprtant MySQL is for web development. We can also say that XAMPP SQL is a mainstay of a web development project. This is because, for any web development project to be successful, it is important to test it rigorously. That is why, you need a safe and well-known platform to do this. XAMPP offers the necessary functionalities, along with the important components needed for it.
Thus, creating and managing large amount of database and tables with XAMPP phpMyAdmin is easy and smooth.
I tried including all the significant aspects related to phpMyAdmin on XAMPP. However, to cover every single portion and to answer each query I need your help. Yes! You can help me by asking your queries in the comments below and I will do my best to answer them. Whereas, if you wish to learn more about website development and want to create your own website, then you may use TemplateToaster offline website builder. It will give you a fully functional, mobile-optimized website in no time. Moreover, it doesn’t require you to be technically skilled to run TemplateToaster. So, craft your site and test it on XAMPP or WAMP wherever you like.
Build a Stunning Website in Minutes with TemplateToaster Website Builder
Create Your Own Website Now
phpMyAdmin in a super tool to Create Database Tables in MySQL and to modify them.