Create an eCommerce Website with WordPress + WooCommerce
Selling online is no longer optional. It is where buyers expect to meet you. Global retail eCommerce is on track to cross $8 trillion in 2026, mobile devices now account for nearly three out of every four online purchases, and AI shopping assistants are quietly rewriting how customers discover products. The most surprising thing about this growth is how little it actually takes to claim your share of it. With the right tools, a complete and professional online store can be built in a single afternoon, without writing code, without hiring a developer, and without paying for an expensive monthly platform.
This guide uses the stack that powers more independent stores than any other on the planet: WordPress as your foundation, WooCommerce as your shopping engine, and TemplateToaster as your visual theme builder. Together they give you the ownership of an enterprise platform, the flexibility of custom development, and the simplicity of a visual builder.
Why This Stack Still Wins in 2026
WordPress powers approximately 43 percent of all websites on the internet, more than every other CMS combined. That dominance translates into an enormous ecosystem of themes, plugins, developers, and refined best practice. With Full Site Editing and the Block Editor, modern WordPress feels like a true visual platform without losing any of the openness that made it popular in the first place.
WooCommerce is the plugin that turns a WordPress site into a fully functional online store. It is free, open source, and currently powers around 4 to 5 million live stores worldwide, including some that process tens of millions of dollars per month. Whatever your payment processor charges is what you pay. WooCommerce itself takes no platform fee on your sales.
TemplateToaster solves a problem that has frustrated WordPress users for years. How do you build a unique, professional storefront without either settling for a generic free theme or learning PHP and CSS? It is a desktop application for Windows and Mac that lets you design a complete WooCommerce theme visually, with full control over every header, footer, product page, and checkout layout. When you finish, it exports a clean, standards compliant theme file. There is no monthly subscription. You pay once and own your work forever.
What You Need Before You Start
A small amount of preparation up front saves hours of fumbling later.
A domain name. Choose something short, brandable, and easy to spell. A .com extension is still the most trusted choice in most markets, though country specific extensions like .in, .co.uk, or .com.au work well for local stores. Domain registration costs around $12 per year through trusted domain registrars such as Namecheap, GoDaddy, or Cloudflare Registrar.
A WordPress hosting account. The next section compares the realistic options.
An SSL certificate. This encrypts the connection between your store and your customers. It is mandatory for processing payments and required by Google for ranking. Almost every modern host now includes a free SSL certificate via Let’s Encrypt, activated with a single click in your hosting dashboard.
TemplateToaster. Download and install the desktop application from the official website. The lifetime license is a one time purchase and includes both the WordPress and WooCommerce theme builders.
Your product information. Prepare a simple spreadsheet listing each product’s name, full description, price, SKU, weight, dimensions, available variations such as sizes or colors, and stock quantity. You will also need at least five high quality images per product at a minimum resolution of 1000 by 1000 pixels.
Choosing Your Hosting Provider
Hosting is the single decision most likely to affect the speed, reliability, and security of your store. Here is an honest comparison of the realistic WordPress hosting options for a 2026 launch.
| Host | Starting price | Best for | Strengths | Watch out for |
|---|---|---|---|---|
| Hostinger | $3 per month | First time store owners on a budget | Cheap, fast LiteSpeed servers, free domain in year one | Renewal prices jump significantly |
| SiteGround | $5 per month | Growing stores wanting strong support | Excellent customer service, daily backups, staging | Tighter storage caps |
| Cloudways | $14 per month | Stores expecting traffic spikes | Cloud infrastructure on DigitalOcean or AWS, hourly billing, easy scaling | Steeper learning curve, no domain registration |
| WP Engine | $20 per month | Agencies and serious commerce | Strong security, WooCommerce specific plans, good staging | Some plugins blocked |
| Kinsta | $35 per month | Established stores with revenue | Premium managed WordPress, blazing performance, top tier support | Higher entry cost |
For a brand new store, SiteGround or Hostinger offers the best balance of price, performance, and ease of setup. Move to Cloudways or Kinsta once you start processing meaningful traffic.
Whatever host you choose, confirm three things before you commit: PHP 8.2 or higher, MySQL 8 or MariaDB 10.5 or higher, and at least 512 MB of PHP memory limit. WooCommerce will run on less, but performance suffers quickly.
Step 1: Install WordPress on Your Hosting Account
Almost every modern hosting provider offers a single click WordPress installer, and the process is genuinely as simple as it sounds. Log in to your hosting dashboard, locate the WordPress installer (sometimes labelled Install WordPress, sometimes inside an app marketplace called Softaculous), and click it.
The installer asks for a few pieces of information: the domain you want to install WordPress on, a site title (which can be changed later), an admin username, a strong password, and an admin email address. Choose an admin username that is not “admin.” That single change blocks most automated brute force login attempts. Generate a long random password and store it in a password manager.
When the installer finishes, your site is live at your domain and your admin dashboard is available at yourdomain.com/wp-admin. Log in using the credentials you just created.
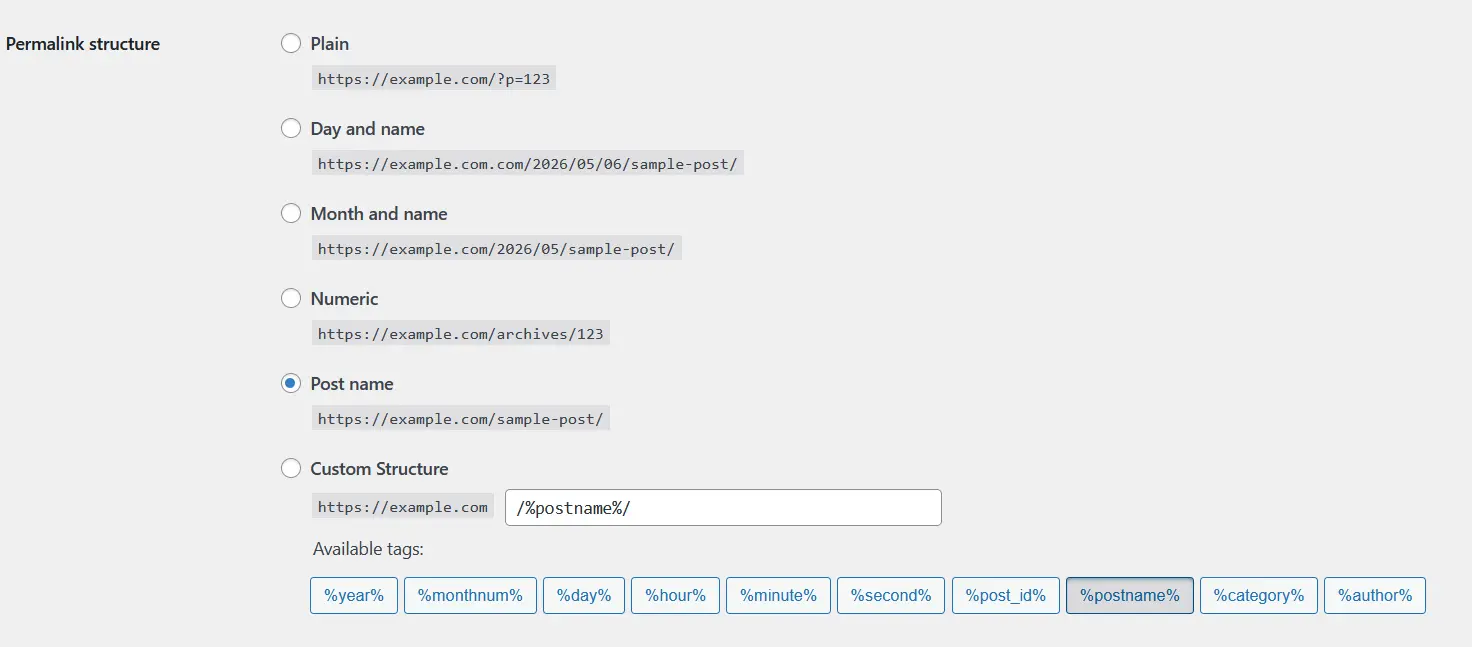
Before doing anything else, take care of housekeeping. Navigate to Settings, then General, and confirm your site title, tagline, time zone, and date format. Then go to Settings, then Permalinks, and select the Post Name option. This changes your URLs from messy strings of numbers into clean, readable slugs like /blue-cotton-shirt, which is essential for both SEO and customer trust. Save your changes. Finally, delete the default Hello World post and the sample page that WordPress ships with.
Step 2: Install and Activate WooCommerce
From your WordPress dashboard, go to Plugins, then Add New. In the search box, type WooCommerce. The official plugin published by Automattic, the company behind WordPress.com, should appear as the first result. Click Install Now, wait a few seconds, then click Activate.
WooCommerce will immediately launch a guided setup wizard. It is well designed and worth completing in full. It asks for your store’s country and address (used for tax and shipping calculations), your preferred currency, the type of products you sell, and the industry your business operates in. WooCommerce uses these answers to suggest sensible defaults.
Toward the end of the wizard, WooCommerce asks whether you want to install its companion services such as WooCommerce Payments, WooCommerce Shipping, WooCommerce Tax, and Jetpack. You can skip these and configure your own preferred providers later, or accept the defaults if you want the fastest possible path to a working store.
When the wizard finishes, WooCommerce will have created several pages on your site automatically: Shop, Cart, Checkout, My Account, and Privacy Policy. Your store now has a fully functional backend, even though the front end still uses your default WordPress theme.
Step 3: Configure WooCommerce Settings in Detail
The setup wizard handles the essentials. The full configuration lives under WooCommerce, then Settings, organized into tabs along the top. Spend fifteen focused minutes going through each one.
The General tab confirms your store’s address, the countries you sell and ship to, your default customer location, whether to enable taxes, and your store’s currency settings. Pay attention to currency formatting. Small details like the position of your symbol and your decimal separator make a real difference to how trustworthy your store looks to local customers.
The Products tab controls how your shop pages behave: which page acts as your shop, how products are sorted by default, the size of product images, whether to enable reviews, and how stock is managed. Enable stock management at the global level if you sell physical products with limited inventory.
The Shipping, Payments, and Tax tabs are covered in their own sections below.
The Accounts and Privacy tab controls how customers register on your store, how their data is retained, and what happens to inactive accounts. In 2026 it is good practice to enable guest checkout (this dramatically reduces cart abandonment), allow customers to create an account during checkout, and enable automatic deletion of inactive personal data to comply with GDPR and similar regulations.
The Emails tab lets you customize the transactional emails WooCommerce sends. At a minimum, upload your logo and set the email header color to match your brand. Customers see these emails far more often than they visit your store.
The Advanced tab is where you change which page is your cart, checkout, or account page, plus enable the REST API for integrations with external tools. Two settings here matter for every new store. First, under Features, enable High Performance Order Storage (HPOS). HPOS is the modern database structure for WooCommerce orders. It dramatically improves performance for stores with even a few hundred orders, and it is now the default for new installations. If you see an option to migrate to HPOS, accept it. Second, switch your cart and checkout pages to use the Cart Block and Checkout Block rather than the legacy shortcodes. The block versions load 30 to 40 percent faster on mobile and convert noticeably better.
Step 4: Create Your Legal and Policy Pages
This step is skipped in almost every WooCommerce tutorial, and skipping it is one of the fastest ways to get your store rejected by Stripe, PayPal, or your domain registrar. Every store needs at minimum four legal pages.
A Privacy Policy explaining what data you collect, how you use it, and how customers can request deletion. WooCommerce creates a starter page automatically. Fill in the placeholder text with your specific practices.
Terms of Service setting out the rules that govern use of your site, your right to refuse service, and how disputes are handled. Free generators such as the one at WooCommerce.com or Termly produce solid starting templates.
A Refund and Returns Policy explaining what items can be returned, how long customers have to return them, who pays for return shipping, and how refunds are processed. Be specific. Vague return policies cost you sales and trigger chargebacks.
A Shipping Policy explaining your processing time, the shipping methods you offer, expected delivery windows, and what happens if a package is lost or damaged.
If you serve customers in the European Union, the United Kingdom, or California, you also need a cookie consent banner. The free version of Complianz or CookieYes handles this in a few minutes and can generate compliant banners that adapt to the visitor’s location automatically.
Link all four legal pages from your footer where customers can find them, and reference your refund and shipping policies on every product page.
Step 5: Design Your Storefront with TemplateToaster
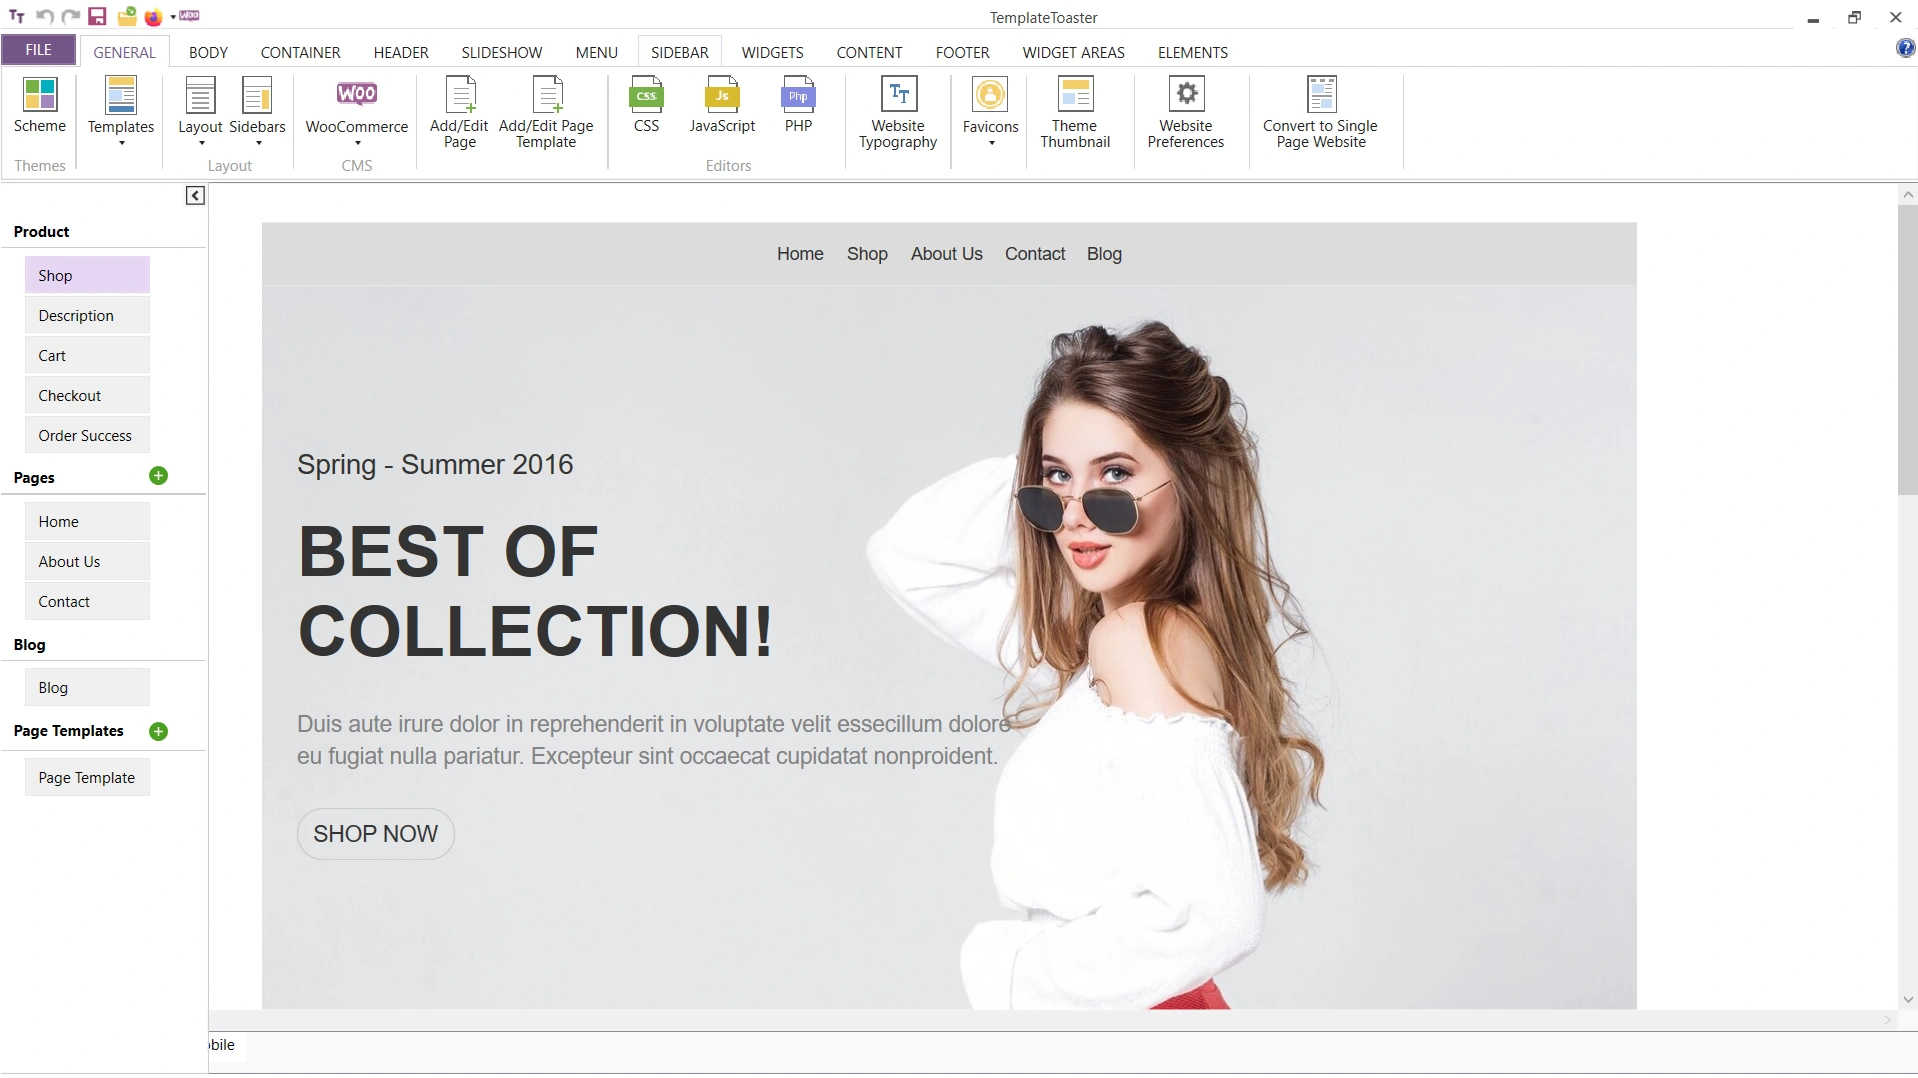
This is the step that transforms your store from a generic WooCommerce installation into a brand. Open TemplateToaster’s WooCommerce theme builder on your computer and select WordPress as the platform, then choose WooCommerce as the type of theme to build. You can begin from a blank canvas if you have a strong design vision, or pick one of the included starter WooCommerce themes if you want a head start.
TemplateToaster’s interface is organized around the structure of a WordPress site. Across the top you will see tabs for every part of your theme: Header, Slider, Menu, Content, Sidebar, Footer, plus dedicated sections for the layouts unique to WooCommerce such as Shop Page, Single Product, Cart, and Checkout. Down the left side is a properties panel where you adjust fonts, colors, spacing, borders, animations, and responsive behavior for whatever element is currently selected.
Set your brand foundations
Begin by establishing your brand globally. Pick a primary color that reflects your brand, a complementary accent color for buttons and highlights (a free color palette generator can help if you are stuck), and one or two web fonts that pair well together. TemplateToaster offers direct access to the entire Google Fonts library. A safe pairing for most stores is a strong sans serif for headings (Inter, Poppins, or Montserrat) with a clean readable face for body text (Open Sans, Lato, or Source Sans Pro).
Design your header
A good 2026 header includes your logo on the left, a horizontal menu in the center with mega menu support for stores with deep category trees, and a row of utility icons on the right covering search, account, wishlist, and cart with a live item count. TemplateToaster handles all of this visually, including hover effects, sticky behavior on scroll, and a dedicated mobile menu pattern.
Design your homepage, shop pages, and product page
Your homepage should answer three questions within the first screen: what you sell, who it is for, and why someone should trust you. A high converting structure for 2026 looks like this. A full width hero section with a strong headline and a single primary call to action. A row of featured product categories below the fold. A band of bestsellers or new arrivals. A section of customer testimonials or trust badges. A footer adjacent newsletter signup.
Shop and category pages need to feel structured rather than overwhelming. Use a clean grid (three or four products per row on desktop, two on mobile), include filter and sort controls in a sidebar or collapsible panel, and make sure each product card shows the image, name, price, and a quick Add to Cart button.
The single product page is where the actual buying decision happens. The classic layout places a large image gallery on the left with thumbnail navigation and zoom on hover, and the product information on the right: title, star rating, price, short description, variation selectors, quantity, and a prominent Add to Cart button in your accent color. Below this primary section, include the long description, customer reviews, and a row of related products.
Design your cart and checkout
These are where most stores leak revenue. The rule is simple: remove every distraction. Strip the navigation menu, hide the sidebar, keep the form fields to an absolute minimum, and show a clear order summary on the side. Single page checkout with collapsible sections converts noticeably better on mobile than multi step checkout.
Export, install, and protect your customizations
When you are happy with your design, preview it inside TemplateToaster across desktop, tablet, and mobile breakpoints. Make adjustments until every layout looks polished on every device. Then click Export, then WordPress, and TemplateToaster will package your design as a .zip file.
Three important things to know about the exported theme. First, TemplateToaster generates classic PHP themes rather than block themes. This is intentional. Block themes look promising on paper but still have rough edges around WooCommerce in 2026. The classic theme TemplateToaster produces is faster, more compatible with the wider plugin ecosystem, and easier to maintain without unexpected breakage. Second, the exported theme is fully responsive and standards compliant out of the box, which means it will work cleanly with caching, image optimization, and SEO plugins. Third, if you plan to keep tweaking the design after installation, generate a child theme (TemplateToaster has a built in option for this) so that future re exports do not overwrite your customizations.
To install your theme, go to Appearance, then Themes, then Add New, then Upload Theme. Select your TemplateToaster .zip file, click Install Now, then click Activate. Refresh your store’s homepage and you will see your custom design live.
Step 6: Add Your Products to WooCommerce
With the design in place, it is time to fill the store. Go to Products, then Add New. The product editor looks similar to the standard WordPress post editor with a few additional panels specific to WooCommerce.
Start with the product title. Make it descriptive and search friendly rather than clever. A title like “Organic Cotton Crewneck T Shirt in Forest Green” performs better than “The Forest Tee” because it tells both Google and AI shopping assistants exactly what the product is. Aim for 50 to 70 characters.
The long description field is where you sell the product: features, materials, who it is for, how to use it, what makes it different from alternatives. Aim for at least 150 words of original content per product. Avoid copying manufacturer descriptions verbatim. Google penalizes duplicate content, and AI shopping assistants prefer original sources.
The short description field appears above the Add to Cart button. Treat it as your elevator pitch: two or three sentences capturing the most compelling reason to buy. This is also the snippet most likely to be picked up by AI search engines, so make every word count.
Below the description editor is the Product Data panel. The dropdown at the top lets you choose the product type: Simple for a standard product with one version, Variable for products with multiple sizes or colors, Grouped for bundles of related items, External for products you link to elsewhere. Most stores use Simple and Variable almost exclusively.
Inside Product Data, the General tab handles your regular and sale prices. Inventory is for SKU, stock management, and backorders. Shipping takes the product’s weight and dimensions for live carrier rate calculation. Linked Products lets you specify upsells and cross sells. Attributes defines the variations for variable products, and Variations is where you set the price, stock, and image for each combination.
In the right sidebar, set Product Categories to mirror how customers naturally browse your store, and Product Tags for cross cutting attributes like “summer,” “waterproof,” or “handmade.” Upload your main Product Image and additional Product Gallery images.
When everything is in place, click Publish. Repeat for each product. If you have dozens of products to add at once, install the free Product CSV Import Suite to import an entire spreadsheet in one go.
Step 7: Set Up Payment Gateways
Go to WooCommerce, then Settings, then Payments, to see your options. For most stores in 2026, the right combination is Stripe plus PayPal, though there are many other WooCommerce payment gateway plugins worth considering for specific markets.
Stripe handles credit cards, debit cards, Apple Pay, Google Pay, and Stripe Link. PayPal handles customers who prefer paying through their PayPal balance or who do not want to enter card details on a new site. Together these two reach roughly 95 percent of buyers worldwide.
To enable Stripe, install the official WooCommerce Stripe Payment Gateway plugin from the Plugins directory. Activate it, then return to WooCommerce, then Settings, then Payments, click on Stripe, and follow the prompts to connect your Stripe account. The connection takes about two minutes and uses OAuth, so you never copy or paste API keys. Once connected, Stripe automatically exposes Apple Pay and Google Pay as one tap checkout options on supported devices.
PayPal is even simpler. Install the official PayPal Payments plugin, click connect, log into your PayPal Business account, and you are done.
If you sell in markets where Buy Now Pay Later is popular (apparel, electronics, and home goods in North America, the UK, Australia, and parts of Europe), consider adding Klarna, Afterpay, or Affirm. Stores that offer BNPL typically see average order values rise by 30 to 50 percent.
For stores in India, enable Razorpay or Cashfree to accept UPI, net banking, and local cards. For European stores, add Mollie to support iDEAL, Bancontact, and SEPA. The pattern is the same in every case: install the official plugin, connect your account, and configure which currencies and countries it applies to.
Step 8: Configure Shipping Zones and Rates
WooCommerce uses shipping zones to handle the reality that you might charge different rates in different parts of the world. Go to WooCommerce, then Settings, then Shipping.
Create a zone for each geographic area you serve. A simple structure for an international store: Domestic (your home country), Continent (the wider region you ship to most often), and Rest of World. Inside each zone, click Add shipping method and choose from three options.
Flat rate charges a fixed amount regardless of order weight or value. Easy to manage and easy for customers to understand.
Free shipping gives shipping at no cost, optionally with a minimum order value. The threshold is a powerful upsell tool. “Spend $50 more for free shipping” measurably lifts average order value.
Local pickup lets customers collect orders from a physical location at no shipping charge.
For more sophisticated rate calculation, install one of the carrier integration plugins: WooCommerce Shipping (the official option), Shippo, EasyPost, or country specific plugins like Shiprocket for India. These connect directly to FedEx, UPS, DHL, USPS, India Post, and others, returning live shipping quotes based on the customer’s address and your package dimensions. They also generate shipping labels for you to print.
Whatever method you use, place a test order to an address in each shipping zone and confirm the rates that appear at checkout match what you expect.
Step 9: Configure Taxes Correctly
For stores selling within a single country with a simple tax structure (a flat GST or VAT rate), configure tax manually under WooCommerce, then Settings, then Tax. Enable taxes in the General settings tab first, then return to the Tax tab and add your standard, reduced, and zero rate tax rates as needed. WooCommerce applies them automatically based on each customer’s address.
For stores selling across multiple US states, into the EU, or in any jurisdiction with complex sales tax rules, manual configuration is impractical. Install WooCommerce Tax (the official integration with TaxJar), Avalara AvaTax, or one of the other best WooCommerce sales tax and VAT plugins for automatic, jurisdiction aware tax calculation. These services know the current tax rate in every state, county, and city in their coverage area, and update automatically when laws change.
Whichever approach you choose, display prices clearly as either tax inclusive or tax exclusive, and show tax as a separate line item at checkout. Both are standard customer expectations and required by law in many jurisdictions.
Step 10: Install Only the Plugins You Actually Need
WordPress’s plugin ecosystem is both its greatest strength and its biggest pitfall. Every plugin you install adds code that runs on every page load, expands your security surface, and adds another piece of software you must keep updated. Install the minimum set that covers the essentials.
For SEO, install DefiniteSEO WordPress SEO Plugin, the clear leader in our comparison of WordPress SEO plugins. DefiniteSEO handle meta titles, meta descriptions, XML sitemaps, structured data, and on page analysis.
For performance, install WP Rocket if you are willing to pay for premium, or LiteSpeed Cache if your host runs LiteSpeed (most modern hosts do, and the plugin is free). Either handles page caching, browser caching, code minification, and lazy loading. See our wider review of WordPress cache plugins if you want to compare alternatives.
For image optimization, install ShortPixel or Imagify, two of our top picks among WordPress image optimizer plugins. Converting product images to next generation formats like WebP and AVIF can cut your page weight by 60 to 80 percent without visible quality loss.
For security, install Wordfence or Solid Security. Both monitor for malicious activity, block brute force login attempts, and alert you to known vulnerabilities. Our WordPress security plugin roundup compares them alongside other strong options.
For backups, install UpdraftPlus (free) or BlogVault (paid but more reliable). For a wider survey of options, see our WordPress backup plugins comparison. Configure daily automatic backups stored offsite on Google Drive, Dropbox, or Amazon S3. Never rely solely on your host’s backups.
For email and abandoned cart recovery, install FunnelKit Automations or connect your store to Klaviyo or Mailchimp. A well configured three email abandoned cart sequence typically recovers 10 to 20 percent of abandoned orders.
For analytics, install the free Google Site Kit plugin to connect Google Analytics 4, Google Search Console, and PageSpeed Insights from a single dashboard. Pair it with Microsoft Clarity (also free) for session recordings and heatmaps.
That is the full essential stack. Eight plugins. You may eventually add more for specific needs (subscriptions, bookings, multi currency), but resist installing plugins speculatively.
Step 11: Optimize for Both Google and AI Search
Ranking online in 2026 means showing up in two very different places: traditional Google search results, and the AI powered answer engines that an increasing share of buyers use to discover products, including ChatGPT, Perplexity, Gemini, Claude, and Google’s own AI Overviews. The foundations of both overlap heavily.
Traditional SEO essentials
Every product and category page needs a unique meta title (under 60 characters) and meta description (under 160 characters) written for humans. Every product image needs descriptive alt text. Not “IMG_2384.jpg” but “Forest green organic cotton crewneck t shirt on wooden hanger.” Submit your XML sitemap (generated automatically by DefiniteSEO) to Google Search Console and Bing Webmaster Tools. Add structured data covering Product, Review, FAQ, and BreadcrumbList schema, which both SEO plugins handle automatically.
Pass Core Web Vitals. The three thresholds: Largest Contentful Paint under 2.5 seconds, Interaction to Next Paint under 200 milliseconds, and Cumulative Layout Shift under 0.1. Test at PageSpeed Insights. Score 90 or above on mobile and you are in good shape.
Connect Google Merchant Center
This is the step most WooCommerce tutorials skip, and it directly affects how often your products appear in Google Shopping, Google Images, and the product carousels inside AI Overviews. Set up a free Google Merchant Center account, install the official Google Listings and Ads plugin from inside your WordPress dashboard, and connect it to Merchant Center. The plugin generates and submits a product feed automatically, updating it whenever your inventory changes. Once approved, your products become eligible to appear in free Google Shopping listings and across the rest of Google’s surfaces. The same product feed can also be reused for Meta catalog ads, Pinterest catalog, and TikTok Shop, so it is worth getting right early.
AI search optimization
AI engines do not crawl your site the way Google does. They ingest content, summarize it, and present it as direct answers. To get included, make your content easy to extract.
Lead every product page with a clear, one sentence description that directly answers “what is this?” Something AI engines can lift verbatim. Include a Frequently Asked Questions section on every product page covering sizing, materials, shipping times, return policy, and compatibility. Publish comparison content that explicitly contrasts your products against alternatives. “X versus Y” articles perform exceptionally well in AI results.
Add a real About page with named authors, your physical address, and any relevant credentials. These signals of Experience, Expertise, Authoritativeness, and Trust matter more than ever in 2026.
Do not block AI crawlers in your robots.txt unless you specifically intend to. The major AI bots are GPTBot, ClaudeBot, PerplexityBot, and Google-Extended. If your robots.txt blocks them, you become invisible to those engines.
Step 12: Test Everything, Then Launch
Before you announce your store, walk through it end to end as a customer. Place a real test order using Stripe’s test mode (Stripe provides test card numbers in their documentation). Confirm the order flows through correctly, the confirmation email arrives, your admin notification fires, and the order appears correctly in your WooCommerce dashboard.
Test on real devices: an iPhone with Safari, an Android phone with Chrome, a desktop with Chrome, and a desktop with Safari or Firefox. Check that your menu works, product images load, the cart updates correctly, and the checkout form is easy to fill out on a small screen.
Run your homepage through PageSpeed Insights one more time and confirm you are scoring 90 or above on mobile. Run a broken link scan using a free tool like Screaming Frog SEO Spider (the free version handles up to 500 URLs). Confirm SSL is active on every page (look for the padlock icon in the address bar). Verify Google Analytics 4 and Google Search Console are receiving data.
When everything passes, announce the store to your existing network, send a launch email to your subscriber list, share the news on the social channels where your audience already lives, and consider running a small paid advertising test of $50 to $100 on Meta or Google Ads to seed your first wave of traffic.
After Launch: Order Fulfillment and Maintenance
Most tutorials stop at launch. The day after launch is when the real work begins.
Day to day order fulfillment
Every new order appears under WooCommerce, then Orders. The typical workflow looks like this. A customer places an order. The order arrives with status “Processing.” You pack the items, generate a shipping label (your shipping plugin can do this), mark the order “Completed,” and WooCommerce automatically emails the customer their tracking number. For digital products, completion happens automatically the moment payment clears.
Refunds, partial refunds, and order edits all happen from the same Orders screen. If a customer disputes a charge, your payment gateway notifies you and provides space to upload your evidence directly through their dashboard.
For order management on the move, install the official WooCommerce mobile app on your phone. It shows new orders, lets you mark them shipped, sends push notifications when sales arrive, and displays your sales dashboard.
Your weekly and monthly maintenance rhythm
WooCommerce stores get hacked overwhelmingly because owners stop updating them. A simple maintenance rhythm prevents almost all such incidents.
Every week, log in and run plugin updates. Skim your sales dashboard. Check Google Search Console for new errors. Review and respond to any new product reviews.
Every month, log in to your hosting dashboard and confirm backups are running and restorable. Run a fresh PageSpeed Insights test. Review your slowest selling products and your highest cart abandonment pages. Check your security plugin’s scan results.
Every quarter, audit your installed plugins and remove anything no longer in use. Refresh your homepage hero and bestseller sections. Review your SEO performance and identify which product pages deserve content expansion.
Migrating From Shopify, Wix, or Squarespace
If you are switching from another platform, the migration process is well established. We have detailed guides for moving from Wix to WordPress and migrating from Squarespace to WordPress. The Cart2Cart service moves products, customers, orders, and reviews between most major platforms automatically for a one time fee starting around $69. For Shopify specifically, the WooCommerce team maintains a free Shopify importer.
Three things to handle manually after migration. First, set up redirects from your old URLs to your new URLs so you do not lose SEO equity. The free Redirection plugin handles this. Second, reissue product images at higher resolution if your previous platform compressed them aggressively. Third, re verify Google Search Console for the new domain and resubmit your sitemap.
Realistic Cost to Launch in 2026
Here is a realistic breakdown for a brand new store launching in 2026.
| Item | One time cost | Recurring cost |
|---|---|---|
| Domain name | None | $12 per year |
| Managed WordPress hosting | None | $5 to $15 per month |
| SSL certificate | None | None (Let’s Encrypt) |
| WordPress | None | None |
| WooCommerce core plugin | None | None |
| TemplateToaster (lifetime) | $49 to $99 | None |
| Premium plugins (optional) | None | $0 to $30 per month |
| Total to launch | $100 to $200 | $10 to $50 per month |
Compare that with Shopify Basic at $39 per month plus 0.5 to 2 percent transaction fees on top of payment processing. Our full WooCommerce versus Shopify comparison breaks down the totals over time. The savings compound. A store doing $100,000 per year in revenue typically saves $2,000 to $4,000 per year in platform costs alone by running on this stack.
Common Mistakes That Quietly Kill Conversion
Slow loading product images. A 4 MB photograph straight from a phone camera is far too heavy for a product page. Always optimize images before uploading or rely on a plugin like ShortPixel.
Forced account creation at checkout. Roughly one in three customers will abandon their cart rather than create an account. Always offer guest checkout.
No trust signals. First time buyers look for reassurance: customer reviews, payment method icons, an About page that shows real humans behind the brand, clear shipping and return policies. Stores that hide this information convert at a fraction of the rate of stores that surface it.
Confusing shipping costs. Customers hate surprises at checkout. Display shipping cost or free shipping threshold prominently, ideally on every product page, and certainly in the cart before they reach checkout.
Generic product descriptions. Manufacturer descriptions copied verbatim hurt both SEO and conversion. Write your own, in your own voice, focused on the customer’s actual concerns.
Not testing on mobile. More than 70 percent of eCommerce traffic is on mobile devices in 2026. If your checkout is awkward on a phone, you are leaving the majority of your revenue on the table.
Frequently Asked Questions
How long does it take to build an eCommerce website with WordPress and WooCommerce?
For a small store with 10 to 20 products, the entire build can comfortably be completed in a single day. Designing a custom theme in TemplateToaster takes most people two to four hours. Adding products takes another two to three hours. Larger catalogs naturally take longer, but the platform setup itself remains a one day project.
Do I need to know how to code?
No. WordPress, WooCommerce, and TemplateToaster are designed for people without coding experience. You may eventually want to learn some basic CSS to make small visual tweaks, but you can launch and run a profitable store without writing a single line of code.
Is WooCommerce really free?
Yes. The core WooCommerce plugin is completely free with no usage limits. You only pay for optional extensions if you need features beyond the standard set, such as advanced subscriptions, complex bookings, or specific regional payment gateways. Stripe and PayPal integrations are free.
Can WooCommerce handle a large store with thousands of products?
Yes. WooCommerce powers stores with hundreds of thousands of SKUs and millions of dollars in monthly revenue. The performance ceiling is determined by your hosting infrastructure, not the platform. As your store grows, you upgrade your hosting tier.
Why use TemplateToaster instead of a free WordPress theme?
Free themes are used by tens of thousands of other websites, which means your store will look like everyone else’s. TemplateToaster lets you design a unique, brand aligned theme visually and own it forever, with no monthly subscription and no design limitations imposed by a third party.
Will my store appear in ChatGPT, Perplexity, and Google AI Overviews?
It can if you optimize for it. Write clear, original product descriptions that answer real buyer questions. Include FAQ sections on every product page. Use structured data correctly. Make sure your robots.txt does not block AI crawlers like GPTBot and ClaudeBot. Connect Google Merchant Center for product carousels.
Is WordPress secure enough for processing payments?
Yes. When you use a modern payment gateway like Stripe or PayPal, sensitive payment data never touches your WordPress site. The customer enters card details into a secure form hosted by the payment provider, which handles all PCI compliance on your behalf. Keep WordPress, WooCommerce, and your plugins updated, use a quality security plugin, and your store is as secure as any major hosted platform.
Can I migrate my store later if I outgrow this setup?
Yes, easily. Because you own your WordPress installation, your database, and your theme files, you can move your entire store to a different host, a different domain, or a different stack at any time without losing data.
Where to Start This Week
If you are ready to act, here is the smallest sensible first step. Today, register your domain and sign up for hosting. Tomorrow, install WordPress and WooCommerce and complete the setup wizard. The day after, design your theme in TemplateToaster and add your first three products. By the end of your first week you can have a real, functional store accepting real payments.
Your first version does not need to be perfect. It needs to be real enough to start collecting actual customer behavior: what people search for, which products they view, where they drop out of the funnel, what they actually buy. Every iteration after launch is informed by real data rather than guesses, and that is when growth compounds.
Build a Stunning Website in Minutes with TemplateToaster Website Builder
Create Your Own Website Now