Migrate from HTTP to HTTPS: Complete Step-by-Step Guide
Migrating from HTTP to HTTPS is no longer optional for website owners who want to maintain search rankings, user trust, and data security. As the web continues to evolve, search engines now favor secure websites, and users expect to see the padlock icon in their browser. This guide walks you through everything you need to know about transitioning your site from HTTP to HTTPS, including the benefits, requirements, and step-by-step instructions for a smooth migration.
As cybersecurity threats continue to rise, the importance of encrypting web traffic has become a priority for developers and business owners alike. HTTPS provides a secure, authenticated channel between your website and your visitors, reinforcing credibility while safeguarding sensitive data. This transition is not just a technical upgrade but a strategic move to future-proof your digital presence.
If you’re planning to launch a new secure website or revamp an existing one, using a powerful Website Builder can help you seamlessly integrate HTTPS from the start while offering flexibility in design and security features.
Table of Contents
- What is HTTPS and How it Works
- Why You Should Migrate from HTTP to HTTPS
- Types of SSL Certificates
- How to Get an SSL Certificate
- Pre-Migration Checklist
- Step-by-Step Guide to Migrate to HTTPS
a. Install the SSL Certificate
b. Update Your Website URLs
c. Redirect HTTP to HTTPS
d. Update External Services
e. Update Sitemap and Robots.txt
f. Test Everything - Common HTTPS Migration Issues and Fixes
- Post-Migration Steps
- Tools and Plugins to Help with Migration
- Ongoing Maintenance and Monitoring
- Frequently Asked Questions (FAQs)
- Complete HTTP to HTTPS Migration Checklist
What is HTTPS and How it Works
HTTPS stands for Hypertext Transfer Protocol Secure. It is an extension of HTTP that uses encryption protocols like SSL (Secure Sockets Layer) or TLS (Transport Layer Security) to secure data transmission between a user’s browser and the website’s server. When a website is served over HTTPS, all data exchanged is encrypted, making it much harder for malicious actors to intercept or tamper with the information.
The HTTPS protocol leverages encryption and digital certificates to ensure that communication between client and server remains confidential and unaltered. It also validates the authenticity of the server, ensuring visitors are not redirected to malicious sites posing as legitimate web destinations. By switching to HTTPS, webmasters can offer both performance and peace of mind to users.
Why You Should Migrate from HTTP to HTTPS
Migrating to HTTPS offers multiple advantages that go beyond security. Here are some of the main reasons to make the switch:
HTTPS is an essential upgrade for modern websites. Not only does it provide a foundational layer of security, but it also signals trustworthiness to search engines and users. In an environment where online security and credibility are paramount, failing to adopt HTTPS can leave your website behind.
SEO Benefits
- Google uses HTTPS as a ranking signal
- Secure sites are more likely to be indexed efficiently
- Better performance on Core Web Vitals metrics
Security Benefits
- Encrypts user data to prevent interception
- Protects against man-in-the-middle attacks
- Ensures the authenticity of your website
Trust and User Experience
- Displaying a padlock icon boosts credibility
- Users are more likely to share and engage with secure sites
- Reduced browser warnings and errors
Compliance
- Essential for meeting GDPR, HIPAA, and PCI DSS standards
- Required for secure online payments
Types of SSL Certificates
Before you can migrate, you need to choose the right SSL certificate. There are several types available, each offering different levels of validation and security.
Selecting the appropriate SSL certificate is crucial to a successful HTTPS implementation. The type you choose affects how much information is validated and how much trust is established with your users. Depending on the scale and purpose of your site, different certificate types offer different levels of protection and presentation.
- Domain Validated (DV): Quick and easy to obtain, suitable for blogs and small websites
- Organization Validated (OV): Offers more credibility, suitable for businesses
- Extended Validation (EV): Displays company name in the address bar, ideal for eCommerce and financial websites
- Wildcard SSL: Secures a domain and all its subdomains
- Multi-Domain SSL (SAN): Allows multiple domain names to be secured under a single certificate
Choose the one that aligns with your site’s purpose and audience trust requirements. You can also explore our detailed comparison of SSL certificate providers to make an informed decision.
How to Get an SSL Certificate
You can obtain an SSL certificate either for free or through a paid provider. Here are the most common ways:
Understanding where and how to acquire an SSL certificate is a fundamental step in the migration process. Your choice will influence not only the setup complexity but also the level of customer support, warranty, and trust indicators available with your certificate.
Free Options
- Let’s Encrypt offers free DV certificates and is supported by most hosting providers
- Cloudflare provides free Universal SSL for sites using its CDN
Paid Options
- Providers like Comodo, DigiCert, and GeoTrust offer DV, OV, and EV certificates with extended warranties and support
- Hosting companies often offer one-click installation for purchased SSLs
Before purchasing, check if your hosting provider includes SSL certificates for free as part of their plans. If you need help, refer to our guide on how to install SSL certificate on a WordPress website.
Pre-Migration Checklist
Proper preparation is essential for a seamless migration. Use this checklist before starting the process:
Migrating to HTTPS involves more than installing an SSL certificate. To avoid data loss, broken links, and user disruption, it’s important to conduct a thorough pre-migration assessment. This checklist ensures that all critical components are accounted for before making any changes.
- Backup your entire website, including files and databases
- Update your CMS (like WordPress), plugins, and themes
- Conduct a full audit of internal links and image paths
- Make a list of third-party scripts and services used on your site
Having this information ready will save time and prevent broken links or content issues post-migration.
Step-by-Step Guide to Migrate to HTTPS
This section provides a detailed walkthrough to help you migrate your site successfully. Each step is designed to ensure minimal downtime, maintain SEO integrity, and preserve user experience. Be sure to follow these in order and test thoroughly as you go.
a. Install the SSL Certificate
First, install your SSL certificate on the server. If you’re using cPanel, this can be done through the SSL/TLS Manager. For other panels like Plesk, similar tools are available. Many hosting providers also support one-click installation. Once installed, verify that the certificate is working by visiting your site using https:// and checking for the padlock icon.
Proper installation is the foundation of HTTPS. A correctly installed certificate will encrypt communication and prevent security warnings from appearing in users’ browsers. Make sure to test installation across various devices and browsers.
For Let’s Encrypt users, check out our tutorial on setting up SSL with Let’s Encrypt for step-by-step assistance.
b. Update Your Website URLs
Update all instances of HTTP in your website’s content to HTTPS. This includes:
- WordPress or CMS settings for site and home URL
- Internal links, scripts, images, and stylesheets
- Database entries (use tools like Better Search Replace for WordPress)
Failing to update internal resources may result in mixed content errors. These can undermine your site’s security and confuse search engines. Make a systematic pass through your entire site to ensure consistency.
c. Redirect HTTP to HTTPS
Set up 301 permanent redirects from HTTP to HTTPS to ensure all traffic is routed through the secure version of your website. These redirects preserve your SEO rankings and provide a seamless experience for users.
For Apache (using .htaccess)
If your website runs on an Apache server, you can redirect all HTTP traffic to HTTPS by editing the .htaccess file located in the root directory of your website. Add the following lines at the top of the file:
RewriteEngine On
RewriteCond %{HTTPS} off
RewriteRule ^(.*)$ https://%{HTTP_HOST}%{REQUEST_URI} [L,R=301]
This configuration checks if HTTPS is off and then redirects the request to the HTTPS version of the same URL using a 301 (permanent) redirect.
For Nginx
If you are using Nginx, you can configure the redirection in your server block within the nginx.conf or your site’s configuration file:
server {
    listen 80;
    server_name yourdomain.com www.yourdomain.com;
    return 301 https://$host$request_uri;
}
This instructs Nginx to listen on port 80 (HTTP) and redirect all incoming requests to the corresponding HTTPS URL using a 301 redirect.
Enforce HTTPS with HTTP Strict Transport Security (HSTS)
To further strengthen your HTTPS implementation, you can enable HTTP Strict Transport Security (HSTS). HSTS instructs browsers to only connect to your site using HTTPS, even if a user manually types in http://. This adds an additional layer of security by preventing protocol downgrade attacks and cookie hijacking.
For Apache (in .htaccess or your virtual host file):
<IfModule mod_headers.c>
    Header always set Strict-Transport-Security "max-age=31536000; includeSubDomains; preload"
</IfModule>
For Nginx:
add_header Strict-Transport-Security "max-age=31536000; includeSubDomains; preload" always;
This configuration:
- Forces HTTPS for one year (
31536000seconds) - Applies the policy to all subdomains
- Signals browsers to preload your site in their HSTS list if you submit it to https://hstspreload.org
Make sure your HTTPS setup is fully functional and all subdomains support HTTPS before enabling HSTS with the preload directive, as it can lock users into HTTPS access permanently once registered.

Make sure your canonical tags point to the https:// version of your pages. This helps search engines consolidate ranking signals correctly and avoid content duplication issues.
d. Update External Services
Notify all third-party services of your new secure URL:
- Update Google Analytics and Search Console with the HTTPS property
- Reconfigure CDN settings to work with HTTPS
- Update URLs in social media profiles, email templates, and marketing tools
External services often rely on URL configurations. Updating them promptly ensures data consistency, performance, and tracking accuracy across platforms.
e. Update Sitemap and Robots.txt
Regenerate your sitemap to reflect the HTTPS URLs and resubmit it to search engines. Also, ensure your robots.txt file references only secure URLs and allows proper crawling.
Search engines use your sitemap and robots.txt to navigate your site. Ensuring both reflect HTTPS URLs accelerates re-indexing and helps maintain organic visibility.
f. Test Everything
After completing the migration, test your site thoroughly:
- Use SSL checkers to verify certificate installation
- Look for mixed content warnings in browser console logs
- Ensure redirects work properly and no insecure content is loaded
Testing is critical for identifying and fixing overlooked issues. Allocate time to perform cross-browser and device tests to confirm your users experience a secure and functional site.
If you encounter issues, you might find our guide on how to fix ERR_SSL_PROTOCOL_ERROR in WordPress particularly helpful.
g. For WordPress Users
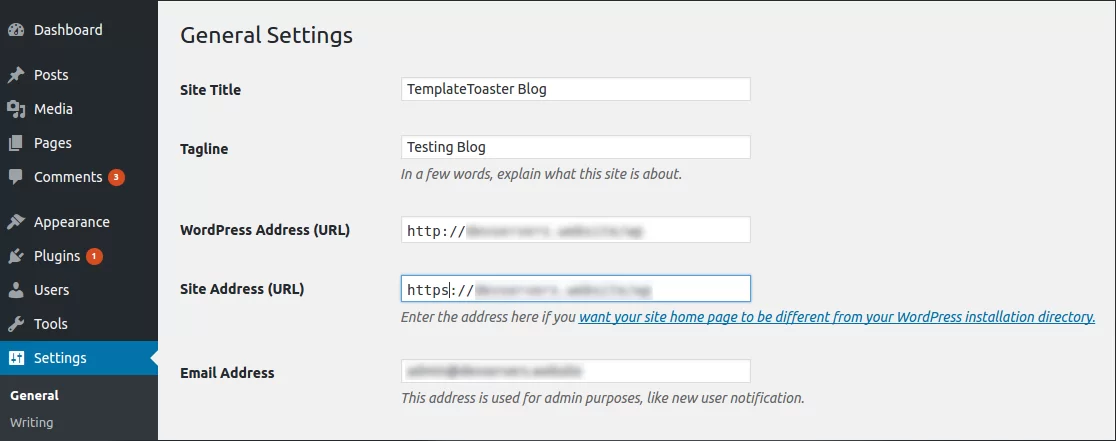
If you are using WordPress, one of the first updates you should make is in the WordPress dashboard itself. Go to Settings → General, and update both the WordPress Address (URL) and Site Address (URL) fields from http:// to https://. This ensures that WordPress uses the secure version of your URLs across the site. After saving these changes, you may be logged out and required to log in again, now through the HTTPS version of your site. It’s a simple yet crucial step in signaling the entire system to begin using secure URLs moving forward.
Common HTTPS Migration Issues and Fixes
Even a well-planned migration can encounter issues. Here are the most common problems and how to fix them:
No migration is without its challenges. Identifying and resolving common problems quickly can prevent traffic loss and user frustration. Here are the typical issues that arise post-migration and how to handle them efficiently.
Mixed Content Warnings
Occurs when a page served over HTTPS loads resources (images, scripts) over HTTP.
- Use browser tools to identify insecure elements
- Update links to HTTPS or use relative URLs
Broken Redirects
Misconfigured redirect rules can lead to redirect loops or broken pages.
- Test all major URLs manually
- Use redirect checker tools to diagnose issues
Third-Party Scripts Over HTTP
Some embedded scripts may still be linked via HTTP.
- Update to HTTPS versions if available
- Replace or remove insecure third-party content
Duplicate Content
Search engines may index both HTTP and HTTPS versions of your site.
- Use 301 redirects from HTTP to HTTPS
- Set the preferred domain in Google Search Console
If you’re looking for tools to make your migration smoother, consider using SSL plugins for WordPress that can automate many of these fixes.
Especially in WordPress or custom themes, hardcoded HTTP links in template files can cause mixed content warnings. Use a code search tool (like grep or a code editor) to locate and replace these manually.
Post-Migration Steps
Once you have confirmed the site is working properly, take these final steps:
The migration doesn’t end once HTTPS is live. Post-migration tasks ensure long-term stability and ongoing SEO performance. Regular monitoring and updates are essential to fully realize the benefits of your secure setup.
- Resubmit your site to Google Search Console and Bing Webmaster Tools
- Monitor traffic and keyword rankings regularly
- Watch for 404 errors and crawl issues
- Continue using HTTPS in all future content and marketing materials
Tools and Plugins to Help with Migration
There are several tools and plugins that can simplify the process of migrating to HTTPS:
Relying on the right tools can significantly reduce the time and risk involved in an HTTPS migration. Whether you’re managing a WordPress blog or a complex eCommerce platform, these solutions can automate repetitive tasks and help diagnose issues quickly.
For WordPress Sites
- Really Simple SSL: Automatically detects and configures HTTPS settings
- Better Search Replace: Helps update database entries
Testing Tools
- SSL Labs: Comprehensive SSL configuration test
- Why No Padlock: Detects insecure elements on HTTPS pages
- Redirect Checkers: Identify redirect issues and loops
Using these tools can streamline the migration and ensure a smoother transition.
Ongoing Maintenance and Monitoring
Successfully migrating to HTTPS is only the beginning. To ensure your website continues to perform securely and efficiently, ongoing maintenance is essential.
Here’s what you should monitor regularly:
- SSL Certificate Expiry: Set reminders to renew your certificate before it expires to avoid downtime or browser warnings.
- Crawl Errors: Regularly check Google Search Console for crawl or indexing issues.
- Redirect Health: Use redirect checker tools to ensure no broken or unnecessary redirect chains have developed.
- Mixed Content: New content or plugin updates can accidentally introduce insecure elements. Use browser tools or security scanners to stay ahead of issues.
- Page Speed: Use tools like Google PageSpeed Insights to confirm that HTTPS isn’t affecting performance, especially if using HTTP/2.
Consistent oversight helps ensure your HTTPS migration continues delivering value over time.
Audit and update URLs in email templates, downloadable PDFs, and marketing materials that may still reference HTTP links to your website.
Frequently Asked Questions (FAQs)
Is HTTPS slower than HTTP?
Modern HTTPS is optimized and often faster due to HTTP/2 support.
Can I use both HTTP and HTTPS?
Technically yes, but it is recommended to redirect all traffic to HTTPS to avoid duplication.
How long does it take for SEO benefits to show?
You may notice improvements in search performance within a few weeks, depending on crawl frequency.
Will HTTPS affect my AdSense or affiliate earnings?
HTTPS can improve trust, potentially increasing conversions and earnings.
Complete HTTPS Migration Checklist
Use this step-by-step checklist to guide your transition from HTTP to HTTPS efficiently and without missing any critical elements.
- Understand the Need for HTTPS
Familiarize yourself with the benefits of HTTPS, including SEO improvements, security enhancements, and compliance with modern web standards. - Choose the Right SSL Certificate
Select the most appropriate SSL certificate (DV, OV, EV, Wildcard, or SAN) based on your website type and business needs. - Select an SSL Provider
Purchase or obtain a free SSL certificate from a reputable provider like Let’s Encrypt or a commercial vendor. Refer to SSL Certificate Providers for a comparison. - Backup Your Website
Create a full backup of your website, including files and databases, before making any changes. - Update CMS, Themes, and Plugins
Ensure your content management system e.g., WordPress themes, and plugins are up-to-date to avoid compatibility issues. - Install the SSL Certificate
Install the SSL certificate on your server through cPanel, Plesk, or your hosting dashboard. Refer to Install SSL Certificate WordPress Website for guidance. - Verify the SSL Installation
Test your website with an SSL checker to ensure the certificate is properly installed and recognized by browsers. - Update CMS Settings
If you’re using WordPress, go to Settings → General and change both the WordPress Address (URL) and Site Address (URL) fromhttp://tohttps://. - Update Internal Links and Resources
Update all internal links, scripts, images, and stylesheets to use HTTPS. Use tools like Better Search Replace for bulk changes. - Redirect HTTP to HTTPS
Set up 301 redirects to force all traffic from HTTP to HTTPS. Use.htaccessfor Apache ornginx.conffor Nginx. - Implement HSTS (HTTP Strict Transport Security)
Add the appropriate HSTS header to your server configuration to force secure connections for future visits. - Update External Services
Inform services like Google Analytics, Search Console, CDN providers, and social media platforms about your new HTTPS URLs. - Update Sitemap and Robots.txt
Generate a new sitemap with HTTPS URLs and update yourrobots.txtto reflect the secure paths. - Resubmit to Search Engines
Submit your updated sitemap to Google Search Console and Bing Webmaster Tools under the HTTPS property. - Fix Mixed Content Issues
Scan for and resolve any mixed content warnings by updating insecure elements to load over HTTPS. - Monitor Redirects
Test and verify that all redirects function correctly and that there are no redirect loops. - Test Site Functionality
Browse your site on various devices and browsers to confirm everything works securely and smoothly. - Track Performance and SEO Metrics
Monitor your search rankings, traffic, and crawl data to ensure your migration doesn’t negatively impact performance. - Enable SSL Monitoring
Set up alerts for certificate expiration and potential issues using tools or plugins. - Maintain HTTPS Best Practices
Continue using HTTPS for all future content, monitor your certificate status, and review your setup regularly.
Build a Stunning Website in Minutes with TemplateToaster Website Builder
Create Your Own Website Now
Those are really good points. Https has become important signal today specially after Google official announcement of sending warning messages. The last official date is October 2017.
Good resource for http to https migration checklist – https://www.cueblocks.com/blog/40-point-checklist-for-a-successful-http-to-https-migration/
Thanks
Ajit
Great howto guide. I am concerning on the link building matter that I had with http previously thus affect to the ranking. Will this matter?
Fantastic guide Param!
In case it helps anyone reading this, for the fixing mixed content / insecure links & resources step, the free HTTPS Checker app can help with that: https://httpschecker.net/guides/https-checker
Awesome guide.
What do these stamps mean when redirecting https – some recommend such ^ (. *) $ Others such (. *) – what does this mean?
Nowadays https becomes the important part for every website, you may also relate it to security.
Using HTTPs is more preferrable in google point of view. Neither google will start sending warning messages.
This is a very thorough guide. I followed the steps to migrate my small business website to HTTPS, and the process was smoother than I expected. The tips on handling mixed content warnings were especially helpful. Thanks for sharing.