How to Increase max_execution_time in WordPress?

Solving WordPress errors especially with the technical terms may seem like difficult tasks but in reality they are quick and easy to resolve. All you have to do is follow the steps mentioned in this tutorial to get it right. Max_execution_time is a fatal error which makes it sound more complicated than it really is. In this article, you will learn to increase max_execution_time in WordPress using different methods to resolve the fatal error. But before that, let’s understand what is max_execution_time and how it occurs.
What is max_execution_time error and when it occurs?
Were you trying to upload a WordPress themes or plugin and instead received the following error?: It is very easy to check WordPress theme, hardly takes a few minutes.
| “Fatal Error: Maximum execution time of 30 seconds exceeded” |
The number 30 given in the example can be any number you have set as the maximum execution time for your WordPress website. Most hosting providers enforce a maximum execution time ranging between 30 and 60 seconds. It means your scripts have 30 to 60 seconds to do their job or else the task will be suspended with the max_execution_time error. For high-quality PHP scripts, a 30-second time is more than enough. However, website owners often have to increase the maximum execution time for their sites depending upon the code and server response. Some developers even set it to as high as 300 but going over this number isn’t advised by experts.
When users see ‘Fatal Error”, they tend to worry. However, maximum execution time error is just a regular error and can be easily resolved. This becomes a problem when you start losing leads, sales or readers because it may show your users on your site’s frontend that your website is going through technical difficulties. Therefore, it may require your urgent attention.
When it Occurs?
Max_execution_time error is nothing serious. It just means that the PHP scripts you run take longer to complete than the limit allows. Standard execution time limit is 30 seconds and varies according to the hosting providers. This is basically a useful limit set to avoid any potential server lockup. It usually occurs when trying to upload a particularly larger file like a template or a plugin which obviously takes longer than the set limit. You can either increase the limit permanently or reverse the changes after the completion of your long operations.
Moreover, you can delete the WordPress theme or plugin that is causing the error if you don’t want to make edits in your core website files. This solution will remove the error on the frontend but will not increase the maximum execution time. Furthermore, this solution is only suitable in case you manage to find a replacement for the offending item.
Ways to Fix max_execution_time in WordPress
When you start receiving the “Fatal Error: Memory Size Exhausted”, it is time to make some changes in your WordPress. Following are the three different ways you can increase the maximum execution time for your WordPress site. I’ve explained all the methods step by step to make the tutorial easier to follow. However, keep in mind that you are about to make changes in the core files of your websites. Therefore, it is absolutely essential that you follow the steps carefully and not break your website. For a safer side, create a backup of the current version of your website before making changes so you can easily restore it in case anything goes wrong. Let’s get started!
Method 1: Increase max_execution_time in WordPress using wp-config.php
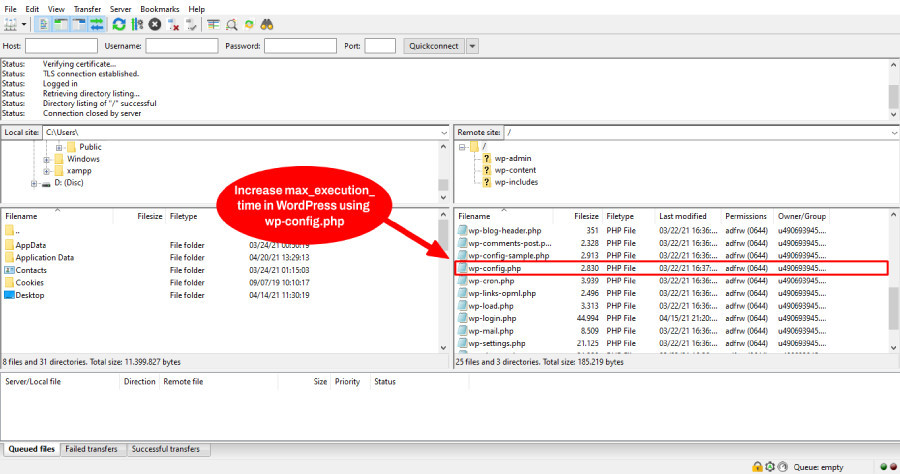
First method I am going to explain is increasing the maximum execution time for WordPress through the wp-config.php file. This file is basically the default configuration file of the WordPress website. This method is useful to you if you use a shared hosting service. In fact, you can increase the execution time according to your specific requirement. Follow the given instruction to increase max_execution_time using wp-config.php file-
- Open an FTP connection to your WordPress files. Next, locate and open the root folder often named as your website and click on the /public folder. This folder contains an extensive collection of core files including wp-config.php.
- Click on the wp-config.pp file to edit it directly in the FTP client. Moreover, you can save the file to your computer if you don’t want to edit it directly in the FTP.
- Insert the following code snippet in the wp-config.php file-
| set_time_limit(300); |
According to experts, placing the code line in the end of the file, right before ‘stop editing’ is the ideal place. However, you can place this code line wherever you want to in your wp-config.php file. As long as you don’t modify anything else, it doesn’t matter.
- After placing the code and saving the file, upload the updated wp-config.php file to your site via FTP. The new maximum execution time for this example is 300 seconds and you can enter any number depending on your individual need.
To test if it worked, go back to WordPress to see if everything is functioning the way it is supposed to. If you don’t encounter the error when you try to upload a template or plugin, this method worked!
Method 2: Increase max_execution_time in WordPress from PHP.ini
You can also try the php.ini method to increase the maximum execution time. In case your website uses the server’s main PHP config file, you need to make changes in /etc/php.ini which is the default PHP configuration file. However, if the servers are running PHP as suPHP or FastCGI, your website will have a custom php.ini. Most difficult part is to locate the php.ini file as the location of the file varies by host. You are most likely to locate the file in the website root folder. Since you are going to make the edits in the core files of the website, don’t forget to make a backup. Follow the given steps to increase the maximum execution time-
- Connect to your website using FTP client and gain access to your php.ini file which is most likely to be in the /public folder.
- After locating it, right click and open View/edit option to open the file within a text editor. After opening it, add the following code at the end of the file-
| php_value memory_limit 256M php_value upload_max_filesize 64M php_value post_max_size 64M php_value max_execution_time 300 php_value max_input_time 1000 |
- Next, it requires editing the timeout values in the web server configuration too because WordPress often shows it as a warning message for using too low values.
Important Note: Many hosting providers restrict the access to php.ini files. This method would only work if you have the direct access to your php.ini file or if you are running your WordPress on localhost.
Don’t forget to test if it worked, go back to WordPress to see if everything is functioning the way it is supposed to. If you don’t encounter the error when you try to upload the problem item (template or plugin), this method worked!
Method 3: Increase max_execution_time in WordPress using .htaccess
Using .htaccess to increase max_execution_time is another great way. We know that max_execution_time is usually set to 30 second by default. You can simply gain access to the .htaccess file to edit it and offer more time to your PHP scripts. WordPress uses this file to manipulate how Apache HTTP web server delivers files from its root directories and subdirectories. You can connect to your website using an FTP client. Since this is an important file, a bad edit can break your website. You need to pay attention to the instructions and do it carefully. To make it easier for you, we are going to add some directives at the end of the file to increase the PHP maximum execution time.
Following are the steps to do it properly-
- Access the website’s root directory that contains the wp-config.php file. In cPanel servers, it is under publin_html. You will find your .htaccess file. With FTP clients like Filezilla, you will find your .htaccess file in the Remote Site section on the right-hand side.
- After locating it, right click and open View/edit option to open the file within a text editor. After opening it, add the following code at the end of the file-
| php_value memory_limit 256M php_value upload_max_filesize 64M php_value post_max_size 64M php_value max_execution_time 300 php_value max_input_time 1000 |
- Finally Save the file to store the changes made and then restart the Apache service
| service apache2 restart |
That’s it, you have successfully made the changes. If you still get the same error, try increasing the value from 300 to 600.
Conclusion
As explained, the WordPress max_execution_time error occurs due to slow PHP scripts. When you try to upload a big file like the occasional WordPress version update, WordPress plugins or templates, you are prone to encounter this error. Hopefully this article helped you understand what exactly this error is and how it can affect your WordPress website. Moreover, this article further explains three ways to increase the maximum execution time to remove this error using wp-config.php, php.ini, and .htaccess file. For more such tutorials, subscribe to our blog.
It is a pretty common type of error. If you want more information or have any question regarding this error, reach out to us in the comments below!
Related Reading:
How to create WordPress theme from the scratch?
How to move WordPress to new host?
How to install WordPress plugin?
Build a Stunning Website in Minutes with TemplateToaster Website Builder
Create Your Own Website Now