A Complete Guide to WordPress .htaccess file: Security, SSL, Redirect, Rules, Tricks & More
It is quite worrisome to control your website’s behavior as it directly affects your customer interaction. What if you know how to handle .htaccess file to boost your site security, speed, and performance!!!
The .htaccess or simply htaccess file is a great tool that allows you to have some worthy cool things on your website. It manipulates how Apache serve files from its root directory and all the subdirectories in WordPress. The WordPress Htaccess file is an important but also a temperamental system file. A small code error in htaccess file can result in server malfunctioning. So, a backup should always be maintained and extra caution should be taken while dealing with it. Here at Templatetoaster WordPress theme builder, I will cover all the basics of htaccess file, setting up security, SSL, redirects to permalinks etc. in WordPress htaccess file. So let’s dive in to learn how to optimize the htaccess file for your WordPress website.
Table of Contents
- What is a .htaccess File in WordPress?
- How to Create a .htaccess File?
- How to Edit .htaccess File?
- Performance Optimisation using HTACCESS
- Secure WordPress site using HTACCESS file
- Redirect URLs using HTACCESS file
- HTACCESS file Rules for WordPress Permalinks
- How to Force SSL with .htaccess?
- More Tips and Tricks for WordPress .htaccess file
- To Sum Up
What is a .htaccess File in WordPress website?
The WordPress htaccess file is a server configuration hypertext access file. It helps you to define the rules that how Apache server will handle your website. The file name has a dot (.) at the beginning, to specify that it’s a hidden file. This file is modified to customize SEO friendly permalinks, improving security & performance of a site, redirect links, and much more.
But sometimes, a user may find it difficult to locate the htaccess file after installing the WordPress. For the very first time, it is automatically generated in the WordPress directory when you will customize your permalinks. If not, you need to create it manually. Here at Templatetoaster website builder software and WordPress website builder, let’s check out the details to create a WordPress htaccess file and top SSL certificate providers to secure your website.
How to Create a .htaccess File in WordPress?
There are two methods to create an htaccess file as follows:
1. By Setting Permalinks
You don’t have to do much. Just navigate to Settings → Permalinks from your WordPress Dashboard. Then, click Save Changes button on Permalink screen. It will generate a “.htaccess” file in your site root directory.
2. Manual Method
In some rare cases, the file will not be generated automatically due to some read/write/create permissions at the server end. In that case, you will create .htac
cess file manually. For that, you can follow these simple steps:
a. Create a text file in Notepad on your computer.
b. Copy and Paste below code in that file:
# BEGIN WordPress

<IfModule mod_rewrite.c>

RewriteEngine On

RewriteBase /

RewriteRule ^index\.php$ - [L]

RewriteCond %{REQUEST_FILENAME} !-f

RewriteCond %{REQUEST_FILENAME} !-dRewriteRule . /index.php [L]

</IfModule>

# END WordPress
c. Rename the file extension of your text file from .txt to .htaccess.
d. Now, upload your .htaccess file in the websites root directory via File Manager in the cPanel at below location: …/home/yourweb/public_html/.htaccess
How to Edit .htaccess File in WordPress?
You may need to modify the WordPress default HTACCESS file to optimise site for speed, security and other things. There are three different methods to edit WordPress htaccess file as follows:
1. Editing WordPress .htaccess file using cPanel
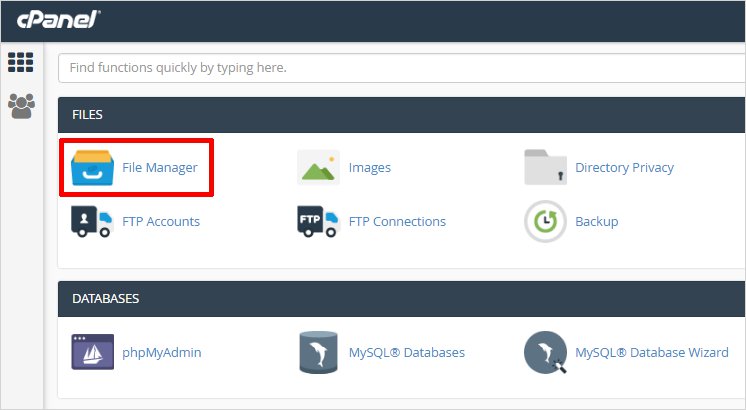
- First of all, log in to your cPanel.
- Go to File Management and select File Manager option.
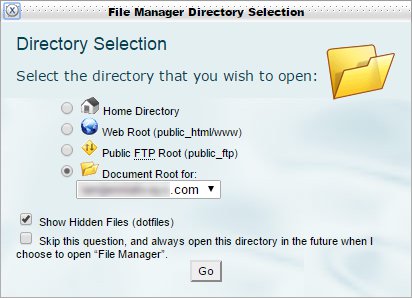
- Select the public_html/www or Document root. Turn On hidden file checkbox, if already not activated.
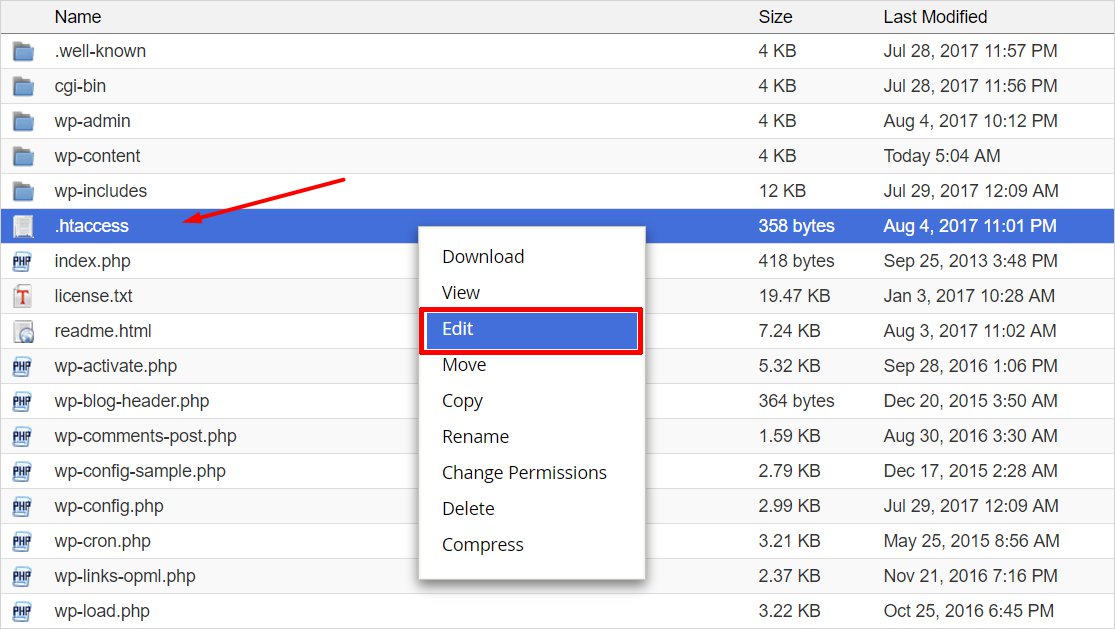
- Finally, right-click on the .htaccess file and select Edit. Follow your cPanel instructions to edit the file.
2. Editing .htaccess file using FTP client
The second method to edit WordPress .htaccess file is through FTP client. There are many free FTP client solutions available. FileZilla is one of the popular FTP clients. Here, we are exemplifying the steps using FileZilla:
- Log in to your FTP hosting account.
- Navigate to the root of your installation to enable Show Hidden I=”ftp” class=”alignnone size-full wp-image-8077″ src=”https://blog.templatetoaster.com/wp-content/uploatems to locate the .htaccess file.
Menu Options → Select Server → Force showing hidden files
- Navigate to the root folder of your domain and download your .htaccess file.
- That’s it. Now, you can edit .htaccess file.
3. Editing .htaccess from the WordPress Dashboard Using Plugin
The third alternative to editing the WordPress .htaccess file is to use plugins. There are many free plugins that allow you to edit your .htaccess file from the WP dashboard. One of the most popular plugins that you can use is – Yoast SEO Plugin.
- Once you installed and activated this plugin, you will see the SEO option in the left pane of your WordPress dashboard.
- When you click on it, a new window will open. From the top bar, select Features and Enable the Advanced settings pages. Then, click Save Changes button.

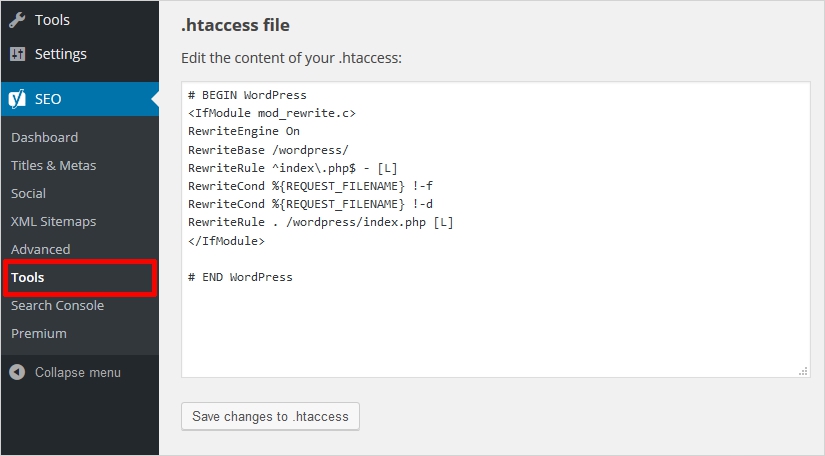
- Then from left pane of the dashboard, navigate to Tools section under SEO to open File Editor as shown below.
SEO → Tools → File Editor

- Make changes to your .htaccess file here and click Save changes to .htaccess after editing.
You can also use WP Htaccess Editor plugin to edit WordPress .htaccess file.
(*Note- Don’t forget to take a backup of your WordPress .htaccess file. A small mistake can make big changes to your site. changes you made so that you can undo if needed.)
There are lots of things, you can do in htaccess file to enhance your WordPress speed, performance and security. Let’s have a closer look.
Common Performance issues due to .htaccess file in WordPress
Each time someone visits your website, the web server loads all .htaccess file configurations. It searches all directories within the domain. This will affect the performance of high-traffic sites. Some other common problems that can be sorted via WordPress htaccess file are:
- warnings about post content-length
- exceeds the maximum upload size
- 413 request entity error
- 500 internal server error
So, a .htaccess file should be used when the main server configuration is not accessible. What else can be done to boost the performance of your website? Let’s find out various tricks to improve performance through WordPress .htaccess files:
Improve Performance of WordPress site using .htaccess File
You can customize your website in following ways to enhance its performance with WordPress .htaccess file. You just have to copy and paste the below-mentioned codes in .htaccess file for each of the suitable option you want for your Site.
1. Disable AllowOverride
You can restrict the .htaccess files from decreasing the performance by enabling AllowOverride only in required directories. As if AllowOverride is enabled throughout all directories, the server will check all. So, disable the AllowOverride in the site’s root .htaccess file. It should be enabled only in required directories via the server config file.
# increase performance by disabling AllowOverride
AllowOverride None
2. Pass the character set
A character set gives a list of the characters recognized by the hardware/software. So to instruct the browser to use a specific character set for rendering the page, you need to specify the character set of the webpage. To give character encoding information, directly affects the web page communication between server & client, form submissions, database connections etc. Your browser will have to guess in case you don’t pass a character set, and it may display “garbage” text. So, you can pass the default character set to prevent the display of errors as follows:
# pass the default character set
AddDefaultCharset utf-8
3. Preserve Bandwidth
Your bandwidth should be able to cater the layout changes, traffic growth, traffic spikes, and should have room to grow. To be future prepare, you can add some directives to increase performance on PHP enabled servers as follows:
# preserve bandwidth for PHP enabled servers
<ifmodule mod_php4.c>
php_value zlib.output_compression 16386
</ifmodule>
4. Set the Server Timezone
Synchronize your server chronologically according to the time zone of the specified state. You can set any time zone from the supported ones.
# set the server timezone
SetEnv TZ America/Washington
5. Set Admin Email Address
Specify the default email address for the server administrator.
# set the server administrator email
SetEnv SERVER_ADMIN [email protected]
6. Enable Browser Caching
Browser caching will allow visitors to save items from your web page. Then, they do not need to download them again. It is used to design different elements like CSS stylesheets and media items. It is a practical solution to allow visitors to load the image saved on their computer rather than your server. This will greatly reduce bandwidth and increase page loading times.
Add this code to enable browser caching:
## EXPIRES CACHING ##
<IfModule mod_expires.c>
ExpiresActive On
ExpiresByType image/jpg "access 1 year"
ExpiresByType image/jpeg "access 1 year"
ExpiresByType image/gif "access 1 year"
ExpiresByType image/png "access 1 year"
ExpiresByType text/css "access 1 year"
ExpiresByType application/pdf "access 1 month"
ExpiresByType text/x-javascript "access 1 month"
ExpiresByType application/x-shockwave-flash "access 1 month"
ExpiresByType image/x-icon "access 1 year"
ExpiresDefault "access 2 days"
</IfModule>
7. Enable File Caching
A server-side file caching helps to serve multiple visitors from the same cache without requiring them all to make requests from the origin server. It reduces the load on the origin server and speeds up the first view of a web page. So, .htaccess gives you great privileges that you can specify the type of content to be cached and time value for this. Let’s see some examples to generalize the WordPress .htaccess rules for cached content as follows:
# cache images and flash content for one month
<FilesMatch ".(flv|gif|jpg|jpeg|png|ico|swf)$">
Header set Cache-Control "max-age=2592000"
</FilesMatch>
# cache text, css, and javascript files for one week
<FilesMatch ".(js|css|pdf|txt)$">
Header set Cache-Control "max-age=604800"
</FilesMatch>
# cache html and htm files for one day
<FilesMatch ".(html|htm)$">
Header set Cache-Control "max-age=43200"
</FilesMatch>
# implement minimal caching during site development
<FilesMatch "\.(flv|gif|jpg|jpeg|png|ico|js|css|pdf|swf|html|htm|txt)$">
Header set Cache-Control "max-age=5"
</FilesMatch>
# explicitly disable caching for scripts and other dynamic files
<FilesMatch "\.(pl|php|cgi|spl|scgi|fcgi)$">
Header unset Cache-Control
</FilesMatch>
# alternate method for file caching
ExpiresActive On
ExpiresDefault A604800
ExpiresByType image/x-icon A2419200
ExpiresByType application/x-javascript A2419200
ExpiresByType text/css A2419200
ExpiresByType text/html A300
# disable caching for scripts and other dynamic files
<FilesMatch "\.(pl|php|cgi|spl|scgi|fcgi)$">
ExpiresActive Off
</FilesMatch>
8. Set Default Language & Character Set
You can set the default language and character set for pages served by your server to suit your needs.
# set the default language
DefaultLanguage en-US
# set the default character set
AddDefaultCharset UTF-8
9. Declare Specific/Additional MIME Types
A MIME type tells that what extension type holds what type of file. For example- .html extensions refers to an html document. In WordPress .htaccess file you can specify the additional MIME types as follows:
# add various mime types
AddType application/x-shockwave-flash .swf
AddType video/x-flv .flv
AddType image/x-icon .ico
10. Send Headers Without Meta Tags
This is used to change the current character set and language for a specific directory use:
# send the language tag and default character set
# AddType 'text/html; charset=UTF-8' html
AddDefaultCharset UTF-8
DefaultLanguage en-US
11. Limit Request Methods to GET/PUT
Sites hosted on Apache servers can accept different request methods. For example, GET, POST, DELETE, and PUT methods etc. Some of them are beneficial, some are just unnecessary as increasing the overall security liability of your site. So, you can lock things down by blocking or allowing only specific types of HTTP requests.
# limit server request methods to GET and PUT
Options -ExecCGI -Indexes -All
RewriteEngine on
RewriteCond %{REQUEST_METHOD} ^(TRACE|TRACK|OPTIONS|HEAD) RewriteRule .* - [F]
12. Process Files Based on Request Method
This rule is to process files according to the specified request methods as follows:
# process files according to server request method
Script PUT /cgi-bin/upload.cgi
Script GET /cgi-bin/download.cgi
13. Execute Various File Types via CGI Script
It is used where certain file types need to be processed with some specific cgi script:
# execute all png files via png-script.cgi
Action image/png /cgi-bin/png-script.cgi
14. Speed Up Your Site by Disabling Revisions Autosave
WordPress saves revisions of your pages and posts every time you update. It is an incredibly useful feature as enable you to see the recent changes. But, it can slow down your site’s speed. If you want to sacrifice this revision convenience in order to have a faster website, use this code in the wp-config.php file:
define(WP_POST_REVISIONS, false);
When you again want to enable this feature, just delete this line.
This was all about boosting the performance. Similarly, WordPress htaccess file helps to improve security. Let’s find out how.
The .htaccess file and WordPress Security
It is quite obvious that a few potential vulnerabilities are left unattended in an unsupervised WordPress installation. Even a mid-level WordPress user, don’t dare to mess with the .htaccess file. But the WordPress .htaccess file has great scope to enhance security by preventing many types of website attacks. You can override many of its configuration settings to secure your website. You can try these .htaccess file tricks for better WordPress security:
1. Protect your WordPress Admin area from Unauthorized Access
The wp-admin folder has required files to run the WordPress dashboard. So, all your visitors don’t need to access it. It will be good to enable only a few selected IP addresses to access the wp-admin folder. You can limit the access to certain users like editors, contributors, and other admins. You can use this code snippet in the .htaccess file:
AuthUserFile /dev/null
AuthGroupFile /dev/null
AuthName "WordPress Admin Access Control"
AuthType Basic
<LIMIT GET>
order deny,allow
deny from all
# whitelist My IP address
allow from xx.xx.xx.xxx
# whitelist John's IP address
allow from xx.xx.xx.xxx
</LIMIT>
2. Password Protect WordPress Admin Folder
You can access your WordPress website from various locations like open internet spots. At that point constraining access to particular IP addresses may not work for you. So, an additional password protection can be added to your WordPress admin area.
For that, you need to generate a .htpasswds file. You can use an online generator for this. Upload it outside your openly available web catalog or/public_html/folder. A good path would be:
/home/user/.htpasswds/public_html/wp-admin/passwd/
Then, create a .htaccess file and upload it in /wp-admin/ directory. Now, add the following code:
AuthName "Admins Only"
AuthUserFile /home/yourdirectory/.htpasswds/public_html/wp-admin/passwd
AuthGroupFile /dev/null
AuthType basic
require user putyourusernamehere
<Files admin-ajax.php>
Order allow,deny
Allow from all
Satisfy any
</Files>
3. Disable Directory Browsing
Many WordPress security experts suggest incapacitating catalog perusing. Hackers can look into your site’s directory to find a vulnerable file with directory browsing. So, to impair catalog browsing on your site, you will add this line to WordPress .htaccess file:
Options -Indexes
4. Disable PHP Execution in Some WordPress Directories
Sometimes hackers break into a WordPress site and introduce a secondary passage. The secondary files are masked into /wp-includes/ or /wp-content/uploads/ folders. To prevent this, you have to increase your site security by disabling PHP files. You can accompany this code to disable PHP execution:
<Files *.php>
deny from all
</Files>
5. Protect Your WordPress Configuration wp-config.php File
Another most important file is wp-config.php. It contains the login information for your WordPress database as well as other important maintenance settings. It is necessary to protect it. For that, simply use this code:
<files wp-config.php>
order allow,deny
deny from all
</files>
6. Ban Suspicious IP Addresses
If there are unusual high requests from a particular IP address, you can block them. Add the following code for this:
<Limit GET POST>
order allow,deny
deny from xxx.xxx.xx.x
allow from all
</Limit>
7. Disable Image Hotlinking in WordPress Using .htaccess
Hotlinking is the process of sharing an image by directly linking to your website. It can have a negative effect on your website and can slow it down. You can prevent the hotlinking by adding this code snippet to your WordPress .htaccess file:
RewriteEngine on
RewriteCond %{HTTP_REFERER} !^$
RewriteCond %{HTTP_REFERER} !^http(s)?://(www\.)?yourwebsite.com [NC]
RewriteCond %{HTTP_REFERER} !^http(s)?://(www\.)?yourotherwebsite.com [NC]
RewriteRule \.(jpg|jpeg|png|gif)$ http://i.imgur.com/g7ptdBB.png [NC,R,L]
8. Secure Your WordPress Plugin Files
Plugins add incredible functionality to your website. But, they can also leave your website vulnerable to attackers. These can give direct access to unauthorized users and can challenge your website security. But these add awesome features to your site, so it is not wise to stop using them. Rather you can add this code to prevent anyone from having direct access to your plugin files:
<files ~ ".(js|css)$"="&quot;.(js|css)$&quot;"> order allow,deny allow from all </files>
9. Block Include-Only Files
There are certain files that should never gain access by the user. You can block access to these files by putting the following code to your .htaccess file:
# Block the include-only files.
<IfModule mod_rewrite.c>
RewriteEngine On
RewriteBase /
RewriteRule ^wp-admin/includes/ - [F,L]
RewriteRule !^wp-includes/ - [S=3]
RewriteRule ^wp-includes/[^/]+\.php$ - [F,L]
RewriteRule ^wp-includes/js/tinymce/langs/.+\.php - [F,L]
RewriteRule ^wp-includes/theme-compat/ - [F,L]
</IfModule>
10. Disable Access to XML-RPC File Using .htaccess
The WordPress install comes with a xmlrpc.php file. It enables third-party apps to connect to your WordPress site. It is recommended to disable this file if you are not using third-party apps with your site. The following code snippet will help you out:
# Block WordPress xmlrpc.php requests
<Files xmlrpc.php>
order deny,allow
deny from all
</Files>
11. Blocking Author Scans in WordPress
It is a common brute force attack technique to run author scans on a WordPress site. It is used to crack passwords for the known usernames. You can prevent these attacks by blocking author scans. The code snippet for this is:
# BEGIN block author scans
RewriteEngine On
RewriteBase /
RewriteCond %{QUERY_STRING} (author=\d+) [NC]
RewriteRule .* - [F]
# END block author scans
12. Block Evil Robots, Site Rippers, and Offline Browsers
There can be unwanted scum in your userspace. To eliminate it, you can make a list of denied agents. You can use this block of code to maintain a blacklist of evil entities:
# deny access to evil robots site rippers offline browsers and other nasty scum
RewriteBase /
RewriteCond %{HTTP_USER_AGENT} ^Anarchie [OR]
RewriteCond %{HTTP_USER_AGENT} ^ASPSeek [OR]
RewriteCond %{HTTP_USER_AGENT} ^attach [OR]
RewriteCond %{HTTP_USER_AGENT} ^autoemailspider [OR]
RewriteCond %{HTTP_USER_AGENT} ^Xaldon\ WebSpider [OR]
RewriteCond %{HTTP_USER_AGENT} ^Xenu [OR]
RewriteCond %{HTTP_USER_AGENT} ^Zeus.*Webster [OR]
RewriteCond %{HTTP_USER_AGENT} ^Zeus
RewriteRule ^.* - [F,L]
You can also redirect the evil agents to a hellish site rather than displaying an error message in the last line of above code with Rewrite line. To redirect them, you will replace the last line with following code:
#redirecting the evil agents
RewriteRule ^.*$ http://www.new-website.com [R,L]
Or redirect to a black hole of fake emails:
RewriteRule ^.*$ http://english-61925045732.spampoison.com [R,L]
13. Disable the Server Signature
You can disable the digital signature that would otherwise identify the server. It can be a security risk as you are essentially telling attackers known vulnerabilities in your system. So to hide the server signature, you will write:
# disable the server signature
ServerSignature Off
WordPress .htaccess: Redirect URLs and more
WordPress redirect is a way to inform your readers that the page they want to read, is moved somewhere else. The browser automatically redirects them to new page. There are various different types of redirects like 301 redirect, 302 redirect, 307 redirect, etc. here, you will see the .htaccess redirect WordPress tricks as follows:
1. Important Note About Redirecting via mod_rewrite
It is necessary to enable the RewriteEngine for all redirects via mod_rewrite directive. the mod_rewrite directive is commonly included in server configuration file or root .htaccess file. If it is not included there, it should be in the first line in any code block that utilizes a rewrite function. To enable it, you will write:
# enable rewrite engine
RewriteEngine on
2.Redirect from “WWW” Domain to “Non-WWW” Domain
It is a good .htaccess technique for SEO, known as www canonicalization. A 301 redirect is used for this. It is better to test after preparing 301 redirects and remove it if any error occurs. Make sure that you included a trailing slash / when linking directories. Finally, use this consistently with all the links of www subdomain or never use it. You can use this code snippet to redirect from www to non-www domain as follows:
# permanently redirect from www domain to non-www domain
RewriteEngine on
Options +FollowSymLinks
RewriteCond %{HTTP_HOST} ^www\.domain\.tld$ [NC]
RewriteRule (.*) http://domain.tld/$1 [R=301,L]
3. Redirect http to https using .htaccess file in WordPress
This technique first checks whether HTTPS is enabled on your server or not. If so, then it will redirect the request to the your homepage.
IfModule mod_rewrite.c>
RewriteEngine On
RewriteCond %{HTTPS} ^on$ [NC]
RewriteCond %{QUERY_STRING} !https-is-on [NC]
RewriteRule (.*) /?https-is-on [R=301,L]
</IfModule>
To redirect all requests to the HTTPS protocol, if https is enabled; you can use this:
<IfModule mod_rewrite.c>
RewriteEngine On
RewriteCond %{HTTPS} off
RewriteRule (.*) https://%{HTTP_HOST}%{REQUEST_URI} [R=301,L]
</IfModule>
If you are worried on SEO Issues after redirection, you can check our in-depth Guide on Website Migration: Redirect http to https.
4. Redirect from an Old Domain to a New Domain
It is really common to redirect users to a new location. The following rule is used for this:
# redirect from old domain to new domain
RewriteEngine On
RewriteRule (.*) http://www.new-domain.com/$1 [R=301,L]
5. Redirect String Variations to a Specific Address
If you want to redirect any request containing a string variation to a specific address, you will use this rule:
# redirect all variations of a specific string
RewriteRule ^some-string http://www.domain.com/index.php/blog/target [R]
Alternatively, you can use there two mapping rules:
# map variations to same directory on same server
AliasMatch ^/director(y|ies) /www/docs/target
# map variations to same directory on different server
RedirectMatch ^/[dD]irector(y|ies) http://domain.com
6. Send Visitors to a Subdomain
It will redirect all the visitors to a subdomain of your choice. You will replace the subdomain, domain, and tld to match your subdomain, domain, and top-level domain respectively in the following code:
# send visitors to a subdomain
RewriteCond %{HTTP_HOST} !^$
RewriteCond %{HTTP_HOST} !^subdomain\.domain\.com$ [NC]
RewriteRule ^/(.*)$ http://subdomain.domain.tld/$1 [L,R=301]
7. Redirecting Visitors to a Temporary Site During Site Development
During web maintenance or development, send your visitors to an alternate site. This is a very useful technique to save the visitors from any type of confusions during web-development moments while giving you full access to the site. Here is the generalized WordPress .htaccess rules to do it:
# redirect all visitors to alternate site but retain full access for you
ErrorDocument 403 http://www.alternate-site.com
Order deny,allow
Deny from all
Allow from 99.88.77.66
8. Other Fantastic Redirect Tricks
- You can also redirect an entire site using WordPress 301 redirect .htaccess.
# redirect an entire site via 301
Redirect 301 / http://www.domain.com/
- To redirect a specific file, use this rule:
# redirect a specific file via 301
Redirect 301 /current/currentfile.html http://www.newdomain.com/new/newfile.html
- Use this rule to redirect an entire site via permanent redirect:
# redirect an entire site via permanent redirect
Redirect permanent / http://www.domain.com/
- Similarly, use following rule to redirect a page or directory via permanent redirect:
# redirect a page or directory
Redirect permanent old_file.html http://www.new-domain.com/new_file.html
Redirect permanent /old_directory/ http://www.new-domain.com/new_directory/
- Redirect using redirectmatch as follows:
# redirect all requests via RedirectMatch
RedirectMatch 301 (.*) http://www.domain.com/index.html
- Redirect Users to a Customized 404 Error Page
A 404 error page is encountered when the requested page is not found. The usual reasons are either the deletion of the page or the page has been moved to a new location. It is good to use a custom 404 error page to keep your site streamlined and professional looking. You can use the following code to redirect users to your custom error page:
# custom error pages
ErrorDocument 401 /err/401.php
ErrorDocument 403 /err/403.php
ErrorDocument 404 /err/404.php
ErrorDocument 500 /err/500.php
- Send Visitors to a Maintenance Page
You can display a maintenance message to your visitors when you are developing or updating your site. You can make use of maintenance plugins for that. But, it is always recommended to create a basic maintenance HTML page. It will convey the visitors that currently the site is experiencing some problems and you will be back soon. So, you can use this code snippet to direct your visitors to this custom page:
RewriteEngineon
RewriteCond %{REQUEST_URI} !/maintenance.html$
RewriteCond %{REMOTE_ADDR} !^123\.123\.123\.123
RewriteRule $ /maintenance.html [R=302,L]
9. More Fun with RewriteCond & RewriteRule
There are some more examples of WordPress .htaccess redirect via Apache’s rewrite module:
# rewrite only if file is not found
RewriteCond %{REQUEST_FILENAME} !-f
RewriteRule ^(.+)special\.html?$ cgi-bin/special/special-html/$1
# rewrite only if image is not found
RewriteCond %{REQUEST_FILENAME} !-f
RewriteRule images/special/(.*).gif cgi-bin/special/mkgif?$1# rewrite rules for various directories RewriteRule ^(.*)/aud/(.*)$ $1/audio-files/$2 [L,R=301] RewriteRule ^(.*)/img/(.*)$ $1/image-files/$2 [L,R=301] RewriteRule ^(.*)/fla/(.*)$ $1/flash-files/$2 [L,R=301] RewriteRule ^(.*)/vid/(.*)$ $1/video-files/$2 [L,R=301]
# broswer sniffing via environmental variables
RewriteCond %{HTTP_USER_AGENT} ^Mozilla.*
RewriteRule ^/$ /index-for-mozilla.html [L]
RewriteCond %{HTTP_USER_AGENT} ^Lynx.*
RewriteRule ^/$ /index-for-lynx.html [L]
RewriteRule ^/$ /index-for-all-others.html [L]# redirect query to google search
RewriteCond %{REQUEST_URI} /search/(.*) [NC]
RewriteRule (.*) http://www.google.com/search?q=$1 [R,NC,L]HTACCESS file Rules for WordPress Permalinks
1. Configuring Permalinks
Permalinks are the URL to the content that you publish on your WordPress website. There are some specific .htaccess directives for various permalink configurations. There are two specific cases to use .htaccess directives depending upon the location of WordPress installation location as follows:
- For WordPress installed in the site root:
The WordPress .htaccess directives will look like:
# BEGIN WordPress
<IfModule mod_rewrite.c>
RewriteEngine On
RewriteBase /
RewriteRule ^index\.php$ - [L]
RewriteCond %{REQUEST_FILENAME} !-f
RewriteCond %{REQUEST_FILENAME} !-d
RewriteRule . /index.php [L]
</IfModule>
# END WordPress
No changes required, simply plug n play this.
- For WordPress installed in its own directory
If WordPress is installed in some subdirectory, WordPress creates & uses the following .htaccess directives:
# BEGIN WordPress
<IfModule mod_rewrite.c>
       RewriteEngine On
RewriteBase /wordpress/
RewriteRule ^index\.php$ - [L]
RewriteCond %{REQUEST_FILENAME} !-f
RewriteCond %{REQUEST_FILENAME} !-d
RewriteRule . /wordpress/index.php [L]
</IfModule>
# END WordPress
2. Add and Customize Blog Permalinks to Create Better URLs
It is a popular .htaccess trick to add some code to create and customize blog permalink settings. Webmasters use this for cleaner URLs that include keywords instead of strings of symbols and numbers. You can make use of the following code in your WordPress .htaccess file to do the same:
# BEGIN WordPress
<ifmodule mod_rewrite.c="mod_rewrite.c">
RewriteEngine On
RewriteBase /
RewriteRule ^index\.php$ - [L]
RewriteCond %{REQUEST_FILENAME} !-f
RewriteCond %{REQUEST_FILENAME} !-d
RewriteRule . /index.php [L]
</ifmodule>
# END WordPress
3. Changing WordPress Permalinks with .htaccess
Sometimes, you may need to combine your blog with your main website or you are merging another blog into yours. In these cases, it is necessary to make your WordPress find the posts associated with links. As the links can be in another pattern. So, here are some .htaccess rules to serve different purposes when moving your WordPress installation:
- Moving WordPress from Subfolder to Root
If moving a WordPress installation from a sub-folder to the web root, you need to redirect all hits for your sub-folder, maybe /blog/ to the web root /.
RewriteRule ^blog/(.*)$ /$1 [R=301,L]
- For Renamed Page or Post, Redirect Previous URL
Here, you will use 301 HTTP status code to refer “moved permanently”.
Redirect 301 "/old-page-name" "/new-page-name"
(Note – These rules are valid for a standard WordPress install and may not operate effectively for non-standard or highly specialized configurations.)
How to Force SSL with .htaccess?
Website’s visitors should access your site using an SSL-encrypted connection for security reasons. So to force an HTTPS connection on your website adds these rules to your website’s .htaccess file:
RewriteEngine On
RewriteCond %{HTTPS} off
RewriteRule ^(.*)$ https://%{HTTP_HOST}%{REQUEST_URI} [L,R=301]
For more information on SSL like what it is, why it is necessary, you can read our articles on How to Install SSL certificate on your WordPress Website and How to setup SSL.
More Tips and Tricks for WordPress .htaccess file
There are some additional useful tricks to perform specific things in WordPress as follows:
1. Activate SSI for HTML/SHTML File Types
SSI stands for Server Side Includes. The greatest benefit of SSI is to include the contents of one or more files into a single web page on an internet server. It is used to have a common piece of code throughout a site like a page header, footer or a navigation menu. You can use this code snippet to activate SSI for HTML/SHTML file types in .htaccess file:
# activate SSI for HTML and or SHTML file types
AddType text/html .html
AddType text/html .shtml
AddHandler server-parsed .html
AddHandler server-parsed .shtml
AddHandler server-parsed .htm
2. Grant CGI access to a Specific Directory
Common Gateway Interface scripts are the content- generating programs to describe that how the information is passed through web server and browser. To grant CGI access to a particular directory, you can use this code snippet:
# grant CGI access in a specific directory
Options +ExecCGI
AddHandler cgi-script cgi pl
# to enable all scripts in a directory use the following
SetHandler cgi-script
3. Command the Browser for Downloading Multimedia Files Instead of Displaying
Typically, browsers attempt to play multimedia files when direct links are clicked. Here is a method to deliver multimedia file downloads to your users. It provides a link to a multimedia file and a dialogue box will throw a choice of saving the file or opening it. The following WordPress .htaccess rule will work out to edit file types as per your needs:
# command browser to download multimedia files
AddType application/octet-stream .avi
AddType application/octet-stream .mpg
AddType application/octet-stream .wmv
AddType application/octet-stream .mp3
4. Minimize CSS Image Flicker in IE6
You can add the following code to minimize or even eliminate CSS background-image “flickering” in MSIE6:
# minimize image flicker in IE6
ExpiresActive On
ExpiresByType image/gif A2592000
ExpiresByType image/jpg A2592000
ExpiresByType image/png A2592000
5. Expression Engine Tricks
# redirect Atom and RSS requests
RewriteRule .*atom.xml$ http://www.yoursite.com/index.php/weblog/rss_atom/ [R]
RewriteRule .*rss.xml$ http://www.yoursite.com/index.php/weblog/rss_2.0/ [R]
# redirect all index.html files
RewriteRule /.*index.html$ http://www.domain.com/index.php [R]
6. Allow Spelling Errors in the URL to be Automatically Corrected
You can allow a misspelled URL to access the file by automatically correcting it. This can be done by adding a Check Spelling directive to your .htaccess file. But it entertains only small typo mistakes, not the gross ones. Add this feature to your site by using the following code:
<ifmodule mod_speling.c>
CheckSpelling On
</ifmodule>
7. Add a Trailing Slash to the End of Your URL
URLs that don’t have a trailing slash are usually files whereas URLs ending in a trailing slash refers a directory. So, It is possible to have two pages with same URLs but the difference will lie in ending slash. To do this, use the following code:
#trailing slash enforcement
RewriteBase /
RewriteCond %{REQUEST_FILENAME} !-f
RewriteCond %{REQUEST_URI} !#
RewriteCond %{REQUEST_URI} !(.*)/$
RewriteRule ^(.*)$ http://domain.com/$1/ [L,R=301]
8. Increase File Upload Size in WordPress
Usually, the small size files are allowed to upload. But in some cases, the larger size file uploads are required. For that, you need to increase the upload file size limit in WordPress. Sometimes, the traditional methods don’t work out. At that time, you can put this code to WordPress .htaccess file:
php_value upload_max_filesize 64M
php_value post_max_size 64M
php_value max_execution_time 300
php_value max_input_time 300
It will increase file size limit in addition to maximizing the execution time in WordPress.
To Sum Up
WordPress .htaccess is an Apache web server configuration file. It’s commonly used to override other configuration settings, especially at the directory level. Including customizing error pages, access control, changing the behavior of folders, redirection and much more as discussed above. We have tried to cover everything you need to about .htaccess. Hoping you will gain good knowledge about WordPress .htaccess file, its importance, creation, editing, various .htaccess rules, tricks etc. from this blog!!
If you have any queries, you can post in the comment section below.
Related reading: WordPress 101 tutorial
How to check WordPress version
How to find WordPress login url
How to change WordPress language
How to create WordPress custom login page
Build a Stunning Website in Minutes with TemplateToaster Website Builder
Create Your Own Website Now
Gives you the best website address
hmm, after edit, my comment was marked as spam.
Hi there admin, could you check if my previous post is still there?
This is the best article to guide us regarding security of WordPress file, thanks for posting.
Thanks for mention every step very clearly, my file was not generated automatically but now I have generated with the help of this article.
Today I understand the proper steps of security purpose for WordPress file, I love this article.