WordPress Theme Development using Bootstrap
Do you want to create your own responsive WordPress themes? Are you getting some cross-browser issues with your site not being responsive? Then, design your own Bootstrap based WordPress theme for better readability, user-experience, and load times.
Responsive websites automatically adjust to look good and function well on any size screen. If you are also thinking to make a responsive WordPress website from scratch, nothing can be better than Bootstrap. Bootstrap is a responsive lightweight, fast, and easy framework to develop mobile-first sites. You can use it uniformly across multiple platforms. So, Bootstrap and WordPress make the best combination to create a responsive website with super speed.
But the question is – How to add Bootstrap to WordPress themes?
Here is a step by step tutorial to guide you through. It will cover all the basics to make a WordPress Bootstrap Enabled theme for your website.
Methods to Add Bootstrap to WordPress
We have many methods to get the best out of the combination of Bootstrap and WordPress. Here at Templatetoaster Bootstrap builder, I am listing the three basic methods for WordPress theme development with Bootstrap as follows
- Manual Coding
- Bootstrap WordPress Theme Builder
- Bootstrap Starter Themes for WordPress
Let’s see the step by step procedure to include Bootstrap in WordPress using these methods
1. Manual Coding: Create a Responsive WordPress Theme with Bootstrap
You can manually add Bootstrap files to WordPress by following below mentioned steps
A. Bootstrap Linking to HTML file
1. Making a site responsive corresponds to the process of linking Bootstrap files to the HTML and other related files. Assuming you already have your website design done from PSD to HTML. The HTML file must be having Header, Footer and other sections.
2. Now, Download and unzip Bootstrap files from the official Bootstrap website. For making Bootstrap 3 enabled theme, you will download Bootstrap 3. Similarly, you will select v4.0 to download Bootstrap 4. Bootstrap just released their latest update which was in active development for over two years. The procedure of linking the Bootstrap files will remain same for both Bootstrap 3 and 4. But if you wish to check which could be a better choice, head over to this comprehensive comparison between Bootstrap 3 and 4.
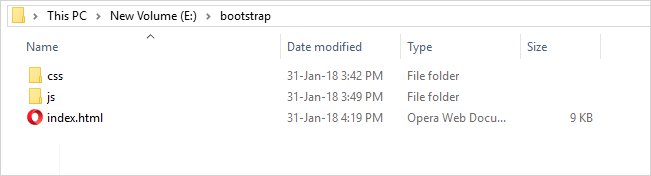
3. Create your HTML directory and give it a desired name. For example, here, its name is ‘bootstrap’.
4. You will get JS & CSS files after downloading Bootstrap. Now, copy these files to your HTML directory, and create a new index.html or if you already have this file (as mentioned in step 1), you can put it into HTML directory. For instance, we have chosen this example design from Bootstrap website itself.
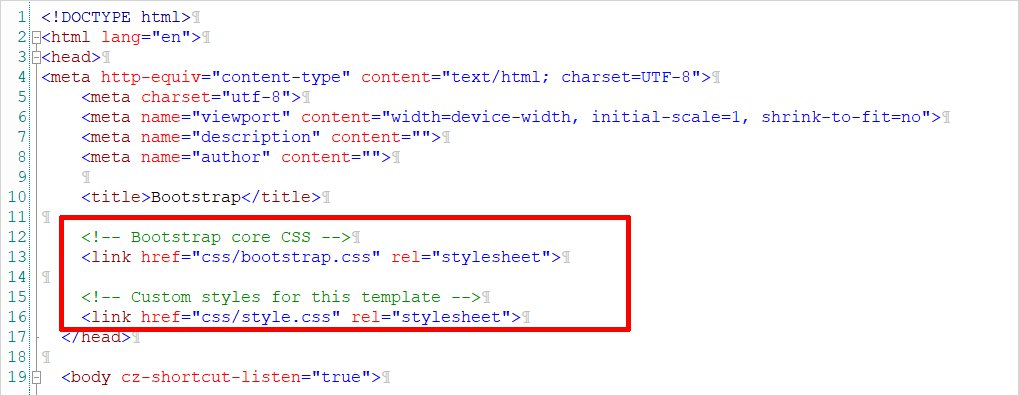
5. To Link Bootstrap CSS file, copy below code and paste to your index.html file under the <head> tag.
<!-- Bootstrap core CSS →
<link href="css/bootstrap.css" rel="stylesheet">
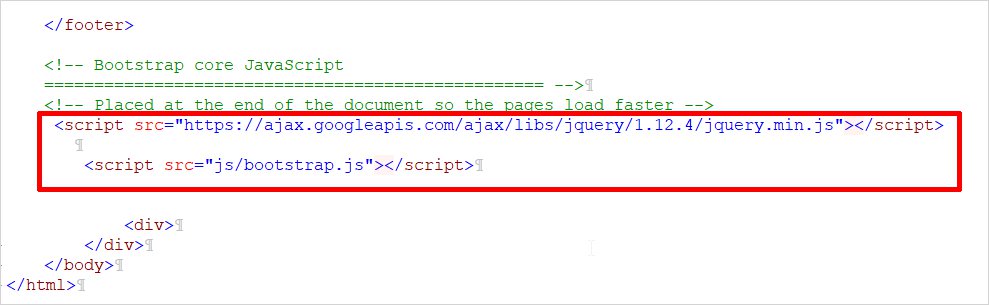
6. Similarly, now add core Bootstrap JavaScript after Footer of index.html for faster loading of pages.
<script src="https://ajax.googleapis.com/ajax/libs/jquery/1.12.4/jquery.min.js"></script>
<script src="js/bootstrap.js"></script>
That was all about linking bootstrap files to HTML.
B. Bootstrap Linking to WordPress
Now, you will see how to add Bootstrap to WordPress.
1. First of all, install WordPress locally or a web host.
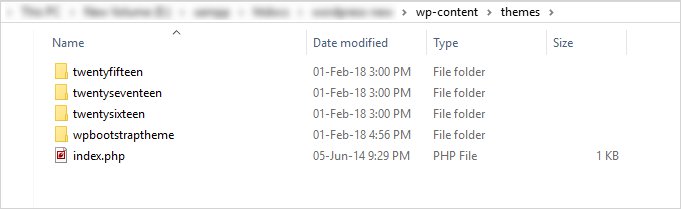
2. Create a new folder named “wpbootstraptheme” in wp-content/themes. You can name it as per your choice.
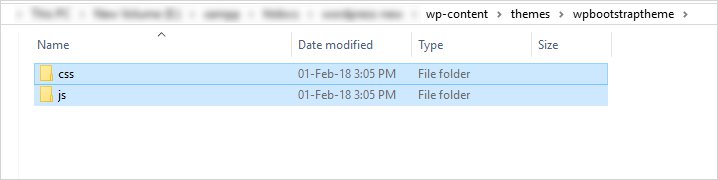
3. Now, you will copy CSS and JS folders from HTML directory to the newly created WordPress theme folder.
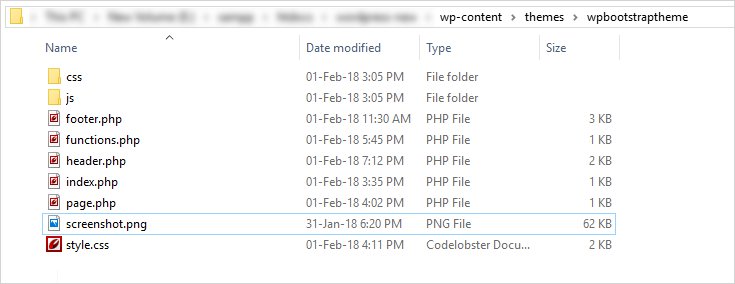
4. Create the following basic blank files in the theme folder
- index.php
- header.php
- page.php
- footer.php
- functions.php
- style.css
5. Now, Now, put below code in your Index.php file to have blog posts page for your WordPress site. This acts as your Homepage.
<?php get_header(); ?>
<div id="bs_main" class="row">
<div id="bs_content" class="col-lg-8 col-sm-8 col-md-8 col-xs-12">

<div class="row">
<?php if (have_posts()) : while (have_posts()) : the_post(); ?>
<div class="col-lg-6 col-sm-6 col-md-6 col-xs-12">
<h1><?php the_title(); ?></h1>
<h4>Posted on <?php the_time('F jS, Y') ?></h4>
<div class="container">
<p><?php the_content(__('(more...)')); ?></p>
</div>
</div>
<?php endwhile; else: ?>
<p><?php _e('Sorry, no posts matched your criteria.'); ?></p>
<?php endif; ?>
</div>
</div>
</div>

<?php get_footer(); ?>
6. Now, Create the header.php file. We have taken the HTML code from index.html (created in step A) file from the top till nav and pasted into the header.php file as shown below.
<html>
<head>
<title>Custom Bootstrap Theme</title>

</head>

<body>
<nav class="site-header sticky-top py-1">
<div class="container d-flex flex-column flex-md-row justify-content-between">
<a class="py-2" href="#">
<svg xmlns="http://www.w3.org/2000/svg" width="24" height="24" viewBox="0 0 24 24" fill="none" stroke="currentColor" stroke-width="2" stroke-linecap="round" stroke-linejoin="round" class="d-block mx-auto"><circle cx="12" cy="12" r="10"></circle><line x1="14.31" y1="8" x2="20.05" y2="17.94"></line><line x1="9.69" y1="8" x2="21.17" y2="8"></line><line x1="7.38" y1="12" x2="13.12" y2="2.06"></line><line x1="9.69" y1="16" x2="3.95" y2="6.06"></line><line x1="14.31" y1="16" x2="2.83" y2="16"></line><line x1="16.62" y1="12" x2="10.88" y2="21.94"></line></svg>
</a>
<ul class="bs_menu_items nav navbar-nav nav-center">
<?php echo wp_nav_menu();?>
</ul>
</div>
</nav>
7. Later, as you need to add multiple pages to your website from WordPress Dashboard, add this code to your page.php file.
<?php get_header(); ?>

<div class="wrap">
<div id="primary" class="content-area">
<main id="main" class="site-main" role="main">

<?php
while ( have_posts() ) : the_post(); ?>
<?php the_content(); ?>
<?php endwhile; // End of the loop.
?>

</main><!-- #main -->
</div><!-- #primary -->
</div><!-- .wrap -->

<?php get_footer(); ?>
8. Similarly, create the footer.php file, taking code from the index.html file.
<footer class="container py-5">
<div class="row">
<div class="col-12 col-md">
<svg xmlns="http://www.w3.org/2000/svg" width="24" height="24" viewBox="0 0 24 24" fill="none" stroke="currentColor" stroke-width="2" stroke-linecap="round" stroke-linejoin="round" class="d-block mb-2"><circle cx="12" cy="12" r="10"></circle><line x1="14.31" y1="8" x2="20.05" y2="17.94"></line><line x1="9.69" y1="8" x2="21.17" y2="8"></line><line x1="7.38" y1="12" x2="13.12" y2="2.06"></line><line x1="9.69" y1="16" x2="3.95" y2="6.06"></line><line x1="14.31" y1="16" x2="2.83" y2="16"></line><line x1="16.62" y1="12" x2="10.88" y2="21.94"></line></svg>
<small class="d-block mb-3 text-muted">© 2017-2018</small>
</div>
<div class="col-6 col-md">
<h5>Features</h5>
<ul class="list-unstyled text-small">
<li><a class="text-muted" href="#">Cool stuff</a></li>
<li><a class="text-muted" href="#">Random feature</a></li>
<li><a class="text-muted" href="#">Team feature</a></li>
<li><a class="text-muted" href="#">Stuff for developers</a></li>
<li><a class="text-muted" href="#">Another one</a></li>
<li><a class="text-muted" href="#">Last time</a></li>
</ul>
</div>
<div class="col-6 col-md">
<h5>Resources</h5>
<ul class="list-unstyled text-small">
<li><a class="text-muted" href="#">Resource</a></li>
<li><a class="text-muted" href="#">Resource name</a></li>
<li><a class="text-muted" href="#">Another resource</a></li>
<li><a class="text-muted" href="#">Final resource</a></li>
</ul>
</div>
<div class="col-6 col-md">
<h5>Resources</h5>
<ul class="list-unstyled text-small">
<li><a class="text-muted" href="#">Business</a></li>
<li><a class="text-muted" href="#">Education</a></li>
<li><a class="text-muted" href="#">Government</a></li>
<li><a class="text-muted" href="#">Gaming</a></li>
</ul>
</div>
<div class="col-6 col-md">
<h5>About</h5>
<ul class="list-unstyled text-small">
<li><a class="text-muted" href="#">Team</a></li>
<li><a class="text-muted" href="#">Locations</a></li>
<li><a class="text-muted" href="#">Privacy</a></li>
<li><a class="text-muted" href="#">Terms</a></li>
</ul>
</div>
</div>
</footer>

<?php wp_footer(); ?>
9. Now, create the function.php file. Mainly, you will enqueue your Bootstrap javascript and style files with functions here as shown below
<?php
wp_register_style('bootstrap', get_stylesheet_directory_uri(). '/css/bootstrap.css');
wp_enqueue_style('bootstrap');

wp_register_style('style', get_stylesheet_directory_uri().'/style.css');
wp_enqueue_style('style');

function my_scripts_method() {
wp_register_script('bootstrap', get_template_directory_uri() . '/js/bootstrap.js', array('jquery'), '1.0.0', false);
wp_enqueue_script('bootstrap');;
}
add_action( 'wp_enqueue_scripts', 'my_scripts_method' );
?>

<?php
function theme_setup()
{
register_nav_menus(array(
'primary' => __('Menu', "wpbootstraptheme"),
));
}

add_action('after_setup_theme', 'theme_setup');
?>
10. You will now, write the style.css file for your theme. The example code is here
/*
Theme Name: wpbootstraptheme
Theme URI: https://wordpress.org/
Description: Custom WordPress Theme built with bootstrap
Version:1.1
Author: admin
Author URI: https://wordpress.org/
*/
.container {
max-width: 960px;
}

/*
* Custom translucent site header
*/

.site-header {
background-color: rgba(0, 0, 0, .85);
-webkit-backdrop-filter: saturate(180%) blur(20px);
backdrop-filter: saturate(180%) blur(20px);
}
.site-header a {
color: #999;
transition: ease-in-out color .15s;
}
.site-header a:hover {
color: #fff;
text-decoration: none;
}

/*
* Dummy devices (replace them with your own or something else entirely!)
*/

.product-device {
position: absolute;
right: 10%;
bottom: -30%;
width: 300px;
height: 540px;
background-color: #333;
border-radius: 21px;
-webkit-transform: rotate(30deg);
transform: rotate(30deg);
}

.product-device::before {
position: absolute;
top: 10%;
right: 10px;
bottom: 10%;
left: 10px;
content: "";
background-color: rgba(255, 255, 255, .1);
border-radius: 5px;
}

.product-device-2 {
top: -25%;
right: auto;
bottom: 0;
left: 5%;
background-color: #e5e5e5;
}
/*
* Extra utilities
*/

.border-top { border-top: 1px solid #e5e5e5; }
.border-bottom { border-bottom: 1px solid #e5e5e5; }

.box-shadow { box-shadow: 0 .25rem .75rem rgba(0, 0, 0, .05); }

.flex-equal > * {
-ms-flex: 1;
-webkit-box-flex: 1;
flex: 1;
}
@media (min-width: 768px) {
.flex-md-equal > * {
-ms-flex: 1;
-webkit-box-flex: 1;
flex: 1;
}
}

.overflow-hidden { overflow: hidden; }
nav.site-header ul li {
display: inline-block;
padding: 10px;
margin-left: 15px;
}
11. The theme folder shall also have the screenshot of your theme. Say it’s screenshot.png here.
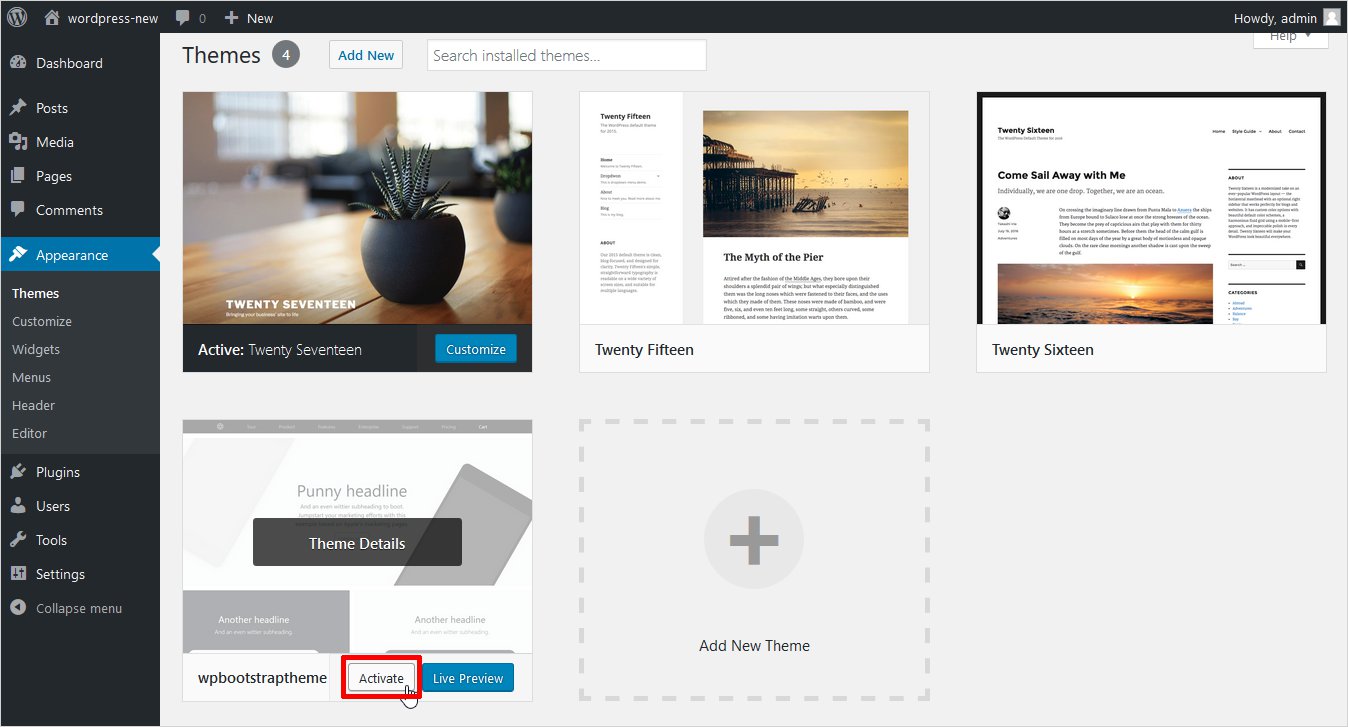
12. You are almost done. Just Activate your wpbootstraptheme theme from WordPress Dashboard.
Appearance → Themes → Activate
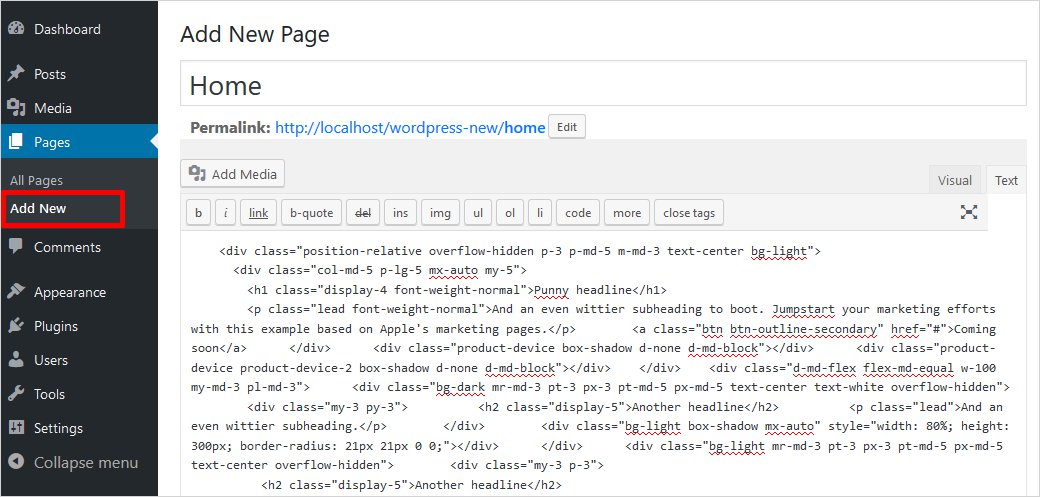
13. Now, create content pages as per your requirements in the Page Editor.
Pages → Add New Page
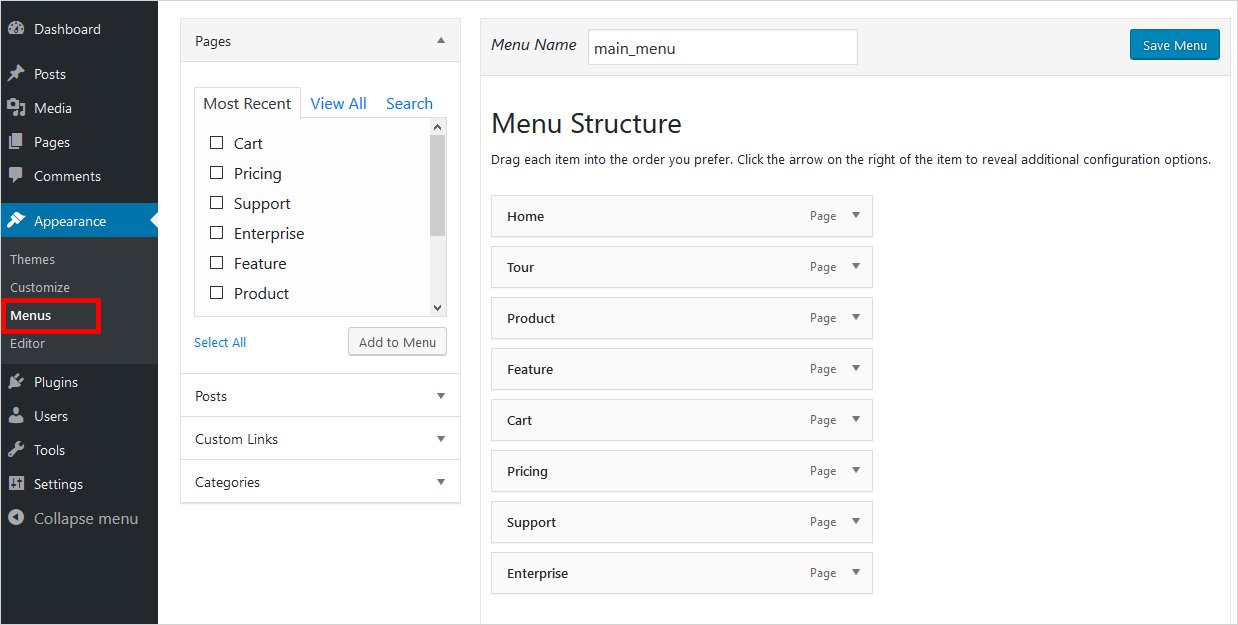
14. Create a menu by using Add New Menu option.
Appearance → Menu → Add New Menu
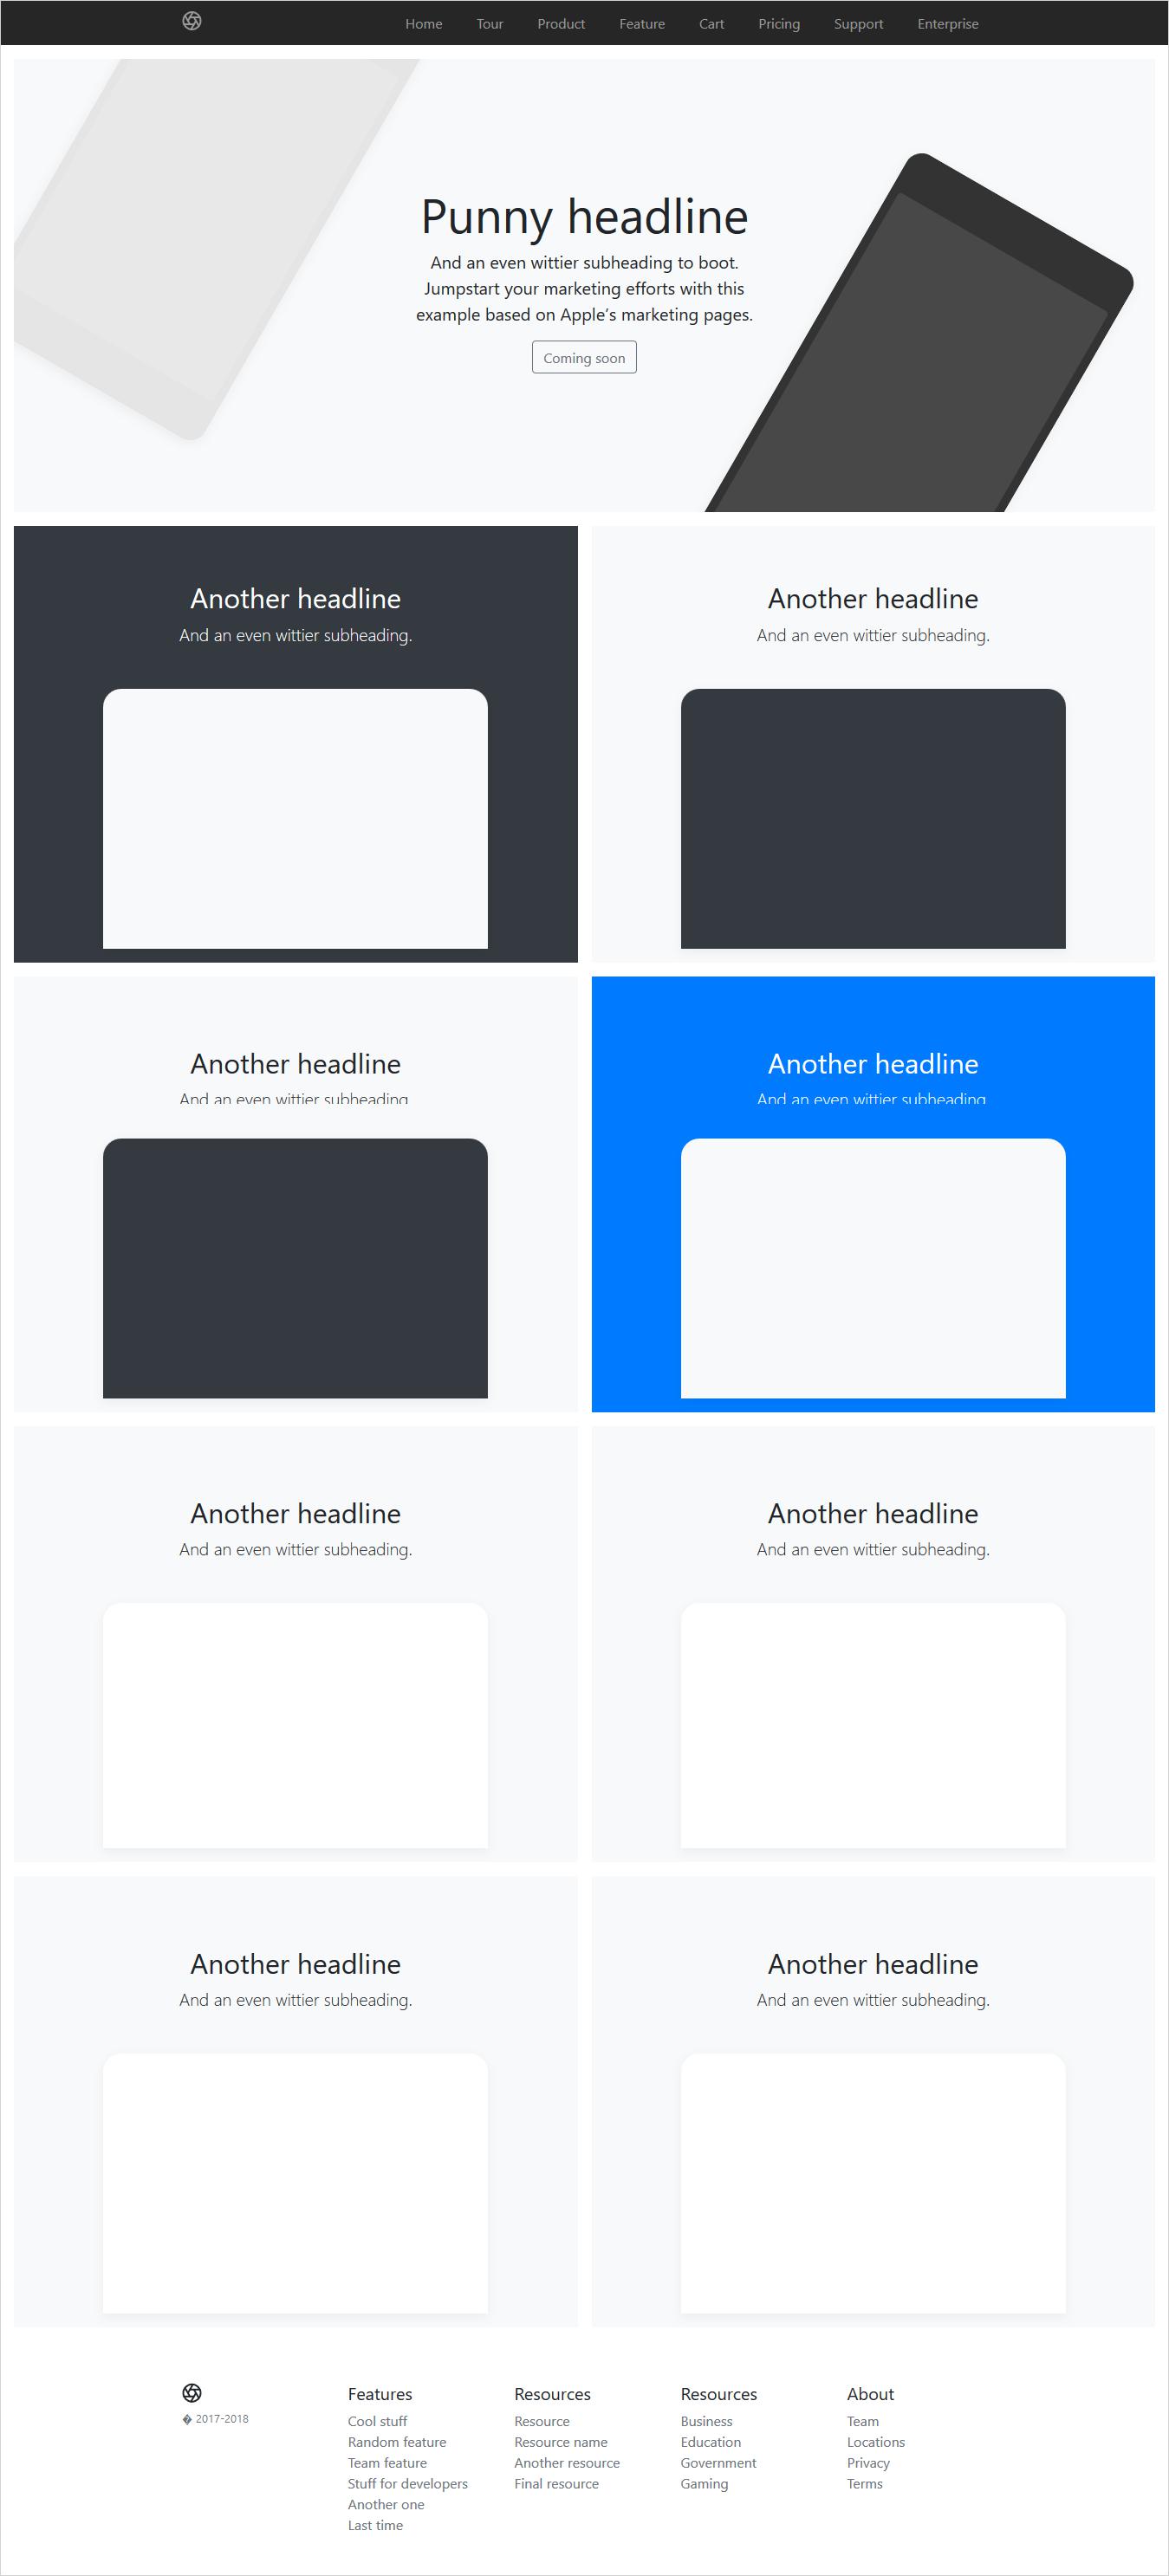
15. Your WordPress Bootstrap theme is ready. You can check its Preview. It will look somewhat like this
2. Using WordPress Bootstrap Theme Builder
If you want a cool alternative to coding, you can use our WordPress theme builder. A fine software that will give a plain-sailing drag and drop environment. You don’t have to write a single line of code. It will be just a matter of few minutes to design your own theme. The most interesting fact is that all the themes you design in TemplateToaster will be Bootstrap based by default. So, no extra botherations to include Bootstrap in WordPress. You can read our blog to get acquainted with the process of creating a WordPress theme from scratch in TemplateToaster web design software. Just expand the horizons of your imagination, and paint down the theme of your dreams on the canvas of TemplateToaster !!
3. Using Bootstrap based Starter Themes for WordPress
The third method is to start customizing your website on a Bootstrap theme only. A Bootstrap theme is built on top of Bootstrap. It will save your coding efforts. There are many WordPress Bootstrap themes available online. These are Bootstrap packages integrated with WordPress and provide styling, UI components, and page layouts. You can customize the design of your theme manually as per your needs. Check out free WordPress themes.
- WordPress Themes Based on Bootstrap 4
There are many WordPress themes available, based on Bootstrap 4. Here, a list of popular WordPress Bootstrap Themes is compiled for you as follows
This theme is a great combination of WordPress, Underscore, Bootstrap, and Sass. It is maintained by Automattic. You can use it as a parent theme and a starter theme as well. It has WooCommerce support and Contact form 7 support. It is also translation ready and integrated with Font Awesome.
- Rating: 5
- Active Installs: 5000+
This another WordPress Bootstrap Starter theme. It has fantastic features and you can customize it freely as you want.
- Rating: 5
- Active Installs: 4000+
- WordPress Themes Based on Bootstrap 3
There are some top-rated WordPress themes based on Bootstrap 3 as follows
It is good to build a new site based on Bootstrap 3, fast. It is developed by Vee Winch and licensed under MIT.
- Rating: 5
- Active Installs: 3000+
It is a Modern WordPress Bootstrap theme with a dark background with high contrast colors. It provides high-end functionality with a fully featured slider, multiple blog layouts, configurable sidebar etc. It is fully responsive and SEO friendly.
- Rating: 5
- Active Installs: 1000+
It is another fully responsive WordPress theme. It will be a good choice to create a professional site based on Bootstrap 3.
- Rating: 4
- Active Installs: 500+
Which method you use for WordPress Theme Development using Bootstrap?
Bootstrap is winning the web. It can be estimated by the fact that it is used by 17% of all the websites. Over the short span of time, it’s popularity has grown surprisingly. This is all because of its capability to develop responsive, mobile-first websites. But some people still prefer Foundation. But to know more about these two frameworks, you can read our comparison of Bootstrap vs Foundation. With all the approaches discussed here at Templatetoaster website builder software and WordPress website builder, you can get best out of the amalgam of Bootstrap and WordPress. So what are you waiting for? Start creating your own WordPress Bootstrap themes today by following these methods!!
We would love to hear your experiences. Please share your thoughts in the comment section below. Check out free WordPress themes.
Related reading: WordPress 101 tutorial
How to create WordPress theme from scratch
How to find WordPress login url
How to create custom header in WordPress
how to create WordPress custom login page
Build a Stunning Website in Minutes with TemplateToaster Website Builder
Create Your Own Website Now
I am using same code as in 10th point but it’s not working?