How To Move WordPress To New Host (Step-by-Step Guide)
If you’re wondering how to move WordPress to a new host, you’re not alone. Many website owners switch hosting providers for better speed, security, and cost efficiency. However, without a proper migration process, you risk downtime, data loss, or broken functionality. This guide will walk you through the steps to safely transfer your WordPress site without affecting its performance.
Before starting, it’s crucial to back up your website, including files, databases, and configurations. If you’ve designed a custom theme using a WordPress Theme Creator, preserving theme settings is essential to maintaining your site’s unique look. Additionally, understanding How to Create a WordPress Theme can be useful if you need to troubleshoot any theme-related issues post-migration.
For those using pre-designed templates, choosing Free WordPress Themes that are optimized for performance can make the migration process smoother.
In this guide, we’ll cover both plugin-based and manual methods to ensure a seamless transition. Whether you’re a beginner or an advanced user, you’ll learn the best practices for moving WordPress to a new host while avoiding common pitfalls.
How To Move WordPress To New Host In few Minutes
- Choose a new WordPress Hosting
- Backup and Transfer your website files
- Export the WordPress database
- Create a new WordPress database on your new Host
- Edit your wp-config files if needed
- Import your MySQL database on your new host
- Migrate your backed up data on your new host
- Update your DNS and name servers
Ready? Let’s get started.
Moving WordPress to a New Host in few simple Steps
Step 1: Choose a new WordPress Hosting
Are you stuck with a slow web host? Have you tried everything to optimize your WordPress Speed but all in vain? Then it’s time for you to move your WordPress site to a new and better host that can handle your growing traffic. You must have realized the importance of having an adequate web hosting service, so choose carefully this time. Here’s the best WordPress Hosting Providers that we recommend.
Step 2: Backup and Transfer your website files
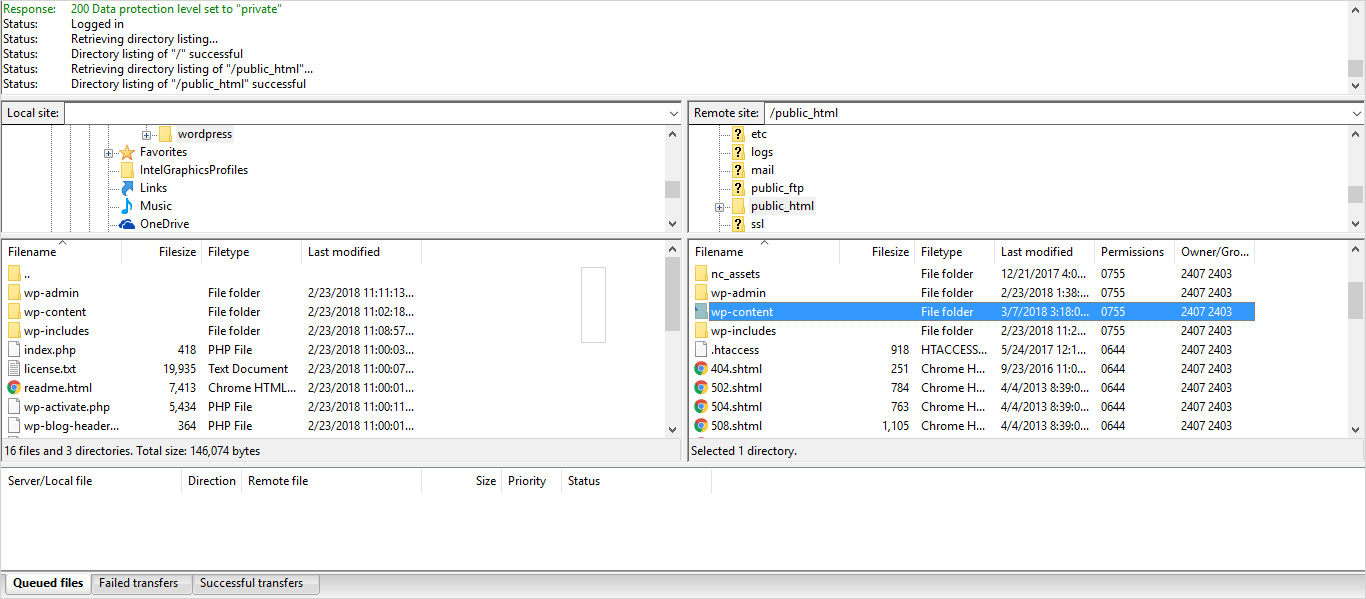
Now that you are sure about your new host, the next step is to back up every aspect of your site. It is a good practice to try your best to prevent any data loss. However, it is also a requirement of migrating your WordPress installation. There are various plugins available that will completely backup your site. However, you need to have a manual approach. You can use an FTP program to download and upload files.
This also includes the .htaccess file that is set to be hidden. You can consult your FTP program’s help to have it display hidden files. Downloading could take some time, depending on the number of media uploads you have in your site. While this is still underway, we can move forward to the next step.
Step 3: Export the WordPress database
Next step is to Export the WordPress database. It is a simple process that requires you to perform a few steps only. First, log into your cPanel account on your web server and open the phpMyAdmin application. Then, select the database having your WordPress installation from the list on the left hand sidebar. Lastly, click on the Export tab from the navigation menu. The default settings of Quick export and SQL format offered by the application is sufficient. Therefore, just click on the Go button and the database export process will start and it will download a file onto your machine. Once the FTP transfer and database export is completed, you can move to the next step.

Step 4: Create WordPress database on your new Host server
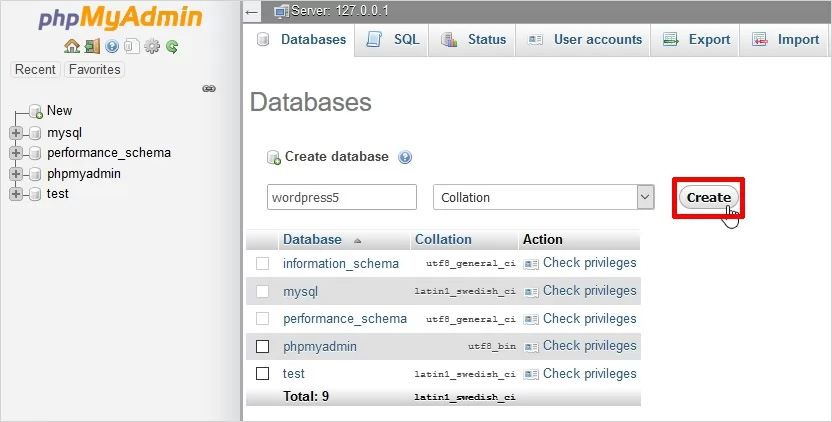
Before you start moving your site to the new host, you need to create an environment for a WordPress installation. In order to do that, create a database that you can import your SQL data into. First, Log into your new web host using your credentials and connect to the cPanel. For easy understanding, we’ll be using the MySQL database application. Follow the given instructions:
- Open mySQL database and create a new database with your website name.
- Then, generate a new MySQL user with a secure password
- Lastly, add this user account to the new database and grant it All Privileges.
Don’t forget to write down the database name, your new MySQL username, and password.
Step 5: Edit your wp-config files to prevent downtime
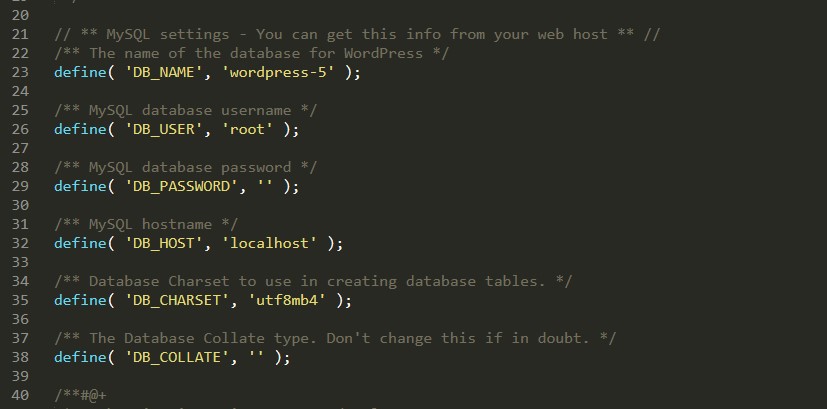
Wp-config file controls the access between WordPress and your database. Now, browse to the folder on your computer where you downloaded your website files to. You need to make a copy of your wp-config.php file and store it in some other folder on your machine. It is basically a backup in case something goes wrong. Now, open the original version of file on your text editor and make the following changes:
- Change the name of Database
Find following section and change db_name or your new database name: define(‘DB_NAME’, ‘db_name’);
2. Change the username of your Database
Find following section and change db_user or your new database user: define(‘DB_USER’, ‘db_user’);
3. Change the user password of your Database
Find following section and change db_password or your new database password: define(‘DB_PASSWORD’, ‘db_pass’);
After completing these steps successfully, save wp-config.php and close the file. Your config.php should look like following screenshot.
Here is the Video Tutorial on How to move your WordPress Site to a New Host :
Step 6: Import your MySQL database on your new host
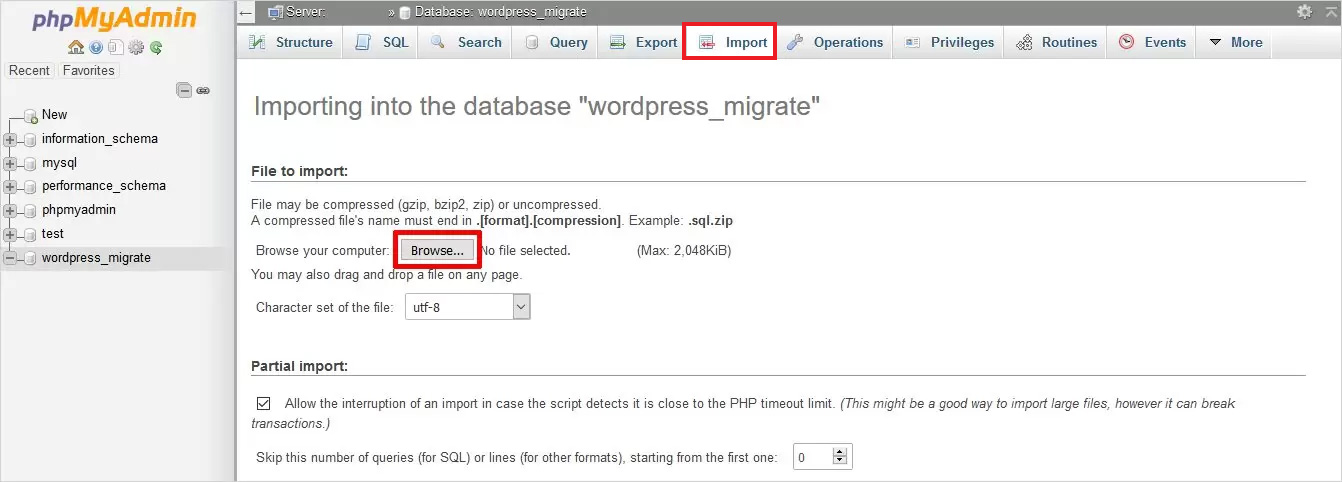
Now that you created a new database to work with, you have the right environment to start the import process. First, open phpMyAdmin from cPanel on your new server and fetch your new database from the list displayed on the left hand sidebar. Once it opens, click on the Import tab of the navigation menu. Then proceed to File> Import check box, and set the format to SQL and then click the Go button. The database import will start. It can take time depending upon the size of your database. Once it is finished, you will get a notification informing you of a successful import.
Step 7: Migrate your backed up data on your new host
Now that you have your database ready and wp-config.php file reconfigured, it’s time to begin uploading your website’s files on your new host. Use FTP to connect to your new web host and browse to the folder, where you placed your website’s files. Upload the files to the public_html folder.
You can upload your website files that now include updated versions of wp-config.php files by selecting the remote directory. However, don’t delete these files from your machine yet, they are still needed until the completion of final steps.
Step 8: Update your DNS
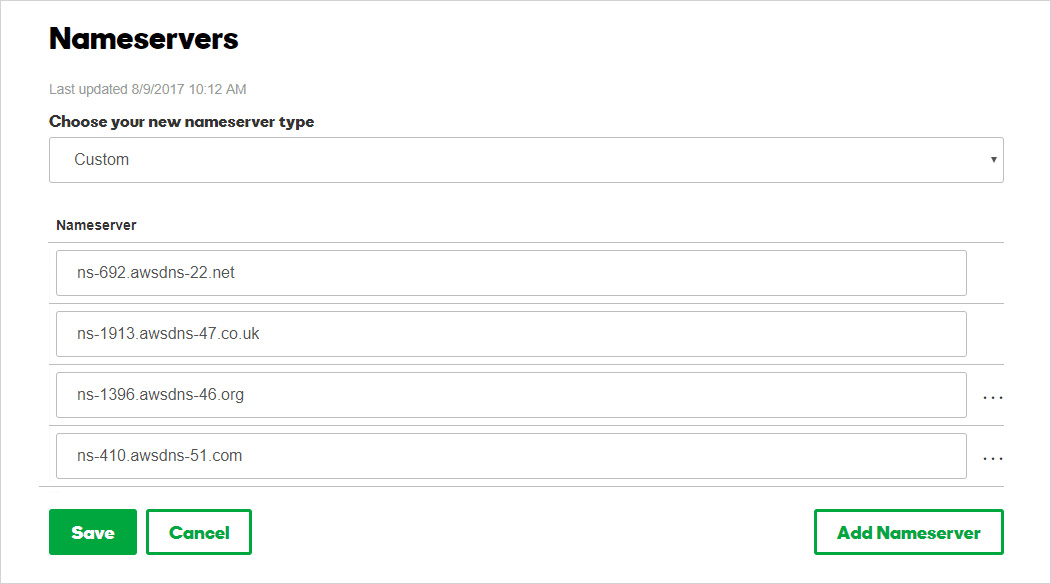
At this point, you’ve successfully created a copy of your WordPress database and files on your new hosting server, however, your domain still redirects to your old web hosting account. You need to switch your DNS nameservers to this new IP. It will make sure that your users are taken to the new location of your website when they enter your address in their browser. We’ll guide you step-by-step to show how you can change DNS nameservers with GoDaddy. Depending upon your new web host, it can be slightly different, however, the basic concept is almost the same.
- Log into your GoDaddy account and then click on Domains. Then, click on the Manage button placed right next to the name you want to change.
- Then, you will find Manage DNS under the Additional Settings section. Click on it.
- Next, scroll down to the nameservers section on the dropdown menu and click on the change button.
- Then change your nameserver type from default to Custom. And then, fill the new hosting provider’s information under Nameservers and click on the Save button to store your changes.
Since, you have the same content on your old host and the new host, your users wouldn’t notice any changes except for the better performance and faster loading time. You may also read about what is a domain name and move WordPress site to new domain and migrate from Tumblr to WordPress.
Moving WordPress to a new host (Frequently Asked Questions)
Q1. Will moving my WordPress site to a new host affect my SEO rankings?
If done correctly, moving WordPress to a new host will not negatively impact SEO. Ensure minimal downtime, update DNS settings promptly, and use 301 redirects if necessary.
Q2. How long does it take to move WordPress to a new host?
The migration process typically takes 1-3 hours. However, DNS propagation can take up to 48 hours, during which your website may still load from the old host for some visitors.
Q3. Can I move WordPress to a new host without downtime?
Yes! To avoid downtime:
- Keep the old hosting active until the migration is complete.
- Use a hosts file modification to test the site before updating DNS.
- Move files and database first, then switch DNS records.
Q4. What is the best plugin for moving WordPress to a new host?
Some of the most reliable WordPress migration plugins are:
- Duplicator – Best for full-site cloning.
- All-in-One WP Migration – Simplest for beginners.
- UpdraftPlus – Great for backups and migration.
Q5. What should I do if my site breaks after migration?
- Check if the wp-config.php file has the correct database credentials.
- Ensure permalinks are updated in WordPress settings.
- Clear browser and WordPress cache.
- Verify that all plugins and themes are active and updated.
Q6. Do I need to update my WordPress site’s URL after migration?
If you’re moving to a new domain, update the site URL in:
- WordPress Settings > General.
- phpMyAdmin (change URLs in the wp_options table).
- Search & Replace plugin (to fix internal links).
Q7. What happens to my emails when I switch hosts?
If your email is hosted with your old provider (e.g., via cPanel), moving to a new host may affect email delivery. Before migration:
- Back up emails.
- Set up the same email accounts on the new host.
- Update MX records if necessary.
Q8. Do I need a new SSL certificate after migrating WordPress to a new host?
If your SSL certificate was provided by your old host, you may need to install a new one. If you used Let’s Encrypt, your new host should allow free SSL installation.
Q9. How do I test my WordPress site before updating DNS?
Modify your hosts file on your local computer to point the domain to the new host’s IP. This lets you preview your site before changing DNS settings.
Q10. Can I revert to my old host if something goes wrong?
Yes, if you kept a backup, you can restore your site on the old host by re-uploading files and the database. Ensure DNS settings are still pointing to the old server.
Related reading:
How to fix and find broken links in WordPress
How to check WordPress version
How to find WordPress login url
How to change WordPress language
Build a Stunning Website in Minutes with TemplateToaster Website Builder
Create Your Own Website Now
Does this method works for any web hosting? also for free web hosting?
I was looking for such post. thanks for the tutorial. I wanted to ask that is there any plugin to move my WordPress website?
Do I need to learn sql for that?
No require to learn sql.
I am following the steps to move wordpress to new host but I am facing some problem. The site is working slow.
I followed the manual method and was able to migrate my site successfully. Just a heads-up for anyone using Cloudflare – don’t forget to update your DNS settings after migration.