How to Migrate from WordPress.com to WordPress.org: Complete 2024 Guide

Are you serious about extending your influence? Do you really want your own online branding? Do you want to run your advertising on your website? If the answer to all these questions is “Yes” — Migrate from WordPress.com to WordPress.org.
As a beginner, if you start with WordPress.com – it’s fine as it provides you free hosting and ease of use. But in long run, you would prefer your own online branding with your domain name. Secondly, you have to pay a huge sum to access themes & third-party plugins with WordPress.com. If you really want to express yourself, to be in full control of your site and grow your business, you need to migrate from WordPress.com to WordPress.org.
Now the question arises, how to migrate from WordPress.com to WordPress.org without losing any search traffic? The solution is here at Templatetoaster website maker, follow the below-given step by step guide on WordPress.com to WordPress.org migration.
Step by Step Guide on How to migrate from WordPress.com to WordPress.org
If you have any confusion about terminology, you can have a look at the article WordPress.org vs WordPress.com before migrating. Here at Templatetoaster WordPress theme builder, this article deals purely with the WordPress.com to WordPress.org migration while assuming that you have already purchased a WordPress Web Hosting.
The main concerns of a user are the safe data migration and SEO while migrating. So, the major steps involved in migration are as follows:
- Exporting your WordPress.com blog.
- Installing WordPress on your web host.
- Get a theme.
- Importing content to your self-hosted site.
- Setting Permalinks.
- Redirect your WordPress.com site to WordPress.org.
- Move Your Subscribers.
- Check your site for any errors.
1. Exporting your WordPress.com Blog
To start with, export your WordPress.com blog by following these steps
- Log into your WordPress blog.

- From the left pane of the screen, click on Settings → Export.

- Select “Export All”.

- Click “Download”.

A “.xml” file will be downloaded and it finishes the export of WordPress.com blog.
2. Installing WordPress on Your Web Host
Now, as you have successfully exported your WordPress.com content, the next step is to set up a fresh WordPress install. WordPress is very easy to install. You can follow this link to install WordPress only in few clicks.
3. Get a Theme
As you have your own website now, you can customize it in a unique style. With ordinary free to access themes, your site will look ordinary. To give a stunning look to your website, try your hand on TemplateToaster. TemplateToaster is a web design software with lots of advanced options that will create a unique theme for you in minutes without writing any code. It’s all free to try.
4. Import Content to Your self-Hosted Site
To import your data, log into the WP admin of your new WordPress.org site.
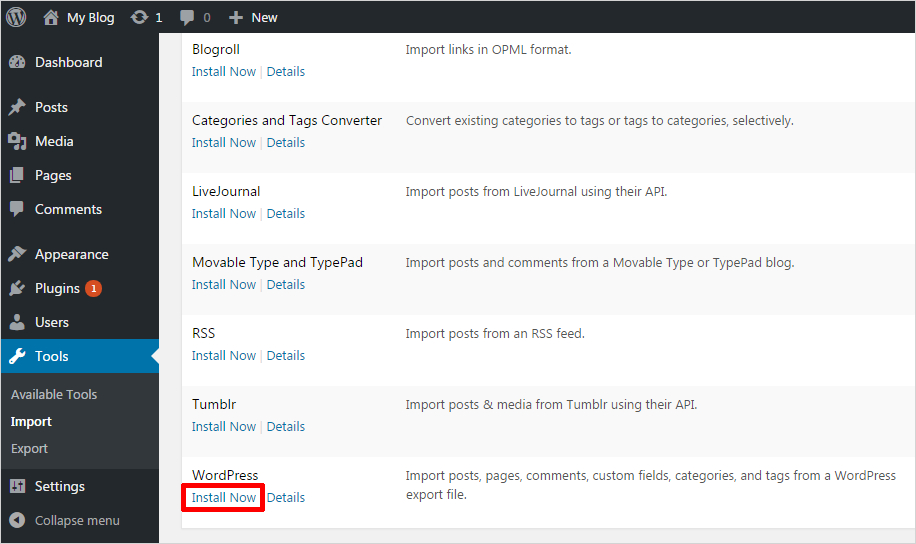
Move to Tools → Import

On next page, you will have to make choice to install a plugin for importing content. You will select “WordPress” and click Install Now.

WordPress will automatically install the plugin. Once the plugin is installed, click Run Importer.

From Choose File, browse the downloaded “.xml” file and click Upload File and import. Once the file is uploaded, it will ask you for the user name of the author. You fill the new user name or can use the existing one too. Check the Download and Import file attachments. This will bring any uploaded image or other media.

Now, Submit it and the WordPress will import everything.

5. Check your content
Now that you’re done importing your content from your WordPress.com site to your WordPress.org, it’s time to ensure that nothing is broken and everything works fine. It is not something that happens to everyone but skipping this step can lead to broken image links. Moreover, some of them may not migrate properly and you may be left with a new blog with images, or faced with the possibility of having to upload everything manually. In most cases, especially if there are a lot of images involved, you may end up finding that not all of the images were imported. To avoid that from happening, you can use a plugin like Auto Upload Images that scans your posts for external images links and then it will do the following listed three things.
- The plugin automatically uploads external images, adds them to your media library, and replaces old URLs with the new ones.
- Adds all the images to your WordPress.org media library.
- Automatically replaces the new image URLs with old URLs.
Using this plugin is easy and it works like a charm. All you have to do is install and activate the plugin. Configure the settings to your liking and it will automatically focus on importing all the images without any complications.
6. Setting Permalinks
Permalinks are the permanent URLs to your web pages and blogs. As you are using a custom domain than to make sure that all the viewers are redirected to the correct post, you need to do minute changes as follows
Settings → Permalinks
Go to Permalinks under Settings and check the Day and Name Field.
Then click ‘Save Changes’.
This permalink structure is same as on WordPress.com. It will ensure the correct redirection from WordPress.com to self-hosted WordPress website.

7. Test Your WordPress.org Site
After migrating your content, it’s critical to thoroughly test your new WordPress.org site. Ensure that all pages, links, and images are working correctly. Check for broken links, missing images, and ensure interactive elements like forms are functioning as expected. You can also use plugins like Broken Link Checker to help identify any potential issues. This step ensures a smooth user experience for your visitors once the site goes live.
8. Migrating Your Theme and Customizations
WordPress.com offers limited theme customization, but with WordPress.org, you can take full control of your site’s design. If you were using a specific theme on WordPress.com, you may need to find a similar or identical theme for your new WordPress.org site. You can also replicate custom designs using page builders like TemplateToaster WordPress Theme Builder. If you had a lot of custom CSS or design elements on your WordPress.com site, make sure to copy those over to your new site.
Check your content
Now that you’re done importing your content from your WordPress.com site to your WordPress.org, it’s time to ensure that nothing is broken and everything works fine. It is not something that happens to everyone but skipping this step can lead to broken image links. Moreover, some of them may not migrate properly and you may be left with a new blog with images, or faced with the possibility of having to upload everything manually. In most cases, especially if there are a lot of images involved, you may end up finding that not all of the images were imported. To avoid that from happening, you can use a plugin like Auto Upload Images that scans your posts for external images links and then it will do the following listed three things.
- The plugin automatically uploads external images, adds them to your media library, and replaces old URLs with the new ones.
- Adds all the images to your WordPress.org media library.
- Automatically replaces the new image URLs with old URLs.
Using this plugin is easy and it works like a charm. All you have to do is install and activate the plugin. Configure the settings to your liking and it will automatically focus on importing all the images without any complications.
9. Redirect your WordPress.com Site to your WordPress.org Site
Once all of your content imported successfully, you should redirect your old WordPress.com site to your new domain. This is important because it ensures you don’t lose your SEO ranking and that any links to your old address will send viewers to your new website.
For this, make use of Site Redirect add-on of WordPress.com. Enter your new domain name and click Go.
Afterwards, handle the payments that are $13 per year.

10. Move Your Subscribers
While migrating your site, you can also move your subscribers. Just install the JetPack plugin and connect it to WordPress.com. Make it sure that the subscription module is activated. You can post a notice to all your followers that their subscriptions are moving as you are moving to a self-hosted site. This will make sure that all your email subscribers are getting email notifications as before.
11. Check Your Site for any Errors
If you have performed all the things correctly, your site will exactly look the same. But it’s always good to check that all the content with images has imported. Mostly, this issue of missing content comes in case of large sites. If so, you can make use of some plugin like Import External Images to import images properly. You may read about move WordPress to new host and migrate from Tumblr to WordPress.
12. Notify Google of Your Migration
Maintaining your SEO rankings is crucial when migrating from WordPress.com to WordPress.org. After the migration, make sure to notify Google about your domain change to avoid any potential drop in search rankings. Head to Google Search Console and use the “Change of Address” tool to inform Google that your site has moved to a new domain. This helps preserve your SEO efforts and ensures a smooth transition in search engine rankings.
Final Thoughts
Really it’s so easy to migrate from WordPress.com to WordPress.org. Isn’t it? Now, you have your own self-hosted site. You have full control over it, you can install any theme or plugin, can run your own advertisements etc. If you have any questions regarding WordPress.com to WordPress.org migration, you can ask by leaving a comment below. Check out our WordPress website builder and free WordPress themes.
Build a Stunning Website in Minutes with TemplateToaster Website Builder
Create Your Own Website Now
If we migrate our website than is there any chance to lose the traffic?
Never stay with WordPress-dot-com for long, create your personal property on self hosted WordPress-dot-org