How to Move Prestashop from Localhost to Live Server: Guide

Are you planning to move PrestaShop from localhost to the live server. Wait! That is the complex part. Migrating your PrestaShop store from localhost to a server requires technical knowledge. And while it is slightly time-consuming, it is one of the most crucial parts of launching an online store. That is why you need to take some time to learn how to move PrestaShop from localhost to a server because this is going to affect your web presence. Localhost migration is often misinterpreted and can be quite confusing especially if you are a beginner.
Learn how to install PrestaShop correctly on localhost. You can also check free templates, free PrestaShop themes , create PrestaShop theme, PrestaShop theme maker, and eCommerce website builder. It is essential, yet can be very complex, if you are not thorough with the steps. In this article, I am going to discuss with you the most important steps that you need to follow to migrate PrestaShop from localhost to a server. So, without any further delay let’s start. Here is the right way to start migrating PrestaShop from localhost to a server. PrestaShop is an open-source best eCommerce platforms that support MySQL databases. However, it takes a lot to create a website, from designing to adding functionalities, products, and so on, there is so much that goes into building an online store. And once everything is ready, you can finally
Move PrestaShop Localhost to Live Server: Step by Step Guide
Most of the developers prefer using localhost while working on an online store, it provides them with an effective way to enhance the codebase without impacting the live site. This is crucial for eCommerce stores where downtime is an important challenge to overcome. Working on localhost lets the developers modify the code while the business can run smoothly. Once the codebase is tested, moving it to the server is easier. In this method, I will discuss in detail how to move the PrestaShop localhost to the server manually. Here are the steps that you need to follow to move PrestaShop from Localhost to Live Server
Step 1: Export Local PrestaShop Database
The first thing you need to do is to export your local PrestaShop database. Here we will use phpMyAdmin to export the database, follow the steps as mentioned below: 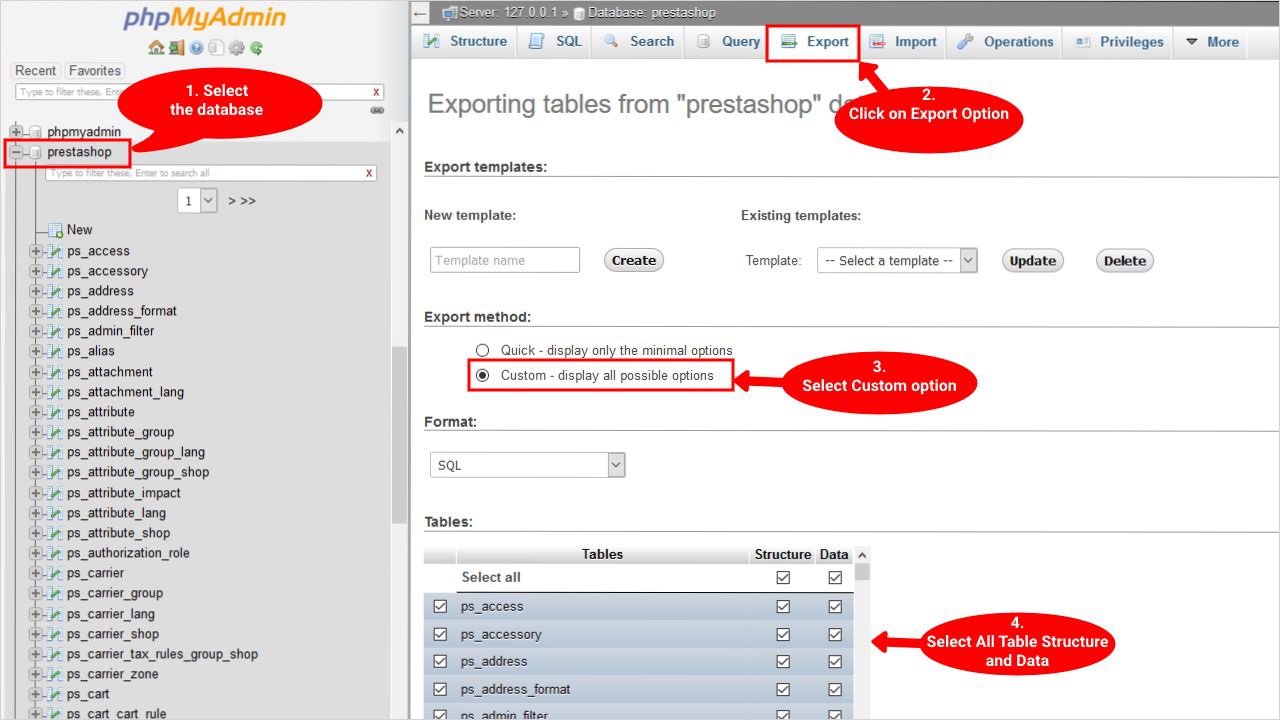
- Open ‘phpMyAdmin’ as http://localhost/phpMyAdmin and then click on the ‘PrestaShop database’.
- Choose the ‘database’.
- Then click on the ‘export’ option on the top. Choose ‘custom’ to show all the options.
- From the dropdown table choose all of the ‘structure’ and ‘data’.
- Next from the ‘output’ > compression, select zipped from the dropdown.,
- And then on the ‘go’ button. The database exports as a .sql file.
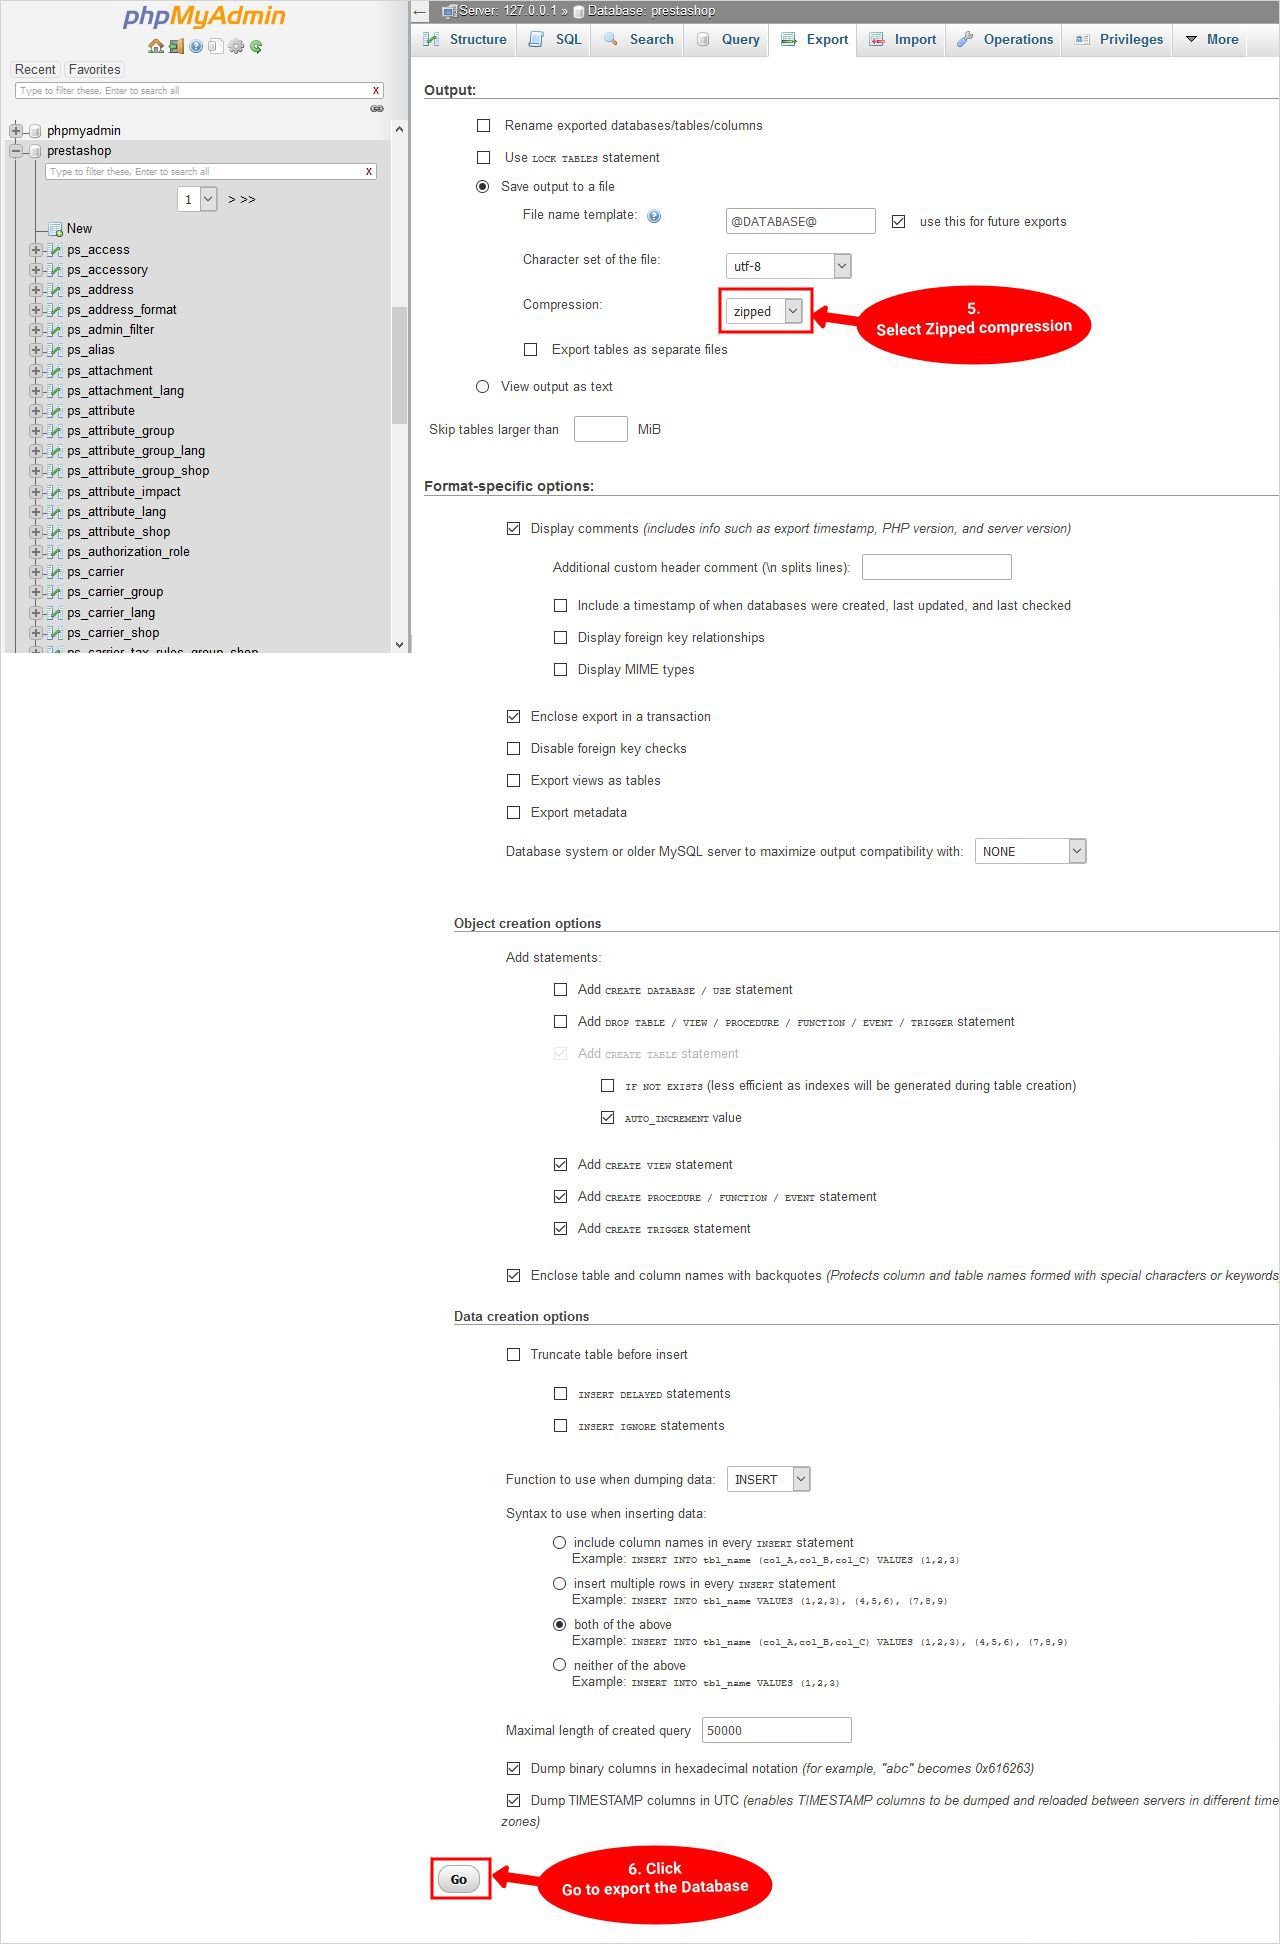 The SQL file will be automatically downloaded. Also check SQL version is the latest one.
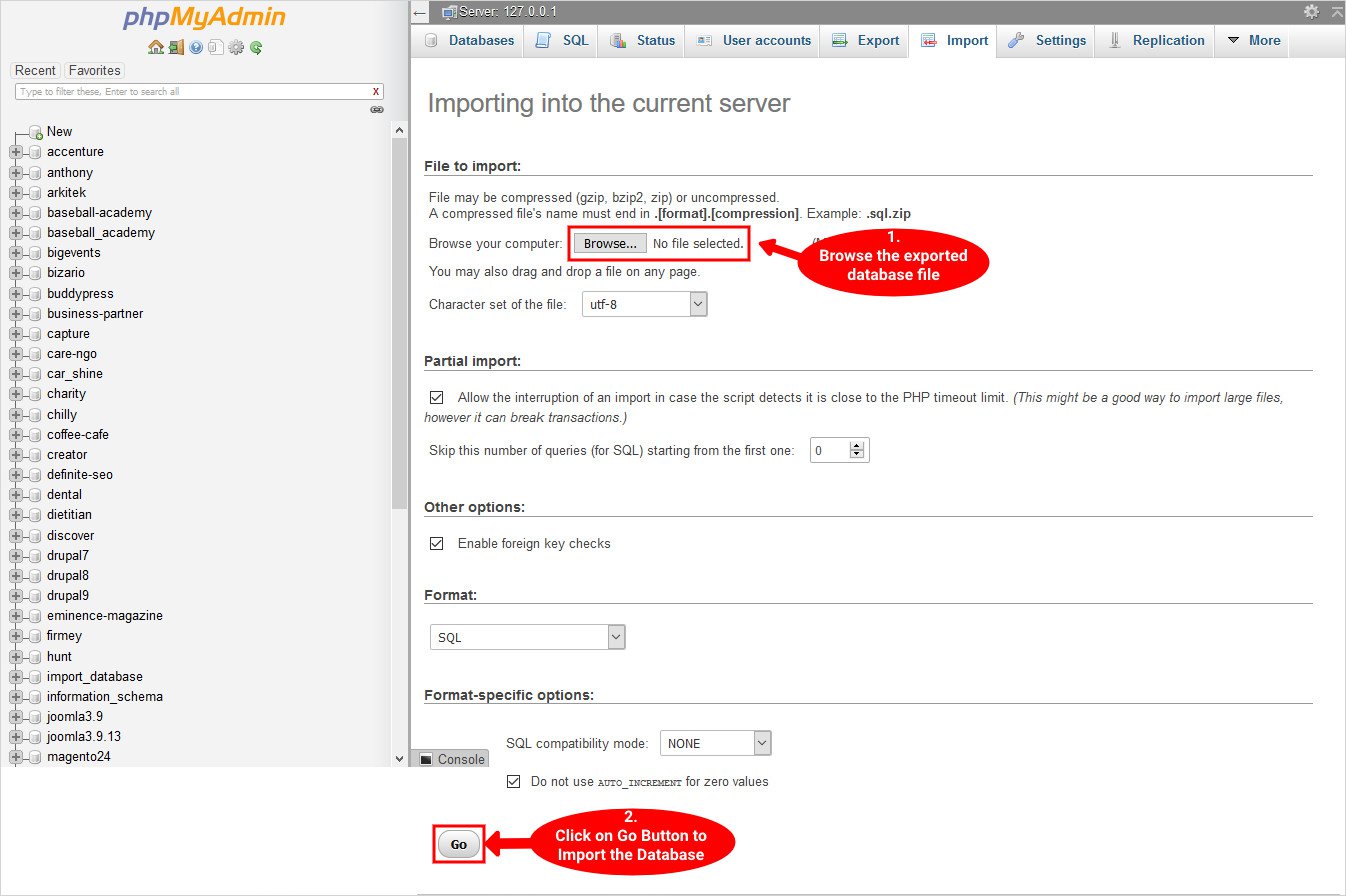
Step 2: Upload Database to the Live Server
Here you will have to upload all of the files to the server now. Check out the ways to follow:
- Login to phpMyAdmin on your live server.
- Then you need to create a database on the server and then open the import tab.
- Choose the database file that you have created in the previous step.
- Lastly, click the go button.
In case you are using FTP to transfer the files from your computer. Here you will have to use an FTP client and connect it to your hosting account.
- Once you are connected with the live site, you need to upload the files to the right directory. For example, if you want to host your site on abcd.com then you need to upload all of the files in the public_html directory.
- Next, choose the local database files and upload them to the server.
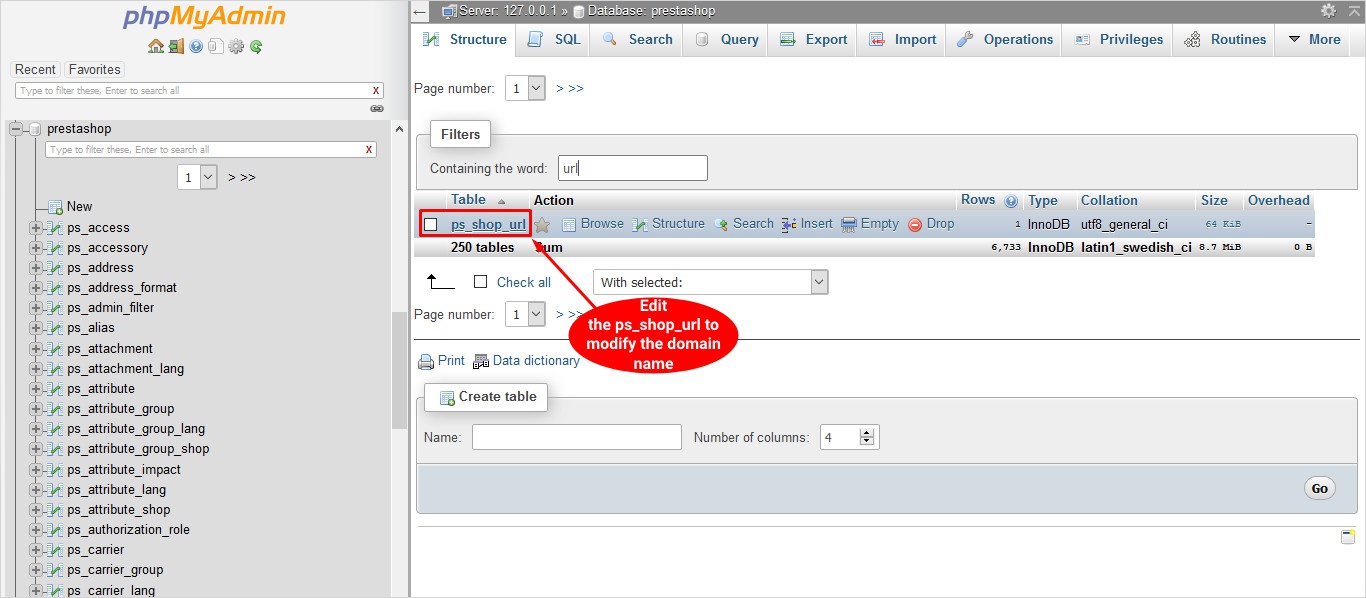
Steps 3: Modify the Domain Name and Path from the Database
You will now have to change the domain name and the path:
- Choose the database file you have imported in the previous step.
- Then go to the structures and filters containing the word: search/ insert /URL.
- Then choose php_shop_url table. Here you can edit important details from the table and change the domain, domain_ssl, and physical_uri.
Steps:4 Migrate the Localhost files to the Live Server
- Choose all of the local files and select all of them.
- Copy and paste these files on the server.
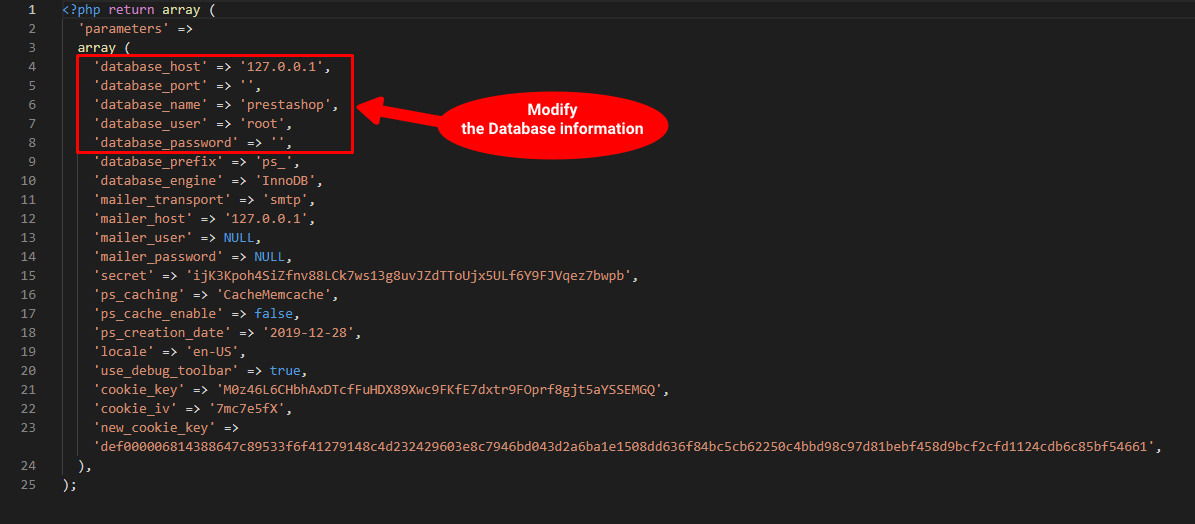
Step 5: Modify the Database Information
- Open the installed live server.
- Next, go to the PrestaShop installed directory.
- Open app > configuration > PHP folder.
- You need to modify the important information as database_host, database_name, database_password, database_user.
Here is what you need to follow (changes must be done as):
- database_host: database server.
- database_name: name of the database.
- database_password: as user’s password.
- database_user: the user related to the password.
Step 6: Remove the .htaccess file on the New Site
You can delete the .htaccess file as:
- Open the public.html/folder where you have stored the files.
- Download the .htaccess to create its backup.
- Now, remove or delete the .htaccess file from this folder.
- Also, consider deleting the cache data.
Step 7: Regenerate .htaccess file
Here is how you can regenerate the .htaccess file:
- Login to the site.
- On the left side of the menu, you can find configure > shop parameters.
- Enable by clicking on the ‘yes’ option for a friendly URL.
- Here click on traffic SEO and then click on the Save button.
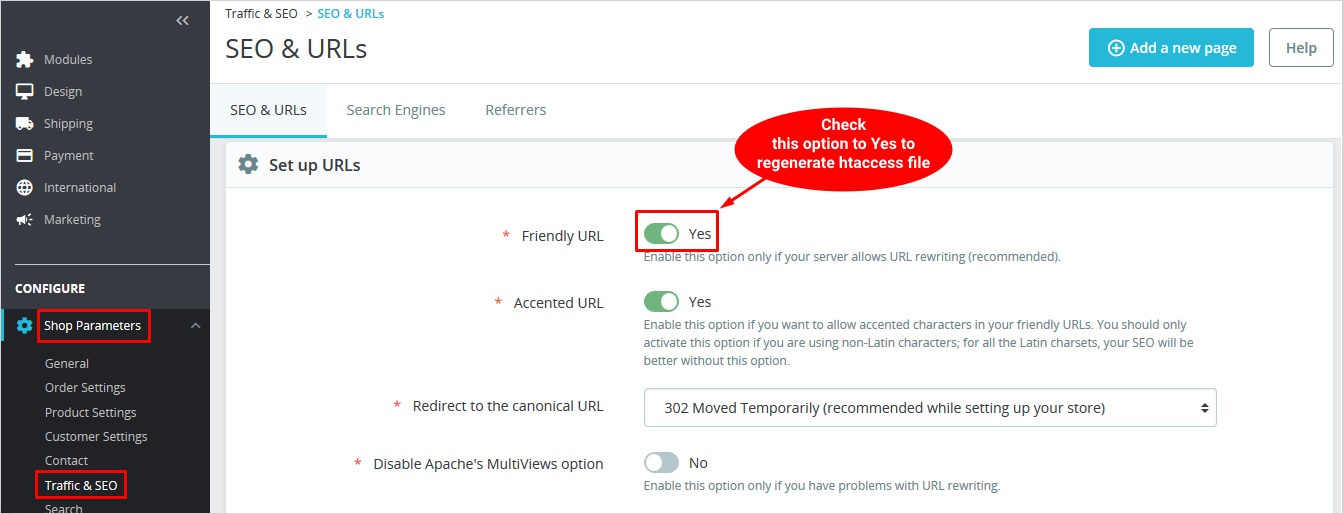
It will generate a .htaccess file.
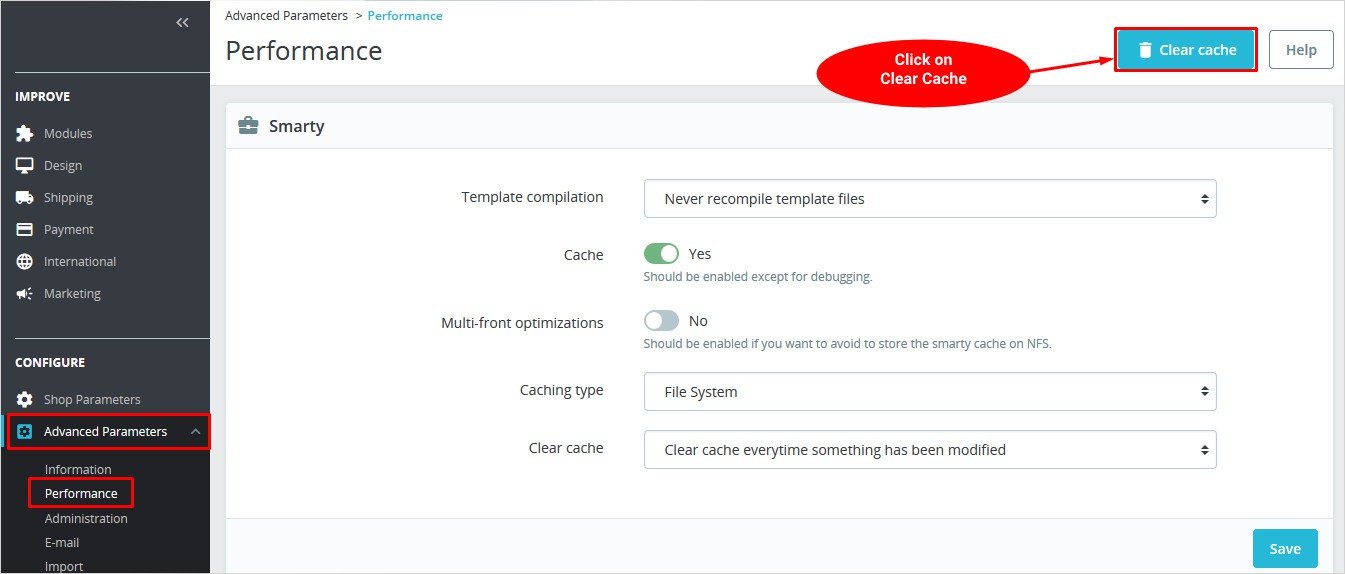
Step 8: Clear the Cache Data
Once all of the above-mentioned steps are successfully completed, you are almost done with moving PrestaShop from localhost to the server. Here is how you can delete the cache: Delete cache from the hosting as:
- Open the live server you have installed.
- Go to this location: file manager > site-hosted-folder > var >cache.
- Here you can delete the cache folder.
Delete cache from the back end as:
- Login to the backend of your site.
- Go to this location: shop parameter > advance parameter > performance > clear cache.
Lastly, make sure to check if PrestaShop is successfully moved from localhost to a server. Open your website and check if everything is fine or not. Congrats! You’ve successfully moved the PrestaShop store to a live server.
How to Plan PrestaShop Migration from Localhost to Live Server?
Now that you know the steps to complete PrestaShop migration successfully, there are a few issues you may come across here and there. However, this challenge can get better Here are a few solutions to take care of during the migration:
- Take charge of the changes that depend upon the third parties.
- Test the new environment.
- Make sure the data is compatible.
- Make sure to check the consistency of the live version with the hosting.
- Avoid errors.
Notably, if you want to successfully move PrestaShop from localhost to live server, you need to make a complete plan to make sure everything goes as planned. Once you are done with the plan, make sure to execute it correctly. Luckily, migrating from a local host to a server for PrestaShop is quick and easy as mentioned here.
Steps to Plan Moving PrestaShop from Localhost to Live Server
Now that you know the importance of carefully moving the PrestaShop store to a live server. It is important to plan the migration carefully to avoid errors and mistakes. Let’s start.
Analysis and Discussion
When it comes to choosing the best web host, there is no such thing as one size fits all. Every website has different requirements. That is why it is important to check the web host and the features they are offering with each plan. Here are a few more things to note:
- What type of content is on the website?
- Are you using static content such as images, HTML etc. or something else?
- Is the hosting specifically for an eCommerce website?
- Will the emails be hosted on the same server?
- How much traffic do you receive?
- Will you require a control panel to manage the services?
- What software version are you running?
Start Migrating
You can start with the migration as soon as your hosting plan is ready. Many hosting plans offer cPanel migration that offers a quick solution to move the store. So, make sure to choose the best PrestaShop hosting providers.
Auditing and Confirming
You may think that once you have copied the files you are good to go. However, it is not the same. However, when it comes to the top web hosts, they make sure everything is working fine. You can test it yourself too, however, make sure you have the skills and knowledge.
Live Site Migration Checklist
Here are few important things to check while making your store live:
Authentication Checklist
- Set the host files to localhost.
- See if all the needed services are working properly.
- Make sure there are no issues like 404 errors, PHP warnings, and so on.
- Get the latest version of all the software.
- Make sure the backups are working properly.
- Check if the email is synched.
Security Checklist
- Look over firewall configuration.
- Find and apply non-standard security requirements.
- Limit access where necessary.
- Make sure the setup is adaptable to all the protocols.
File System Checklist
- Make sure to copy all the files.
- Check all the permissions are right.
- Crawl the website to find out 404 or any other errors.
User Account Checklist
- Move the user accounts and passwords.
- Try to force reset the password for the next login.
- Remove old and inactive accounts.
The Ultimate Checklist
- Check all of the issues are fixed at the time of migration?
- Are you happy with the live site?
- What more needs to be done?
Wrapping Up: Migrating PrestaShop to a Live Server
That’s it, you have now successfully moved PrestaShop to a live. Hopefully, now your store is running smoothly and successfully. Creating a website crucial process because this is what your audience and search engine is going to see. However, moving PrestaShop from localhost to a server does not have to be a daunting task. Although there are quite a few steps that you need to follow, once you get familiar with the process, it is all going to seem easy peasy. Also making sure to choose the best web host, can be a sign of relief. Also while moving to a server you may come across issues here and there, it is a common experience so do not panic. The URL may change, you may have to change from HTTP to HTTPS, image pathways may alter, and so on.
So, you need to check the website for issues and things that are not working. See if you can fix these issues. First and foremost, once you move PrestaShop from localhost to live server, check your website carefully for any issues and if everything is working properly. See if you can fix these problems yourself. One of the ways to avoid issues is by using a similar database name as you used on the local server. However, few hosts have limitations for the database names so that may not be possible with all of the hosts. Also, make sure to keep a backup of your site to avoid issues. In this article, I have tried my best to help you with migrating your PrestaShop store to a live from the local host. But if you have any doubts or queries make sure to drop them in the comment section so I can help you with it.
FAQs – Move PrestaShop from Localhost to Live Server
Q. Do I need an SSL certificate to make the PrestaShop store live?
Yes, an SSL certificate authenticates the identity of a site and ensures a secure connection between the web server and the browser. As an eCommerce site owner, you need to make sure all of the user data and information is encrypted and is secure. So, it is important to have an SSL certificate on your live PrestaShop site. Besides, having an SSL certificate may help with a boost in SEO ranking. Most of the domain registrars and hosting providers offer SSL certificates with their plans.
Q. What are the important things to note before making a PrestaShop site live?
It is crucial to have a checklist before you make a site live. This will ensure everything is in the right place when you launch the PrestaShop store. Here is a checklist:
- Check the content
- Compress the images
- Check the load speed
- Optimize for mobile use
- Setup a backup solution
- Test site’s navigation and internal links
- Make sure the XML sitemap is on the server
- Double-check the links
- Check the SSL certificate
Q. How can I change the domain name using the admin panel? In case you want to change the PrestaShop domain using the admin panel you need to take the steps mentioned below:
- Sign In to the admin panel and then go shopping Parameters > Traffic & SEO.
- Go to the SEO & URLs section, then go to Set Shop URL.
- Here under the Shop Domain and SSL Domain sections, you need to add the New Domain. Do not add anything to the Base URL section
- Lastly, click on the Save option.
Q. What are the things to avoid while moving live? While moving PrestaShop store from localhost to live site here are a few things to avoid to make sure everything goes as planned:
- Make sure to avoid scheduling the live site during the critical period of your business.
- Try to get your site live during the off-hours.
- Avoid moving the site during the exploration period.
Q. Why should I move PrestaShop from localhost to live server?
Creating a PrestaShop store on localhost is a safe way to test the changes on the site without affecting the user experience. Once you are all done with the site, the next step is to go live. Your website needs to be running smoothly locally to make it live on the server. Next, you will require a domain name and web hosting. Make sure you understand what domain name is and how it works.
Related Readings:
PrestaShop vs WooCommerce: Which one is better?
How to migrate from PrestaShop to WooCommerce?
PrestaShop vs OpenCart differences What is new in PrestaShop 1.7.7.2?
PrestaShop vs Magento Comparison
Build a Stunning Website in Minutes with TemplateToaster Website Builder
Create Your Own Website Now