How to Create a Joomla Template – Step by Step Guide
Creating a Joomla template from scratch offers complete control over the design, functionality, and user experience of your website. This detailed guide will walk you through every step of the process, helping you build a fully functional and responsive Joomla template that stands out. By crafting your own template, you’re not just limited to pre-made designs but can tailor the site to your specific needs.
If you prefer a faster approach without coding, you can also explore tools like a Joomla Template Creator, which simplifies template creation with drag-and-drop functionality. In the later part of this article I’ll also tell you to how to create a Joomla template easily without coding using the TemplateToaster software.
Let’s dive into the process of building a Joomla template from scratch, ensuring you have full customization and flexibility for your project.
How to Create a Joomla Template: Steps
Step1: Setting Up the Template Folder Structure
Step2: Creating the templateDetails.xml File
Step3: Building the index.php File
Step4: Styling Your Template
Step5: Installing the Template
Step6: Testing and Debugging
Requirements for Building a Joomla Template
Before you start building a Joomla template, you need to ensure you have the following prerequisites:
- Basic Knowledge of HTML, CSS, and PHP: Understanding these languages will make the process smoother.
- Text Editor: Tools like Visual Studio Code, Sublime Text, or Notepad++ are great for coding.
- FTP/File Upload: These days all hosting providers offer inbuild file upload option.
- Joomla Installation: Have Joomla installed on your local server or a live site to test your template.
Step 1: Setting Up the Template Folder Structure
A Joomla template consists of a series of files organized in a specific structure. Here’s how to set up your folder structure:
- Create a Folder for Your Template:
- Navigate to the
templatesdirectory in your Joomla installation. - Create a new folder for your template. Name it something unique like
customtemplate.
- Navigate to the
- Essential Files and Folders: Inside your template folder, create the following essential files and directories:
- index.php: The main template file that controls the layout.
- templateDetails.xml: The manifest file that Joomla uses to install and recognize your template.
- css/ folder: Contains all your stylesheet files (e.g.,
template.css). - js/ folder: For JavaScript files.
- images/ folder: For template images (like logos or background images).
- error.php: The file that displays custom error messages.
Sample Template Folder Structure:
customtemplate/
│
├── css/
│ └── template.css
├── js/
│ └── script.js
├── images/
├── index.php
├── templateDetails.xml
├── error.php
Step 2: Creating the templateDetails.xml File
The templateDetails.xml file is the manifest file that defines the template’s metadata. It tells Joomla the name of the template, its version, and other key details. Here’s a basic structure of the file:
<?xml version="1.0" encoding="utf-8"?>
<extension version="5.0" type="template">
	<name>customtemplate</name>
	<creationDate>2024-10-25</creationDate>
	<author>TemplateToaster</author>
	<authorUrl>https://templatetoaster.com/joomla-template-creator</authorUrl>
	<copyright>TemplateToaster 2009</copyright>
	<license>GNU/GPL</license>
	<version>2.0.0</version>
	<description>My Custom Template</description>
	<files>
		<filename>index.php</filename>
		<filename>templateDetails.xml</filename>
		<folder>images</folder>
		<folder>css</folder>
<folder>js</folder>
	</files>
	<positions>
		<position>menu</position>
		<position>left-sidebar</position>
		<position>right-sidebar</position>
		<position>above-menu</position>
		<position>bottom</position>
	</positions>
</extension>
- name: The name of your template.
- creationdate: The date on which you have created this template.
- author: The author or developer name.
- authorURL: Page, where more details of the developer are available.
- version: Template version.
- copyright: Copyright of this template.
- files and folders: List the files and directories included in the template.
- description: More details about this Joomla template.
- License: License, most templates are open source(GPU/GPL).
- positions: List of all the Module Positions available in this Joomla template.

Plan your module positions carefully. This allows you to place content (such as banners, sidebars, footers) in multiple areas across the site. Remember, a flexible template with several customizable module positions is more useful to a broad range of users.
Step 3: Building the index.php File
The index.php file is the heart of your Joomla template. It controls the layout and structure of your website’s front end. Here’s how to structure your index.php:
<?php defined( '_JEXEC' ) or die( 'Restricted access' );?>
<!DOCTYPE html>
<html xmlns="http://www.w3.org/1999/xhtml" xml:lang="<?php echo $this->language; ?>" lang="<?php echo $this->language; ?>" >
<head>
<jdoc:include type="head" />
<link rel="stylesheet" href="<?php echo $this->baseurl ?>/templates/system/css/system.css" type="text/css" />
<link rel="stylesheet" href="<?php echo $this->baseurl ?>/templates/system/css/general.css" type="text/css" />
<link rel="stylesheet" href="<?php echo $this->baseurl ?>/templates/<?php echo $this->template; ?>/css/template.css" type="text/css"
/>
<link rel="stylesheet" href="<?php echo $this->baseurl ?>/templates/<?php echo $this->template;?>/css/styles.css" type="text/css" />
</head>

<body>
<img src="<?php echo $this->baseurl; ?>/templates/<?php echo $this->template; ?>/images/myimage.png" alt="Custom image" class="customImage" />
<jdoc:include type="modules" name="menu" />
<jdoc:include type="component" />
<jdoc:include type="modules" name="bottom" />
</body>

</html>
Key Components of the index.php file:
<?php defined( '_JEXEC' ) or die( 'Restricted access' );?>This is for security purpose, omitting it may get your Joomla website hacked.<jdoc:include type="head" />: Loads the head section, including metadata and stylesheets.<jdoc:include type="component" />: Loads the main content area.<jdoc:include type="modules" name="menu" />: Loads a specific module position (like a navigation menu).- CSS and JavaScript files are linked using
baseurlto ensure proper path referencing. link rel="stylesheet"Linking of CSS file sin above specific example code.src="baseurl; ?>/templates/template;Loading of an image in header section of the template.

Adhere to the standard Joomla file structure and coding practices. This ensures that your template is compatible with future Joomla updates and extensions. Your templateDetails.xml should always include correct metadata, as it defines important information such as check version compatibility, author, and positions.
Step 4: Styling Your Template
The next step in how to create a Joomla template is designing it using CSS. In your css/template.css file, add styles to define the look and feel of your website.
Sample template.css:
body {
font-family: Roboto, sans-serif;
color: #000;
background-color: #fff;
}
header {
background-color: #f2eeed;
color: #f6ea97;
padding: 15px;
text-align: center;
}
footer {
background-color: #f2eeed;
color: #f6ea97;
text-align: center;
padding: 15px;
}
You can add as many styles as needed, such as custom layouts for different devices to make your template responsive.
You can create as many module positions as needed, allowing users to add content in specific areas of the template.
Step 6: Installing the Template
Once you’ve created your files, it’s time to package and install the template on Joomla.
- Zipping the Template Files: Compress your template folder (
customtemplate) into a ZIP file. - Uploading to Joomla:
- Log in to your Joomla admin panel. Tip: You may consider Two Factor Authentication for user log in.
- Navigate to
Extensions>Manage>Install. - Upload the ZIP file and click
Install.
Once installed, you can activate the template under Extensions > Templates > Styles If you want, you can edit the code of your Joomla Template even after installing. If you’ve installed this new template just for testing, you can read these instructions to how to change a Joomla Template.
To enhance your Joomla website’s performance, consider integrating Google Analytics. For detailed instructions, check out our article on Adding Google Analytics to Joomla.
Step 7: Testing and Debugging
After installation, you should test your template thoroughly to ensure it’s responsive, loads quickly, and displays correctly across different browsers. You can also enable Joomla’s debugging mode to check for any errors.
Tools for Testing:
- Google Chrome Developer Tools: To inspect elements and debug CSS issues.
- Lighthouse (Built-in Chrome Tool): For performance, accessibility, and Joomla SEO checks.
- Responsive Design Tools: Check if your template is mobile-friendly.
If you’ve created your template on your local PC and you’re ready to launch your site, learn how to smoothly transition your Joomla website from a localhost to a live server by reading our article on Moving Joomla from Localhost to Live Server.
To ensure the safety of your website, it’s essential to implement a reliable backup strategy. Learn more about this in our article on Joomla Backup.

Test your template on different browsers (Chrome, Firefox, Safari) and devices (desktop, mobile, tablet) to ensure cross-browser compatibility. You can use tools like BrowserStack or Lambdatest for browser and device testing.
Here is the process how to create Joomla template from scratch with TemplateToaster.
How to Create Joomla Template with TemplateToaster
TemplateToaster helps Joomla developers in creating standardized and professional Joomla Templates. It automates the code generation process which in turn reduce the development time. You just have to choose the right options from the design interface. And in order to understand the interface and the options that come with this Joomla template creator.
It takes only a few steps to design a beautiful Joomla template.
Let us quickly go through the steps to create a template in TemplateToaster.
Step 1: Choose the Template Layout
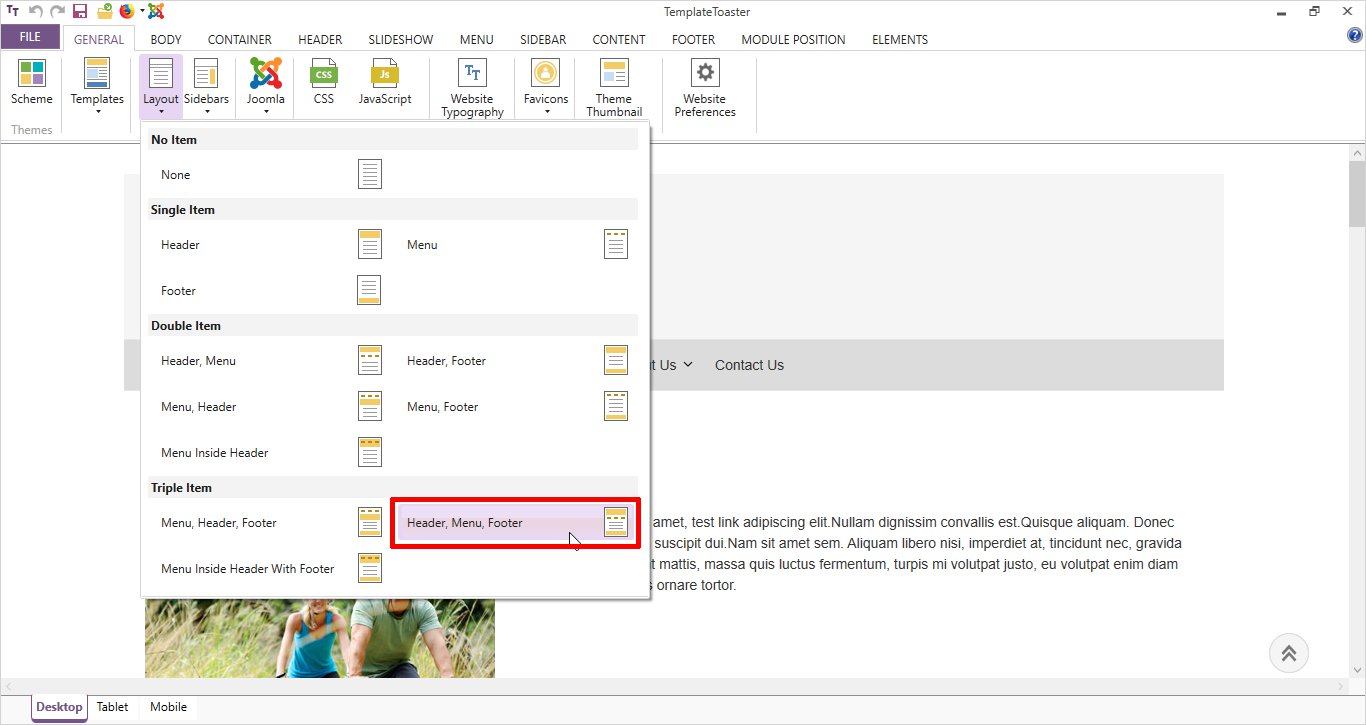
TemplateToaster allows you to choose a layout from the given options. Simply go to General → Layout → and choose any desired layout option. Like here I have chosen Header, Menu, Footer. You will see many options here such as None, Single item, Double items, and Triple items. And you can choose as per your requirements.
Step 2: Design the Header
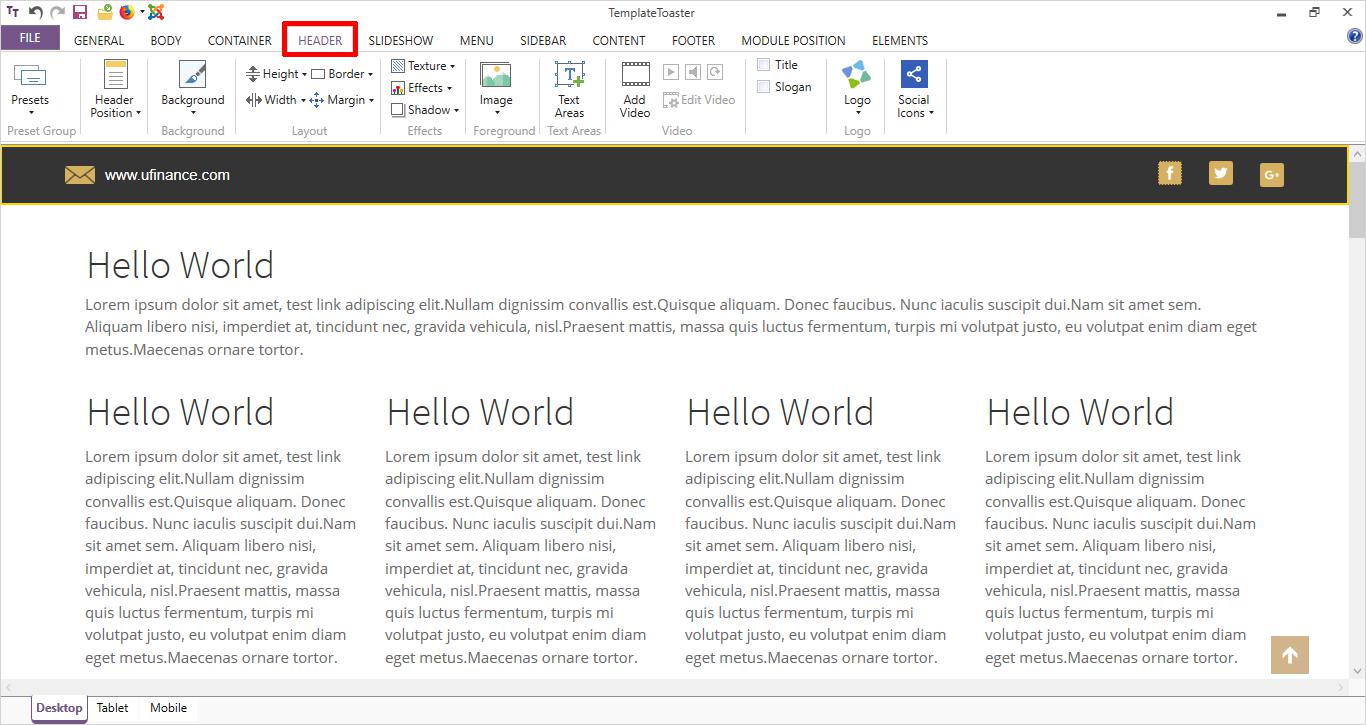
In order to design the header, you will get plenty of options. Header tab includes background designing options, header layout settings, effects, options to use foreground image and to draw text area. You can use different typography to enhance your title and slogan. You will find a bundle of logos as well inside the header tab, which are provided free of cost.
Step 3: Slideshow Designing
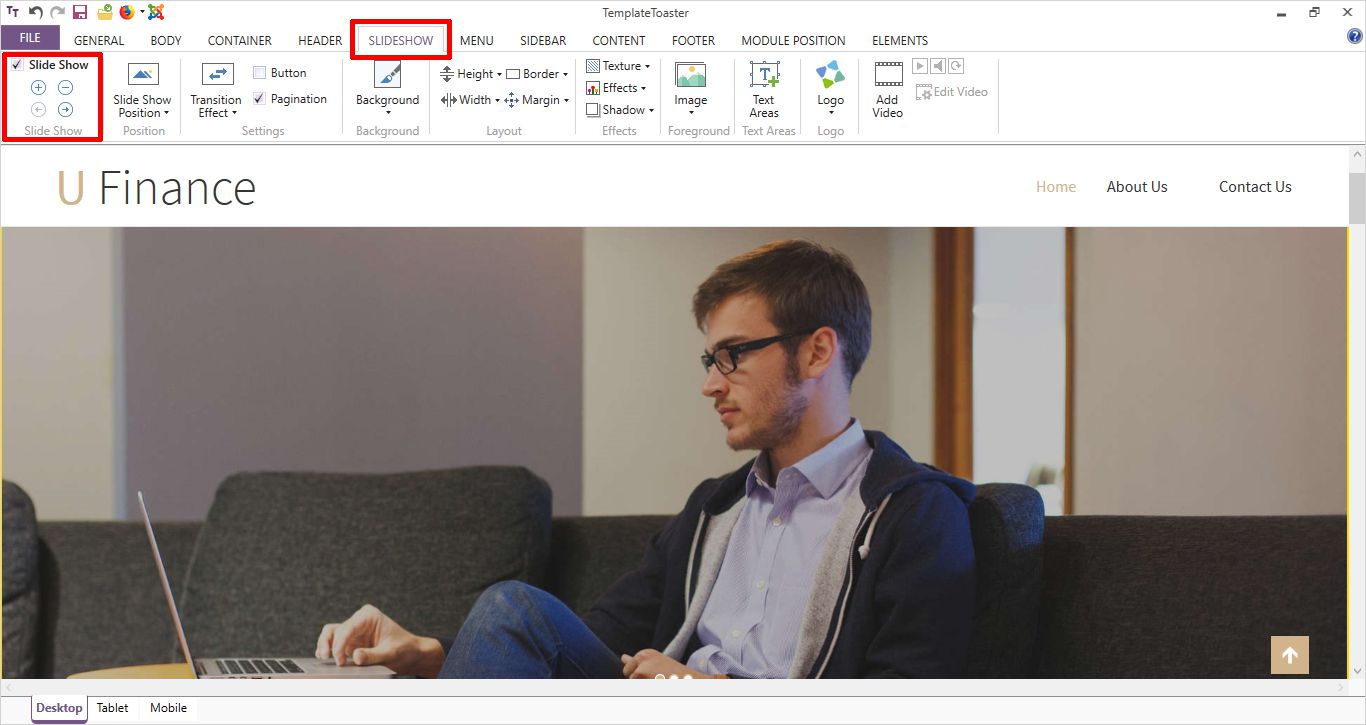
Design the slideshow with beautiful options such as transition effects, slideshow positioning, pagination, height, width, border, margin, put any foreground images of your choice, text areas, logo etc. You can add any number of slides you want to add into the slideshow by clicking on the + (plus) sign. Whereas, if you want to remove any slide from the slideshow then click on the – (minus) sign present at the left top corner.
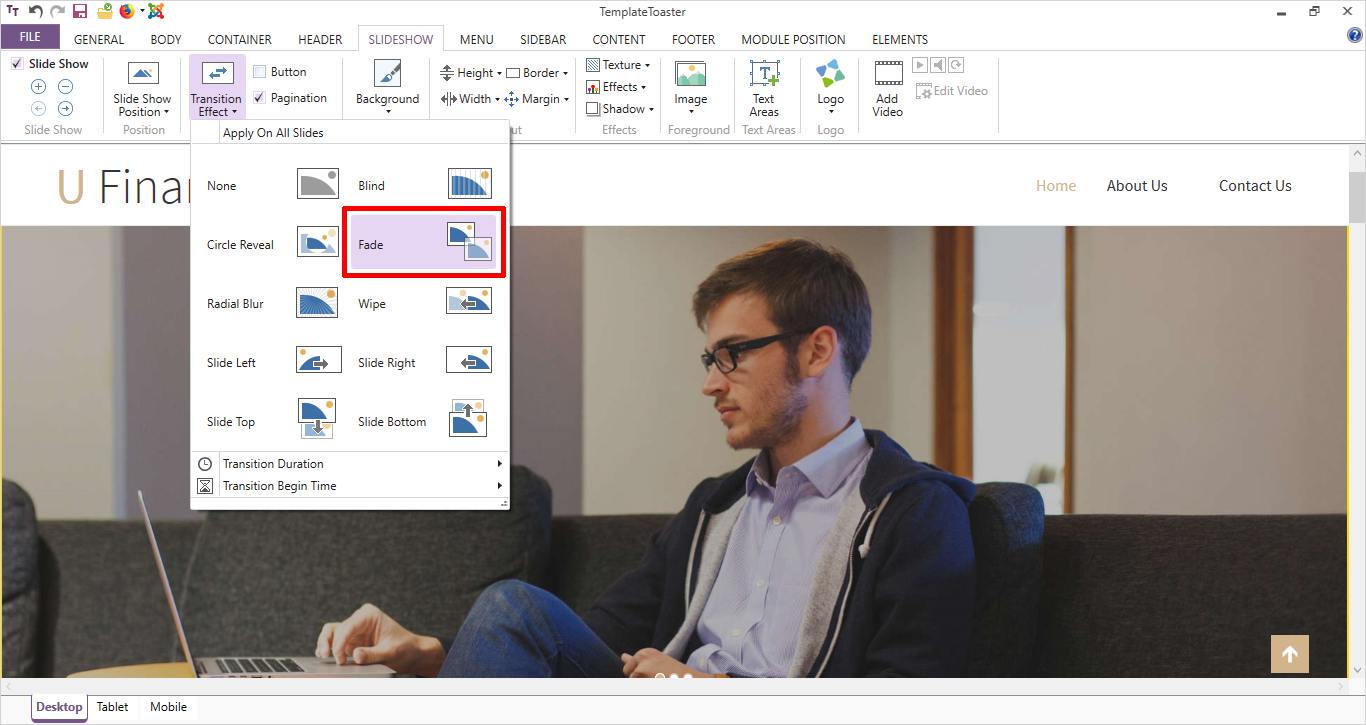
TemplateToaster has many transition effects that you can apply to your slideshow for that amazing effect. Options, for instance, Blind, Fade, Wipe, Side Right, Side Left, Side Top, Side Bottom, Radial Blur, Circle Reveal are there for transition effects. You can also set the transition duration time and transition begins time quite easily.

The text area allows you to add your desired text to your slideshow and connect with your users.
Step 4: Menu Designing

You can kick-start your menu design process with some of TemplateToaster’s amazing presets for menu designing. You can embellish the menu by using the beautiful color combinations, images, texture or effects and making other minor settings like adjusting height, width, border, and margin.

Three choices for the submenu – horizontal, vertical, and mega. However, in mobile view, the menu automatically turns into Hamburger Menu. And TemplateToaster also provides the options to specifically design the Hamburger Menu.
Step 5: Design the Content Area
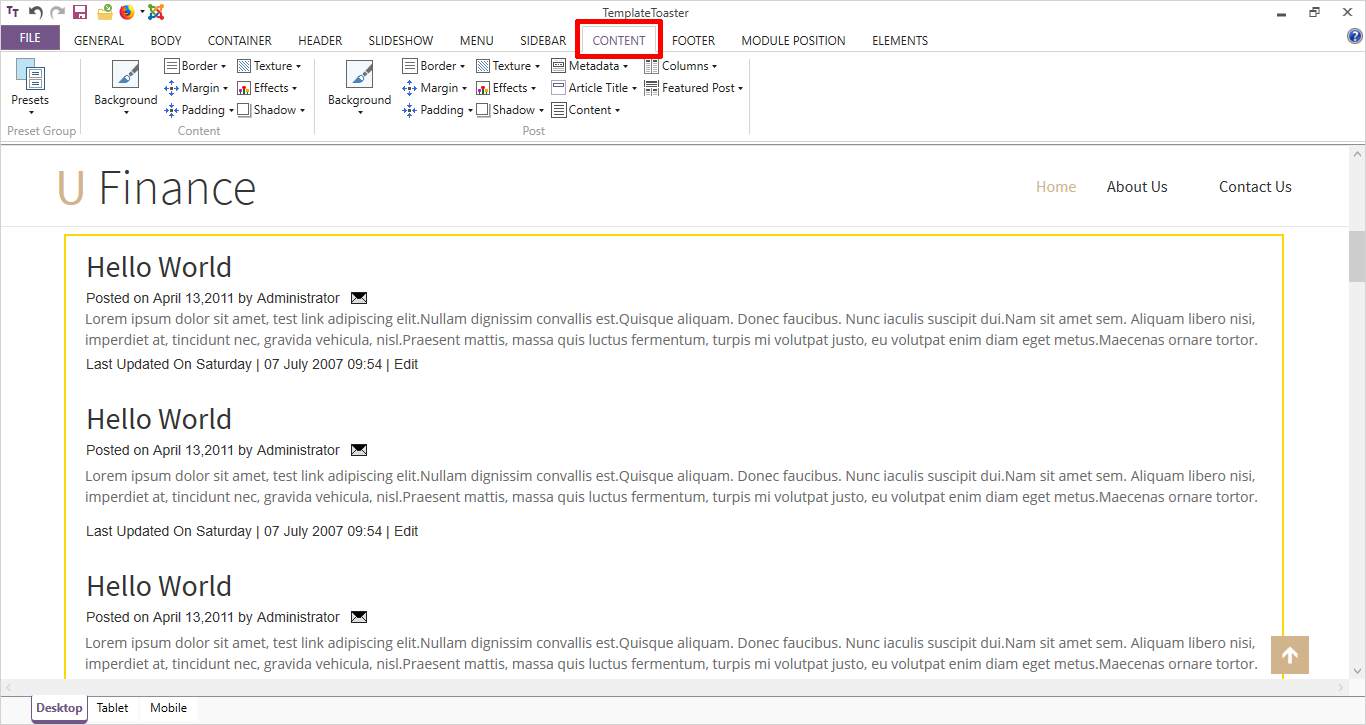 In Joomla, the content is represented as a category Joomla blog, featured articles or a single article. And TemplateToaster has numerous options to design them. You can choose to show the metadata of articles as well.
TemplateToaster allows to set different typography for each of these- headings, paragraphs, active link, visited links, hover link, table, ordered list, and unordered lists.
Step 6: Create a Custom Module Position
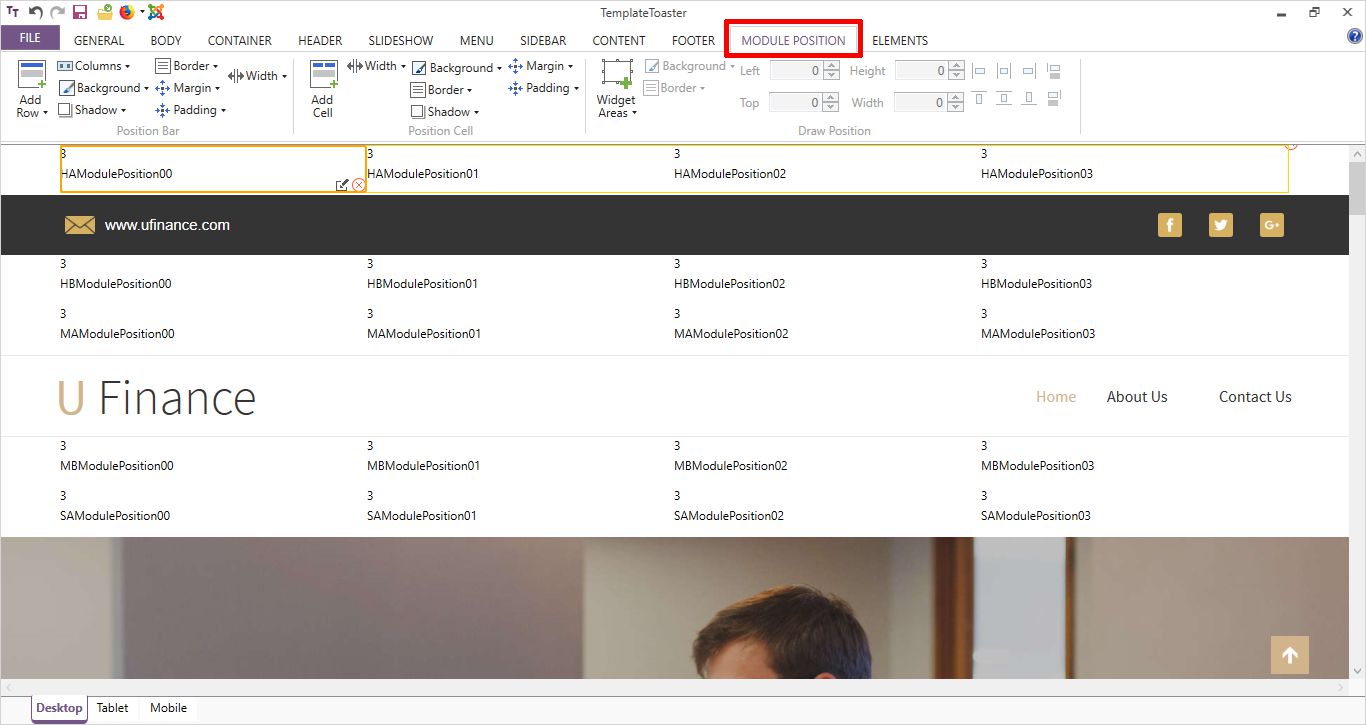
TemplateToaster provides the default module positions such as above and below the header, above and below the menu, above and below the slideshow, and above and below the footer, which are based upon BOOTSTRAP grid system.
You can even alter these default module positions as per your needs. You can simply add new one or delete the default positions easily. In addition to this, TemplateToaster allows you to draw custom module positions in the header, menu, slideshow, and footer.
Step 7: Footer Design
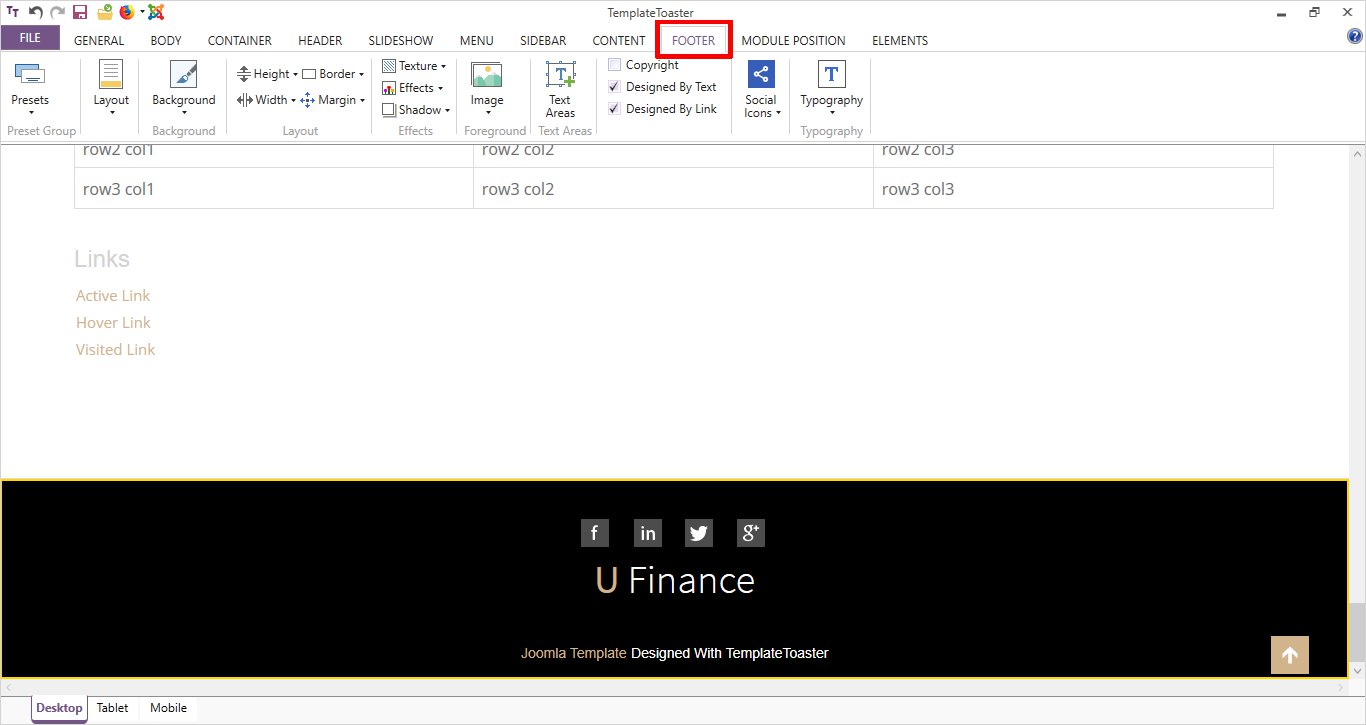
You will get the conventional layout settings such like border, height, margin, width, background effects, images, ability to draw text area, add and configure the social media icons, the inclusion of lists and links. TemplateToaster offers a nice collection of social media icons.
Step 8: BOOTSTRAP Controls

Since TemplateToaster supports BOOTSTRAP 3, you are provided with certain bootstrap controls for instance buttons, text box, pagination, breadcrumb, label, badge, and alert. You can design these controls in your own style. Options for each control are given under the “Element” tab.
Step 9: Adding the VirtueMart Support
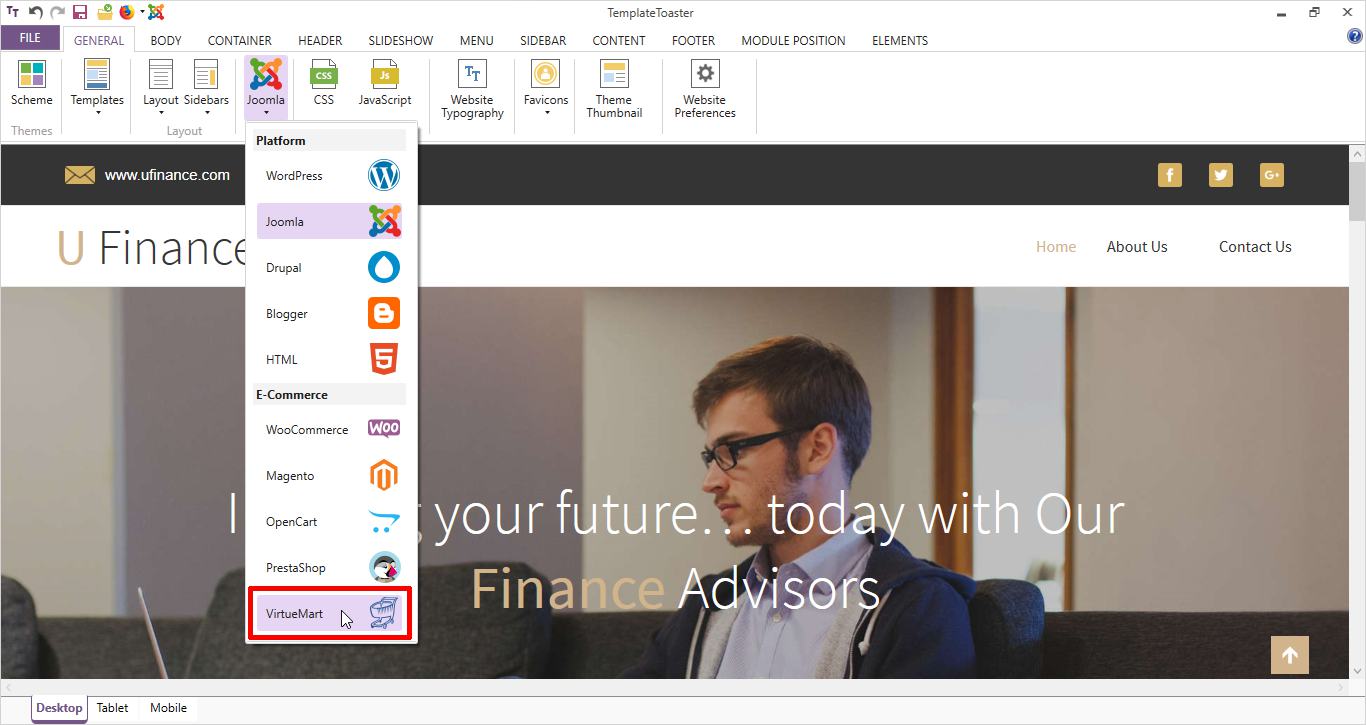
TemplateToaster automatically creates VirtueMart compatible Joomla templates while exporting the template. As illustrated in the above image, when you export the template, check “VirtueMart compatible” checkbox.
General → Joomla → VirtueMart.
Step 10: Template Customization for Mobile & Tablet
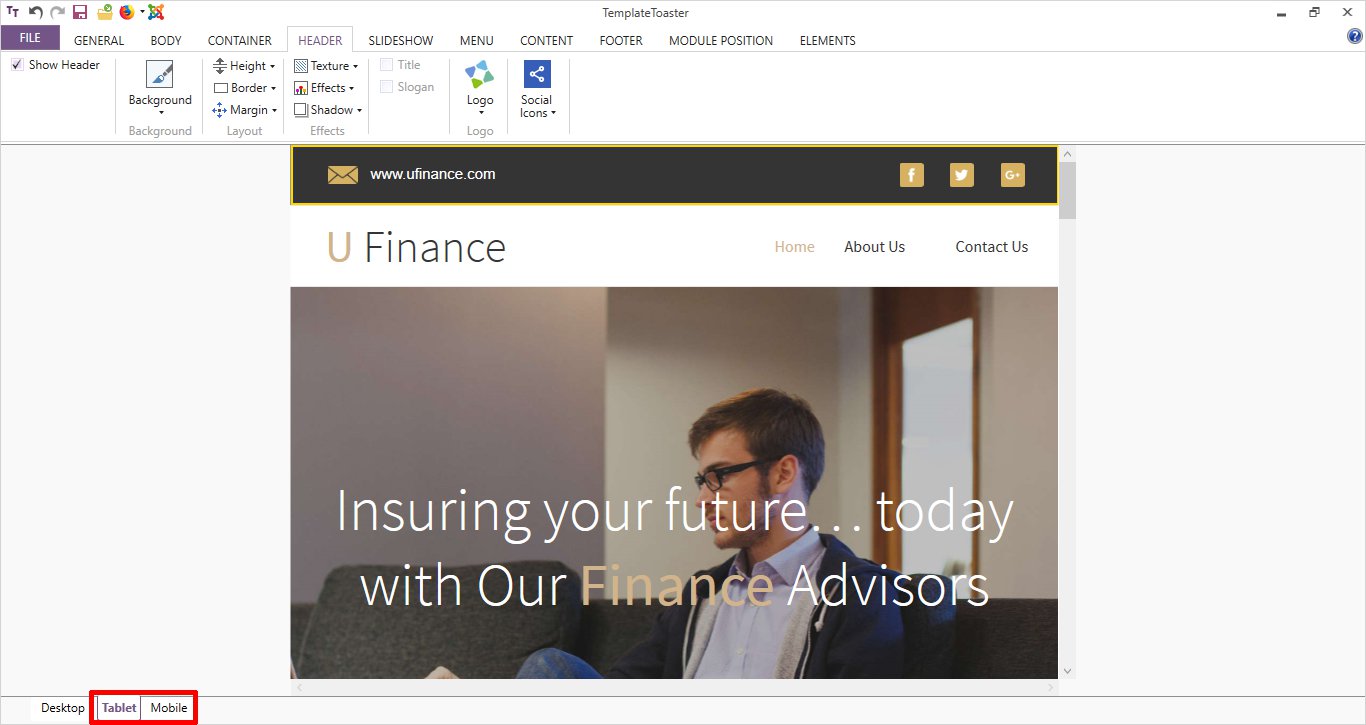
You can customize the two different designs for mobile and tablets independent of desktop design. Any template that you create supports the mobile and tablet view. However, you can explicitly modify the mobile design simply by switching the view from desktop to mobile. The modifications you do, will not affect the desktop and tablet design. Similarly, you can modify the design, for the tablets, by switching to tablet view and the tablet modifications will neither affect the desktop design nor the mobile design.
For beautifying the content on your Joomla website later, check out the Best Joomla Content Editors. For additional insights on optimizing your Joomla experience, check out our article on Tips for Joomla Websites.
Why Build a Custom Joomla Template?
Before diving into the step-by-step tutorial, let’s understand the reasons why building a Joomla template from scratch can be beneficial. To understand why Joomla is an excellent choice for building websites, explore the Benefits of Joomla for Creating a Website:
- Customization: Tailor every aspect of your website to meet your exact specifications.
- Optimization: A custom template can be lightweight and optimized for performance, improving SEO and user experience.
- Scalability: Custom-built templates are easier to scale and modify as your website grows.
As you know, there is a learning curve with Joomla. After creating your Joomla template and spending some time on the platform, if you find it to be challenging, you might consider switching to WordPress. For a detailed guide on the transition, check out our Joomla to WordPress migration guide. This article delve deeper into a comparison of Joomla alternatives.
FAQs
Q1: How long does it take to create a Joomla template? The time required depends on your familiarity with HTML, CSS, and Joomla’s structure. It can take anywhere from a few hours to several days.
Q2: Can I use Bootstrap with Joomla templates? Yes, you can easily integrate Bootstrap into your Joomla template by including Bootstrap’s CSS and JavaScript files.
Q3: How to make a Joomla template responsive? Ensure that your CSS uses media queries and percentage-based widths to make your template responsive across all devices.
Build a Stunning Website in Minutes with TemplateToaster Website Builder
Create Your Own Website Now
isn’t this artisteer? Did it change names… or hands… or something? does it write any better code now? does it use bootstrap 2?
Does this Templatetoaster support creating templates for latest version of Joomla 5.x ?
Yes, TemplateToaster support creating templates for latest version of Joomla 5.x