How to Move Magento From Localhost to Live Server: Guide

First of all congratulations! Your online store is almost ready, you’ve successfully added products, set up the currency rates on the local host, and are all set to launch it on the live server. Magento is one of the best eCommerce platforms. But, how do you move Magento from localhost to live server? If this is on your mind, you have come to the right place. In this guide, we are going to discuss in detail the steps that you can follow while migrating Magento site to a live server. Also, do check Magento version you are using before you start with the migration process.
Honestly, moving a Magento store to a live server can be a bit complex and requires technical knowledge. After creating a website on localhost most probably XAMPP or WAMPP, you need to move Magento from localhost to live server.
So, without any further adieu, let’s begin with a step by step tutorial.
Steps to Move Magento from localhost to Live Server
Before migrating your Magento store from local host to a live server, here is the checklist. So make sure you are equipped with all of the necessary things required to migrate a Magento site to a live server.
Here is the checklist:
A Magento Hosting Plan
You can certainly host your Magento store standard hosting plans. However, using plans that are specific for the Magento stores can improve the efficiency in terms of speed and performance, Magento performance optimization tips and tricks to improve the sales of your store when it is live. These hosting plans are set up to work seamlessly for online stores that run on the Magento platform. Consider getting the best hosting provider for Magento for the best results.
Get a Domain Name
You need a domain name specific for your Magento store. It should be unique and something that brings the essence of your website. Here is a quick way of adding strong keywords in the domain name that can boost SEO ranking and get more traffic to your online store. You can buy the domain name from domain registrars, however, a few hosting providers like Bluehost, GoDaddy also offer hosting plans with domain name service.
phpMyAdmin
phpMyAdmin is an open-source administration tool for MySQL. It is a free tool written in PHP, and is great for web hosting services. It is basically used to create a database, run queries, and add user accounts. Make sure to get the latest version of phpMyAdmin.
MySQL
MySQL is an open-source relational database management system. Magento uses MySQL database triggers to improve access while reindexing. Again, make sure to get the latest version of MySQL.
cPanel
cPanel is a control panel web hosting based on Linux. It offers graphical interface (GUI) and automation tools which make it easier to host a website. You can use cPanel to manage domains, publish websites, create email accounts, create FTP users, and more.
Most of the hostings provide cPanel. To access it simply add cpanel with your domain name, for example, websitecheck.com/cpanel. Then you can add login details.
Well, this is the main checklist that you need in case you are moving Magento from localhost to live server. Now, let’s start with the steps.
Steps to Move Magento Store from Localhost to a Live Server
Step 1: Export the Database from the Local server
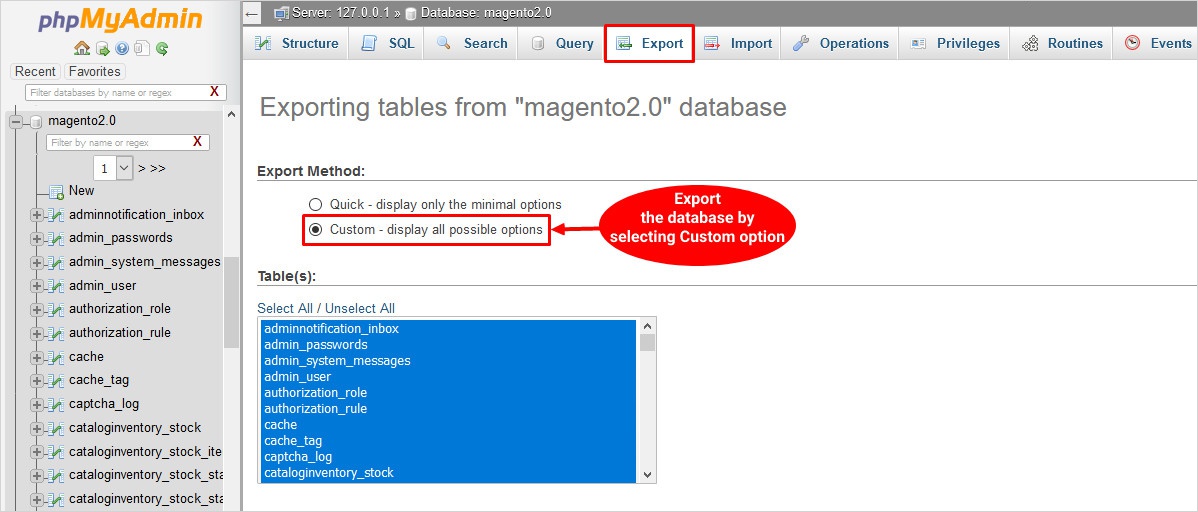
- In the first place, you need to login to your ‘phpMyAdmin’ on your local server on your computer using the localhost software of your choice. Mostly XAMPP or WAMP is used, but you can also choose some other one as well.
- Next, you need to open the ‘database’ of the store.
- At the top of the menu you can find the ‘export’ option. Click on it and then the ‘go’ button, to download the database files of the store in the ‘.sql’ extension version. You need to save it as a ‘.zip’ form.
Step 2: Create Magento Files in Zip Format
In this step, you need to zip all the Magento files (the ones that you will have to upload to the live server).
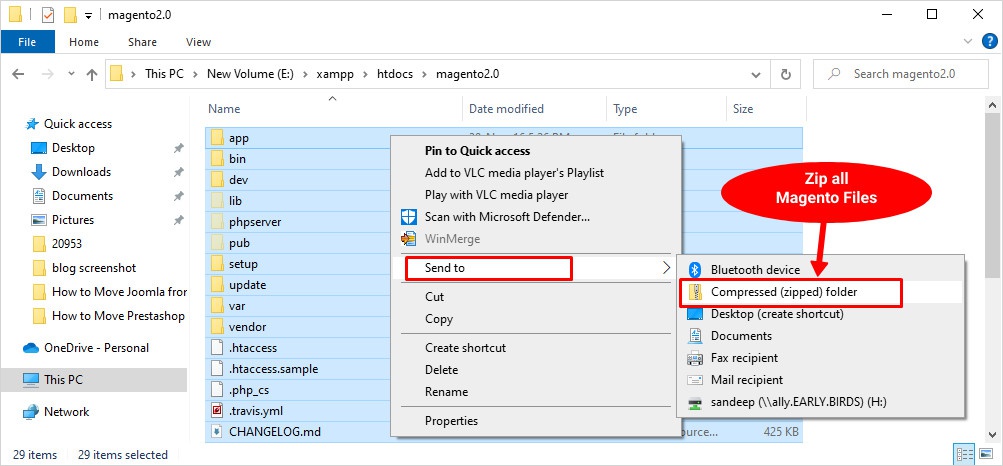
- In case you are using XAMPP open ‘htdocs folder’, and in case of WAMP, (install WAMP) you can use ‘www folder’. Check how to update XAMPP,
- Next, open the Magento folder and compress all of the files in the ‘zip’ folder.
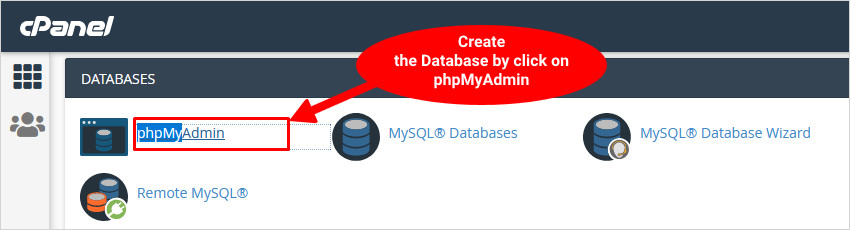
Steps 3: Upload the Magento Files from Localhost to the Live Server
In this step you will have to upload the database to the domain using the control panel.
- Login to the cPanel of the live server and then open ‘phpMyAdmin’. Here you can create a new database.

- Make sure to check important details like database, username, and password. Then click the ‘new’ button to build the database.
Step 4: Import the Database
Once the database is generated, the next step is to import the database that you have downloaded from the localhost on your computer to the new database that you just generated in Step 3.
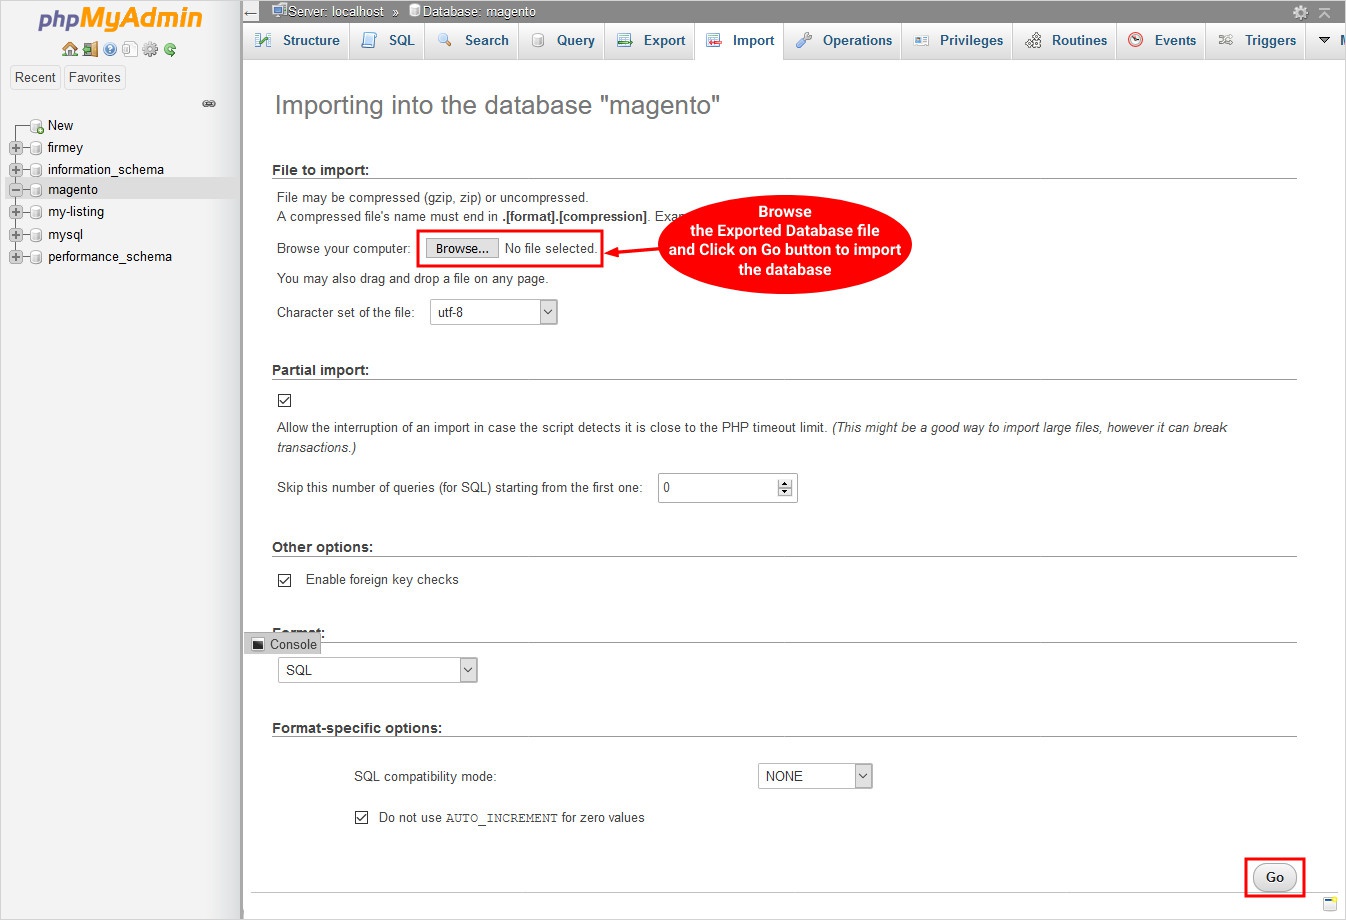
- Here you need to select the database that you have generated. Then from the top of the menu track down the ‘import link’.
- Select the import link and under the section files to import, click on the option that says ‘choose file’.
- Next select the file from your computer. Note that the format must be ‘.sql’.
- Finally click on the ‘go’ button, it may take a while to import the database.
Step 5: Upload the Magento Files
In case you want to create a subfolder on the new domain, this is the time to make it. However, you can work with the normal directory as well.
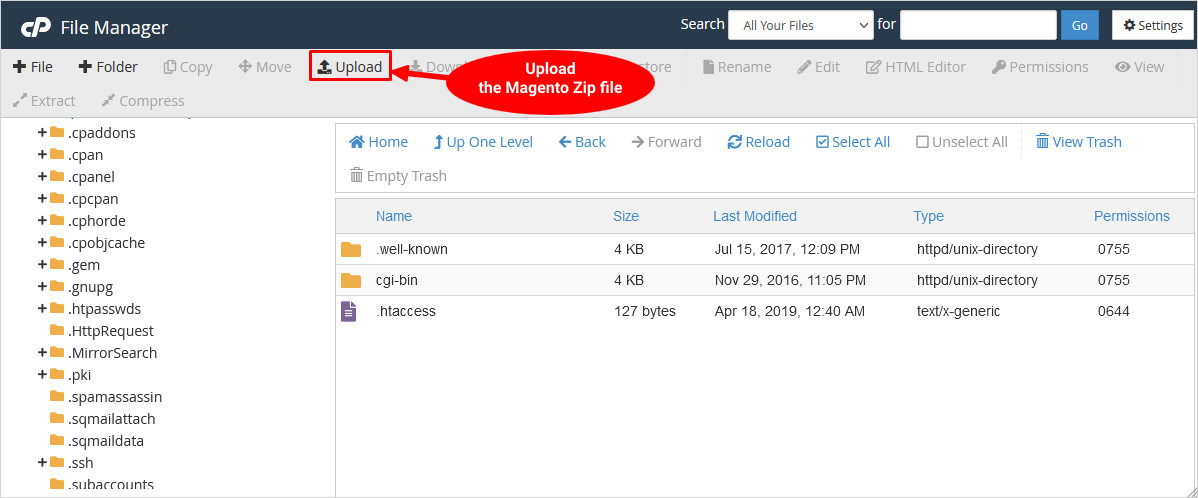
- Make sure to upload the Magento zip file (the one you created in step 3).
- Once the file is uploaded you can extract it.
Hold on! You’re almost done to move Magento from localhost to live server.
Step 6: Modify the php.xml File to Retrieve the Magento System to New Database
Once you have uploaded the Magento file and extracted it successfully, in the next step, you will have to make some changes in the php.xml file using your directory.
Here are the steps that you need to perform:
- To find the file open app/etc/php.xml and then choose the php.xml file.
- Now in the php.xml file you will have to make changes based upon information related to the new database that you have made on your domain. This information includes password, username, and name that you have that you created while importing the database
- Then look for the file where this information is appropriate. You will also see that the ‘connection tag’ has to be changed with the new one.
Step 7: Find the New Domain for Magento System
- Make sure to save the changes. Click on the ‘save’ button on the top right corner.
- In case you choose to download and make the changes in the file, then you will have to upload it from the directory.
- Open the Magento database and then search for ‘Table Core_Config_Data’.
- Then you need to replace the local URL to domain name in ‘web/secure/base_url’, ‘web/unsecure/base_url’.
Step 8: Clear the Cached Data
In this step you need to clear the cache data from the localhost, so as to have the data for the newly connected Magento store. Here are the steps that you need to follow to erase the cache data.
- Open ‘/var/cache and erase all of the data from there.
- You need to choose all the files and then click on the red button that says ‘delete’.
Congratulations, you have successfully moved Magento from localhost to a live server.
Step 9: Use the Store – Successfully Move Magento from Localhost to Live Server
Once you complete all of the steps as mentioned above you will be able to upload your Magento store from the localhost to the server. To check this follow the steps mentioned below:
- Open a browser and enter the domain for your Magento store and press the search button/enter key.
- You will be able to see the frontend of your online store as if it is successfully uploaded to the server.


Wrapping Up : Move Magento from Localhost to Live Server
Creating a website on a localhost is quicker and also cost-effective. It gives you a chance to work privately on your site, but at the same time, you will have to migrate your online store to a live server. Building your Magento store on a localhost is a secure way to test changes and modify them. Once you’re done improving your website, the next step is to make it live by uploading it to the server.
In this guide, I have discussed in detail the steps that you need to follow to migrate a Magento store from a local server to a live one. Hopefully, now you will find it easy to do so, and your store will be up and running successfully.
I hope this guide helped you upload your store to a live server. If you are new you may also want to see our guide on Magento website development, also check out Magento theme builder , free Magento themes and free templates to further ease your job. And if you are confused about which eCommerce website builders to use, do check our detailed Magento vs.Prestashop, Magento vs. WooCommerce comparison.
FAQS – Move Magento from Localhost to Live Server
Here are few of the answers to questions that will help you move Magento from localhost to live server successfully, without an issue.
Q. How can I access the Magento admin panel on a localhost?
Here are the steps that you need to perform to access the Magento admin panel on a localhost:
- Open the root directory folder of the server and then search for it.
- Then you need to open the varien.
- Then press ctrl + F5 to open the search tab.
- Next comment out the codes in green colour.
- Lastly go back to the login page on the admin panel.
Q. How can I manage the Magento admin panel?
Here are the steps as mentioned here:
- Open the Magento admin panel (which is the backend of Magento). Here you can modify and access the data.
- Go to the stores > settings > configurations. Then under the ‘advanced options’, select ‘admin’. Here you need to enable the ‘charts’ and then click on ‘yes’.
Q. How can I install Magento in localhost?
It is quite easy to install Magento locally. Here I have mentioned the steps to install Magento in localhost (XAMPP). Just follow these steps as mentioned:
- Download the Magento data.
- Import the Magento data into the store database.
- Then install Magento.
- Copy media to source files.
- Refresh the cache and re-index the data.
- Check in the frontend.
Q. How can I move Magento from server to localhost?
Here are the steps you need to take:
- Use FTP client to download Magento files..
- Then export the data from the live server.
- Add the downloaded files in the localhost root folder.
- Create a blank database in your computer and import the database backup that you exported from the server.
Q. What is the default admin URL for Magento websites?
The default admin URL for Magento websites is as yourwebsite/admin.
Q. How to find the Magento admin URL?
Here is how you can find the Magento admin URL:
- Open xml file from the directory.
- Then scroll down to find the tag <frontend>. Here you can find the custom Magento URL.
Q. Can I use Magento on Windows?
Yes, you can use Magento on Windows. Here are the steps you need to take to install Magento 2 in Windows. We are going to discuss using XAMPP:
- First of all, you need to install ‘XAMPP’.
- Then you can install ‘composer’ (not mandatory).
- Now you need to download Magento 2.3.
- Install Magento 2.
Q. How can I move Magento to another server?
- First of all, create a backup of the files in the test server.
- Export the Magento database.
- Import Magento files to a new server.
- Also move the database to a new server.
- Make sure to upgrade the database information.
- Change the base URL database table.
- Lastly, reload the cache and reindex the data.
Q. How can I transfer Magento 2 from any other domain?
Here are the steps that you can follow to copy Magento installation to a another domain:
- Configure the new domain.
- Then export/import the MySQL database.
- Copy the installation from the current directory to the new domain.
- Modify the Magento settings.
- Lastly, clear the cache data.
Related Reading:
Build a Stunning Website in Minutes with TemplateToaster Website Builder
Create Your Own Website Now